Quantcast
Channel: all and sundry
Viewing all 250 articles
Browse latest View live

Gentle Introduction to Hystrix - Hello World

$
0
0
In a previous blog post I had covered the motivation for needing a library like Netflix Hystrix. Here I will jump into some of the very basic ways to start using Hystrix and follow it up with more complex use cases.


Hello World


A simple Hello World example of a "Hystrix Command" is the following:

import com.netflix.hystrix.HystrixCommand;
import com.netflix.hystrix.HystrixCommandGroupKey;
import org.slf4j.Logger;
import org.slf4j.LoggerFactory;

public class HelloWorldCommand extends HystrixCommand<String> {

private static final Logger logger = LoggerFactory.getLogger(HelloWorldCommand.class);

private final String name;

public HelloWorldCommand(String name) {
super(HystrixCommandGroupKey.Factory.asKey("default"));
this.name = name;
}

@Override
protected String run() throws Exception {
logger.info("HelloWorld Command Invoked");
return "Hello " + name;
}
}


The run method holds any dependent activity that we want to be protected against, which ultimately returns the parameterized type - String in this specific instance. If you are fan of Netflix Rx-java library , then another way to create the Hystrix command is the following:

import com.netflix.hystrix.HystrixCommandGroupKey;
import com.netflix.hystrix.HystrixObservableCommand;
import rx.Observable;

public class HelloWorldObservableCommand extends HystrixObservableCommand<String> {

private String name;

public HelloWorldObservableCommand(String name) {
super(HystrixCommandGroupKey.Factory.asKey("default"));
this.name = name;
}

@Override
protected Observable<String> resumeWithFallback() {
return Observable.just("Returning a Fallback");
}

@Override
protected Observable<String> construct() {
return Observable.just("Hello " + this.name);
}
}

Here "construct" method returns the Rx-java Observable.


Using a Hystrix Command

Now that we have a Hystrix command to wrap around our call, it can be used in whole lot of different ways, let us start with the simplest, in a synchronous call -

HelloWorldCommand helloWorldCommand = new HelloWorldCommand("World");
assertEquals("Hello World", helloWorldCommand.execute());

Or, it can be made to return a Future :

HelloWorldCommand helloWorldCommand = new HelloWorldCommand("World");
Future future = helloWorldCommand.queue();
assertEquals("Hello World", future.get());

Or, even better it can be made to return a Rx-Java observable:

HelloWorldCommand helloWorldCommand = new HelloWorldCommand("World");

CountDownLatch l = new CountDownLatch(1);

Observable<String> obs = helloWorldCommand.observe();
obs.subscribe(
s -> logger.info("Received : " + s),
t -> logger.error(t.getMessage(), t),
() -> l.countDown()
);
l.await(5, TimeUnit.SECONDS);


The Observable variation of the command also works along the same lines, however we should contrast a small behavior difference:

HelloWorldObservableCommand helloWorldCommand = new HelloWorldObservableCommand("World");
logger.info("Completed executing HelloWorld Command");
Observable<String> obs = helloWorldCommand.observe();

There are two ways to obtain an Observable here, one is like the above by making an ".observe()" call, another is the following way:

HelloWorldObservableCommand helloWorldCommand = new HelloWorldObservableCommand("World");
Observable<String> obs = helloWorldCommand.toObservable();

another is the following using ".toObservable()" call :

HelloWorldObservableCommand helloWorldCommand = new HelloWorldObservableCommand("World");
Observable<String> obs = helloWorldCommand.toObservable();

The difference is that the ".observe()" method returns a Hot Observable which starts executing the "construct" method immediately, whereas the ".toObservable" variation returns a Cold Observable and would not call "construct" method unless it is subscribed to, say the following way:

CountDownLatch l = new CountDownLatch(1);
obs.subscribe(System.out::println, t -> l.countDown(), () -> l.countDown());
l.await();

I have more information here.

Note though that Hystrix Command is not a Singleton, the typical way to use Hystrix Command is to construct it where it is required and dispose it once done.

Fallback and Command Group Key

In the constructor of the HelloWorldCommand, I had called a super class constructor method with the following signature:

public HelloWorldCommand(String name) {
super(HystrixCommandGroupKey.Factory.asKey(&quot;default&quot;));
this.name = name;
}

This parameter specifies a Hystrix "Command group" Key, along with Command Key which by default is the simple name of the class, it controls a lot of the bells and whistles of Hystrix behavior, a sample of the properties is the following and I will come back to the specifics of these later:

hystrix.command.HelloWorldCommand.metrics.rollingStats.timeInMilliseconds=10000
hystrix.command.HelloWorldCommand.execution.isolation.strategy=THREAD
hystrix.command.HelloWorldCommand.execution.isolation.thread.timeoutInMilliseconds=1000
hystrix.command.HelloWorldCommand.execution.isolation.semaphore.maxConcurrentRequests=10
hystrix.command.HelloWorldCommand.circuitBreaker.errorThresholdPercentage=50
hystrix.command.HelloWorldCommand.circuitBreaker.requestVolumeThreshold=20
hystrix.command.HelloWorldCommand.circuitBreaker.sleepWindowInMilliseconds=5000

hystrix.threadpool.default.coreSize=10
hystrix.threadpool.default.queueSizeRejectionThreshold=5

Another behavior we may want to control is the response in case the call to the dependent service fails, a fallback method provides this behavior, so consider a case where the dependent service always fails:

import com.netflix.hystrix.HystrixCommand;
import com.netflix.hystrix.HystrixCommandGroupKey;
import org.slf4j.Logger;
import org.slf4j.LoggerFactory;

public class FallbackCommand extends HystrixCommand<String> {

private static final String COMMAND_GROUP="default";
private static final Logger logger = LoggerFactory.getLogger(FallbackCommand.class);


public FallbackCommand() {
super(HystrixCommandGroupKey.Factory.asKey(COMMAND_GROUP));
}

@Override
protected String run() throws Exception {
throw new RuntimeException("Always fail");
}

@Override
protected String getFallback() {
logger.info("About to fallback");
return "Falling back";
}
}

Here the dependent service call always fails and the response as shown in the following test will always be the response from the fallback method:

FallbackCommand fallbackCommand = new FallbackCommand();
assertEquals("Falling back", fallbackCommand.execute());


Monitoring

Before I wrap up the basics it is good to demonstrate an awesome feature that Hystrix packs in terms of Hystrix stream and Hystrix dashboard. Let us start with Hystrix streams, if enabled typically as a servlet in Java based webapplications, it provides a SSE stream of realtime statistics about the behavior of the Hystrix commands present in the web application.

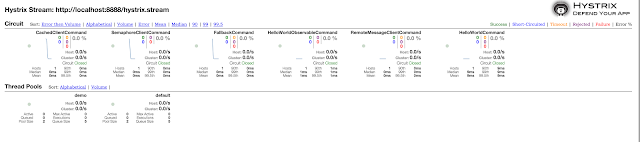
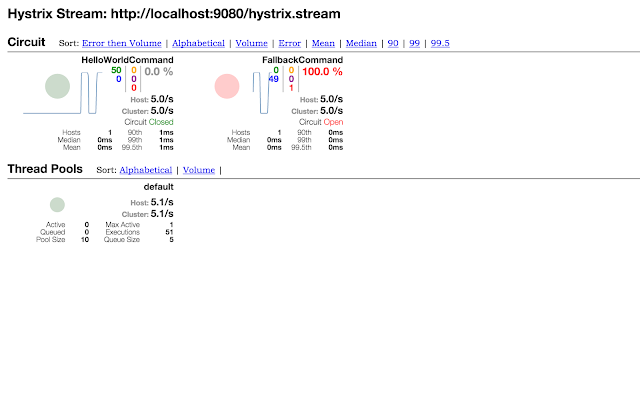
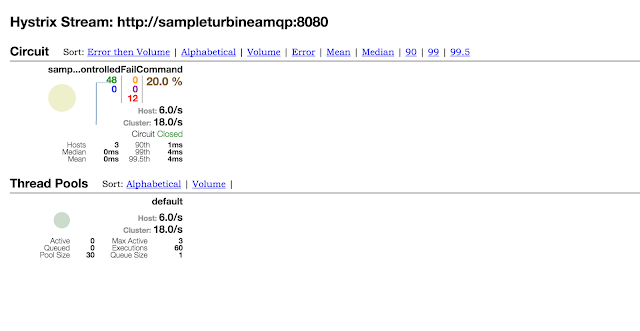
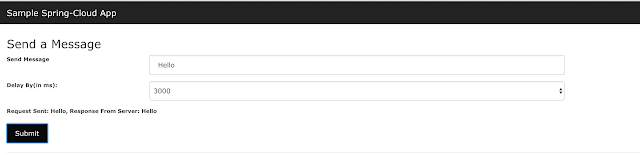
Since my demo is based on a Karyon2 Rx-Netty based application, my configuration can be seen here. The information from the Hystrix stream is a little too raw though, this is where the awesome Hystrix dashboard fits in - It consumes the Hystrix stream and shows real-time aggregated information about how each of the Hystrix command and different underlying threadpools are performing. I have here a sample Hystrix dashboard project based on the awesome Spring-Cloud project. A sample dashboard is here:


Conclusion

This covers the Hystrix basics, there is a lot more to go, I will wrap this up in the next blog post with details on some of the advanced Hystrix features.

Gentle Introduction to Hystrix - Wrapup

$
0
0
This is a follow up to two other posts - Motivation for why something like Hystrix is needed in a distributed systems and a basic intro to Hystrix.

This will be a wrap of my Hystrix journey with details of various properties that can be tweaked to change the behavior of Hystrix and will touch on a few advanced concepts

Tweaking Hystrix Behavior

Hystrix configuration is explained in this wiki here, in brief two broad groups control the properties of Hystrix,

1. Command Properties
2. ThreadPool properties

The properties follow an order of precedence that is explained in the wiki, here I will concentrate on ones specified through a properties file.

For a sample Command defined the following way:

public class HelloWorldCommand extends HystrixCommand<String> {

private static final Logger logger = LoggerFactory.getLogger(HelloWorldCommand.class);

private final String name;

public HelloWorldCommand(String name) {
super(HystrixCommandGroupKey.Factory.asKey("default"));
this.name = name;
}

@Override
protected String run() throws Exception {
logger.info("HelloWorld Command Invoked");
return "Hello " + name;
}
}

First behavior that can be tweaked is whether to execute the command in a thread pool or the same thread of execution as the caller(SEMAPHORE strategy type). If the execution is in a threadpool, then a timeout for the request can be set.

hystrix.command.HelloWorldCommand.execution.isolation.strategy=THREAD
hystrix.command.HelloWorldCommand.execution.isolation.thread.timeoutInMilliseconds=1000

The second behavior is the Circuit breaker which works based on information collected during a rolling window of time, configured this way, say for 10 seconds:

hystrix.command.HelloWorldCommand.metrics.rollingStats.timeInMilliseconds=10000

In this window if a certain percent of failures(say 50%) happen for a threshold of requests(say 20 in 10 seconds) then the circuit is broken, with a configuration which looks like this:

hystrix.command.HelloWorldCommand.circuitBreaker.requestVolumeThreshold=20
hystrix.command.HelloWorldCommand.circuitBreaker.errorThresholdPercentage=50

Once a circuit is broken, it stays that way for a time set the following way, 5 seconds in this instance:
hystrix.command.HelloWorldCommand.circuitBreaker.sleepWindowInMilliseconds=5000

The threadpool settings are controlled using the Group Key that was specified, called default in this sample. A specific "Threadpool Key" could also have been specified as part of the constructor though.

hystrix.threadpool.default.coreSize=10
hystrix.threadpool.default.queueSizeRejectionThreshold=5

Here 10 commands can potentially be run in parallel and another 5 held in a queue beyond which the requests will be rejected.

Request Collapsing

Tomaz Nurkiewicz in his blog site NoBlogDefFound has done an excellent job of explaining Request Collapsing . My example is a little simplistic, consider a case where a lot of requests are being made to retrieve a Person given an id, the following way:

public class PersonService {

public Person findPerson(Integer id) {
return new Person(id, "name : " + id);
}

public List<Person> findPeople(List<Integer> ids) {
return ids
.stream()
.map(i -> new Person(i, "name : " + i))
.collect(Collectors.toList());
}
}

The service responds with a canned response but assume that the call was to a remote datastore. Also see that this service implements a batched method to retrieve a list of People given a list of id's.

Request Collapsing is a feature which would batch multiple user requests occurring over a time period into a single such remote call and then fan out the response back to the user.

A hystrix command which takes the set of id's and gets the response of people can be defined the following way:

public class PersonRequestCommand extends HystrixCommand<List<Person>>{

private final List<Integer> ids;
private final PersonService personService = new PersonService();
private static final Logger logger = LoggerFactory.getLogger(PersonRequestCommand.class);

public PersonRequestCommand(List<Integer> ids) {
super(HystrixCommandGroupKey.Factory.asKey("default"));
this.ids = ids;
}

@Override
protected List<Person> run() throws Exception {
logger.info("Retrieving details for : " + this.ids);
return personService.findPeople(this.ids);
}
}

Fairly straightforward up to this point, the complicated logic is now in the RequestCollapser which looks like this:

package aggregate.commands.collapsed;

import com.netflix.hystrix.HystrixCollapser;
import com.netflix.hystrix.HystrixCollapserKey;
import com.netflix.hystrix.HystrixCollapserProperties;
import com.netflix.hystrix.HystrixCommand;

import java.util.Collection;
import java.util.List;
import java.util.Map;
import java.util.function.Function;
import java.util.stream.Collectors;

public class PersonRequestCollapser extends HystrixCollapser<List<Person>, Person, Integer> {

private final Integer id;
public PersonRequestCollapser(Integer id) {
super(Setter.
withCollapserKey(HystrixCollapserKey.Factory.asKey("personRequestCollapser"))
.andCollapserPropertiesDefaults(HystrixCollapserProperties.Setter().withTimerDelayInMilliseconds(2000)));
this.id = id;
}

@Override
public Integer getRequestArgument() {
return this.id;
}

@Override
protected HystrixCommand<List<Person>> createCommand(Collection<CollapsedRequest<Person, Integer>> collapsedRequests) {
List<Integer> ids = collapsedRequests.stream().map(cr -> cr.getArgument()).collect(Collectors.toList());
return new PersonRequestCommand(ids);
}

@Override
protected void mapResponseToRequests(List<Person> batchResponse, Collection<CollapsedRequest<Person, Integer>> collapsedRequests) {
Map<Integer, Person> personMap = batchResponse.stream().collect(Collectors.toMap(Person::getId, Function.identity()));

for (CollapsedRequest<Person, Integer> cr: collapsedRequests) {
cr.setResponse(personMap.get(cr.getArgument()));
}
}
}


There are a few things going on here, first the types in the parameterized type signature indicates the type of response(List<Person>), the response type expected by the caller (Person) and the request type of the request(id of the person). Then there are two methods one to create a batch command and the second to map the responses back to the original requests.

Now given this from a users perspective nothing much changes, the call is made as if to a single command and Request Collapsing handles batching, dispatching and mapping back the responses. This is how a sample test looks like:

@Test
public void testCollapse() throws Exception {
HystrixRequestContext requestContext = HystrixRequestContext.initializeContext();

logger.info("About to execute Collapsed command");
List<Observable<Person>> result = new ArrayList<>();
CountDownLatch cl = new CountDownLatch(1);
for (int i = 1; i <= 100; i++) {
result.add(new PersonRequestCollapser(i).observe());
}

Observable.merge(result).subscribe(p -> logger.info(p.toString())
, t -> logger.error(t.getMessage(), t)
, () -> cl.countDown());
cl.await();
logger.info("Completed executing Collapsed Command");
requestContext.shutdown();
}

Conclusion

There is far more to Hystrix than what I have covered here. It is truly an awesome library, essential in creating a resilient system and I have come to appreciate the amount of thought process that has gone into designing this excellent library.


Reference


Here is my github repo with all the samples - https://github.com/bijukunjummen/hystrixdemo

Spring Cloud support for Hystrix

$
0
0
Spring Cloud project provides comprehensive support for Netflix OSS Hystrix library. I have previously written about how to use the raw Hystrix library to wrap remote calls. Here I will be going over how Hystrix can be used with Spring Cloud

Basics

There is actually nothing much to it, the concepts just carry over with certain Spring boot specific enhancements. Consider a simple Hystrix command, that wraps around a call to a Remote service:


import agg.samples.domain.Message;
import agg.samples.domain.MessageAcknowledgement;
import agg.samples.feign.RemoteServiceClient;
import com.netflix.hystrix.HystrixCommand;
import com.netflix.hystrix.HystrixCommandGroupKey;
import org.slf4j.Logger;
import org.slf4j.LoggerFactory;

public class RemoteMessageClientCommand extends HystrixCommand<MessageAcknowledgement> {
private static final String COMMAND_GROUP = "demo";
private static final Logger logger = LoggerFactory.getLogger(RemoteMessageClientCommand.class);

private final RemoteServiceClient remoteServiceClient;
private final Message message;

public RemoteMessageClientCommand(RemoteServiceClient remoteServiceClient, Message message) {
super(HystrixCommandGroupKey.Factory.asKey(COMMAND_GROUP));
this.remoteServiceClient = remoteServiceClient;
this.message = message;
}

@Override
protected MessageAcknowledgement run() throws Exception {
logger.info("About to make Remote Call");
return this.remoteServiceClient.sendMessage(this.message);
}

@Override
protected MessageAcknowledgement getFallback() {
return new MessageAcknowledgement(message.getId(), message.getPayload(), "Fallback message");
}
}

There are no Spring related classes here and this command can be used directly in a Spring based project, say in a controller the following way:


@RestController
public class RemoteCallDirectCommandController {

@Autowired
private RemoteServiceClient remoteServiceClient;

@RequestMapping("/messageDirectCommand")
public MessageAcknowledgement sendMessage(Message message) {
RemoteMessageClientCommand remoteCallCommand = new RemoteMessageClientCommand(remoteServiceClient, message);
return remoteCallCommand.execute();
}
}

The customization of behavior of a Hystrix command is normally performed through NetflixOSS Archaius properties, however Spring Cloud provides a bridge to make the Spring defined properties visible as Archaius properties, this in short means that I can define my properties using Spring specific configuration files and they would be visible when customizing the command behavior.

So if were earlier customizing say a HelloWorldCommand's behavior using Archaius properties which look like this:

hystrix.command.HelloWorldCommand.metrics.rollingStats.timeInMilliseconds=10000
hystrix.command.HelloWorldCommand.execution.isolation.strategy=THREAD
hystrix.command.HelloWorldCommand.execution.isolation.thread.timeoutInMilliseconds=1000
hystrix.command.HelloWorldCommand.circuitBreaker.errorThresholdPercentage=50
hystrix.command.HelloWorldCommand.circuitBreaker.requestVolumeThreshold=20
hystrix.command.HelloWorldCommand.circuitBreaker.sleepWindowInMilliseconds=5000

this can be done in the Spring Cloud world the exact same way in a application.properties file or in a application.yml file the following way:

hystrix:
command:
HelloWorldCommand:
metrics:
rollingStats:
timeInMilliseconds: 10000
execution:
isolation:
strategy: THREAD
thread:
timeoutInMilliseconds: 5000
circuitBreaker:
errorThresholdPercentage: 50
requestVolumeThreshold: 20
sleepWindowInMilliseconds: 5000

Annotation based Approach

I personally prefer the direct command based approach, however a better approach for using Hystrix in the Spring world may be to use hystrix-javanica based annotations instead. The use of this annotation is best illustrated with an example. Here is the remote call wrapped in a Hystrix command with annotations:

import agg.samples.domain.Message;
import agg.samples.domain.MessageAcknowledgement;
import agg.samples.feign.RemoteServiceClient;
import com.netflix.hystrix.contrib.javanica.annotation.HystrixCommand;
import org.springframework.beans.factory.annotation.Autowired;
import org.springframework.stereotype.Service;

@Service
public class RemoteMessageAnnotationClient {

private final RemoteServiceClient remoteServiceClient;

@Autowired
public RemoteMessageAnnotationClient(RemoteServiceClient remoteServiceClient) {
this.remoteServiceClient = remoteServiceClient;
}

@HystrixCommand(fallbackMethod = "defaultMessage", commandKey = "RemoteMessageAnnotationClient" )
public MessageAcknowledgement sendMessage(Message message) {
return this.remoteServiceClient.sendMessage(message);
}

public MessageAcknowledgement defaultMessage(Message message) {
return new MessageAcknowledgement("-1", message.getPayload(), "Fallback Payload");
}

}


These annotations are translated using an aspect into a regular Hystrix commands behind the scenes, the neat thing though is that there is no ceremony in using this in a Spring Cloud project, it just works. Like before if the behavior needs to be customized it can be done with the command specific properties. One small catch is that the command name by default is the method name, so in my example the command name would have been "sendMessage", which I have customized using the annotation to be a different name.

If you are interested in exploring this sample further, here is my github project.

Spring Cloud Rest Client with Netflix Ribbon - Basics

$
0
0
In an earlier blog post I had covered the different options for a REST client in the Spring Cloud world. All the options wrap around a Netflix OSS based component called Ribbon which handles the aspects related to loadbalancing the calls across different instances hosting a service, handling failovers, timeouts etc. Here I will cover a few ways to customize the behavior of underlying Ribbon components when used with Spring Cloud and follow it up with more comprehensive customizations.

Creating a Rest Client


To recap, first consider a case where a simple service needs to be called:


A typical way to make this call using Spring is to inject in a RestTemplate and use it make this call, the following way:


public class RestTemplateBasedPongClient implements PongClient {

@Autowired
private RestTemplate restTemplate;

@Override
public MessageAcknowledgement sendMessage(Message message) {
String pongServiceUrl = "http://serviceurl/message";
HttpEntity<Message> requestEntity = new HttpEntity<>(message);
ResponseEntity<MessageAcknowledgement> response = this.restTemplate.exchange(pongServiceUrl, HttpMethod.POST, requestEntity, MessageAcknowledgement.class, Maps.newHashMap());
return response.getBody();
}

}

There is nothing special here. When using Spring Cloud however the same code behaves differently, now the RestTemplate internally uses Netflix OSS Ribbon libraries to make the call. This helps as the typical call flow is to first find the instances running the service and then to loadbalance the calls across the instances and to maintain this state.

Rest Client With Ribbon


Let me digress a little to touch on Ribbon, Ribbon uses an abstraction called a "Named client" to control the behavior of a remote service call - the name by which the service has registered with Eureka, timeout for service calls, how many retries in case of failures etc. These are specified through configuration files, and the entries are typically along these lines, note that the "Named client" here is "samplepong" and the properties have this as a prefix:

samplepong.ribbon.MaxAutoRetries=2
samplepong.ribbon.MaxAutoRetriesNextServer=2
samplepong.ribbon.OkToRetryOnAllOperations=true
samplepong.ribbon.ServerListRefreshInterval=2000
samplepong.ribbon.ConnectTimeout=5000
samplepong.ribbon.ReadTimeout=90000
samplepong.ribbon.EnableZoneAffinity=false
samplepong.ribbon.DeploymentContextBasedVipAddresses=sample-pong
samplepong.ribbon.NIWSServerListClassName=com.netflix.niws.loadbalancer.DiscoveryEnabledNIWSServerList


Coming back to Spring Cloud, it supports the concept of a "Named Client" in a very clever way through the Url hostname, so the RestTemplate call would now look like this:

ResponseEntity<MessageAcknowledgement> response =  this.restTemplate.exchange("http://samplepong/message", HttpMethod.POST, requestEntity, MessageAcknowledgement.class, Maps.newHashMap());

The "samplepong" in the url is the "Named client" and any customization for the behavior of the underlying Ribbon can be made by specifying the properties using this prefix. Since this is a Spring Cloud applications the properties can be specified cleanly in a yaml format along these lines:

samplepong:
ribbon:
DeploymentContextBasedVipAddresses: sample-pong
ReadTimeout: 5000
MaxAutoRetries: 2


Conclusion

This covers the basics of how Spring Cloud abstracts out the underlying the Ribbon libraries to provide a very intuitive facade to make remote service calls in the Cloud environment. There are some details that I have skimmed over on some of the customizations, I will cover these in a newer post. Here is my github repo with the code that I have used for the article.

Spring Cloud Rest Client with Netflix Ribbon - Customizations

$
0
0
In an earlier blog post I had covered the basic configuration involved in making a REST call using Spring Cloud which utilizes Netflix Ribbon libraries internally to load balance calls, with basic configurations like setting read timeout, number of retries etc . Here I will go over some more customizations that can be done that will require going beyond the configuration files.

Use Case

My use case is very simple - I want to specify the URL(s) that a rest call is invoked against. This may appear straightforward to start with however there are a few catches to consider. By default if Spring Cloud sees Eureka related libraries in the classpath the behavior is to use Eureka to discover the instances of a service and loadbalance across the instances.

Approach 1 - Use a non-loadbalanced Rest Template

An approach that will work is to use an instance of RestTemplate that does not use Ribbon at all:

@Bean
public RestOperations nonLoadbalancedRestTemplate() {
return new RestTemplate();
}

Now, where you need the Rest Template, you can inject this instance in, knowing that Spring Cloud also would have instantiated another instance that supports Eureka, so this injection will have to be done by name this way:

@Service("restTemplateDirectPongClient")
public class RestTemplateDirectPongClient implements PongClient {

private final RestOperations restTemplate;

@Autowired
public RestTemplateDirectPongClient(@Qualifier("nonLoadbalancedRestTemplate") RestOperations restTemplate) {
this.restTemplate = restTemplate;
}

...
}

The big catch with the approach however is now that we have bypassed Ribbon all the features that Ribbon provides are lost - we would not have features like automatic retry, read and connect timeouts, loadbalancing in case we had multiple urls. So a better approach may be the following.

Approach 2 - Customize Ribbon based Rest Template

In the earlier blog post I had shown some basic customization of Ribbon which can be made using a configuration file:

samplepong:
ribbon:
DeploymentContextBasedVipAddresses: sample-pong
ReadTimeout: 5000
MaxAutoRetries: 2

All the customizations that you would normally do through a configuration file for Ribbon however do not carry over, in this specific instance I want to use a list of server instances that I specify instead of letting Ribbon figure out via a Eureka call. Using raw ribbon it is specified the following way:

samplepong.ribbon.NIWSServerListClassName=com.netflix.loadbalancer.ConfigurationBasedServerList
samplepong.ribbon.listOfServers=127.0.0.1:8082

This specific configuration will not work with Spring Cloud however, the way to specify a list of servers is by specifying a configuration file along these lines:

package org.bk.noscan.consumer.ribbon;

import com.netflix.client.config.IClientConfig;
import com.netflix.loadbalancer.ConfigurationBasedServerList;
import com.netflix.loadbalancer.Server;
import com.netflix.loadbalancer.ServerList;
import org.springframework.cloud.netflix.ribbon.RibbonClientConfiguration;
import org.springframework.context.annotation.Bean;
import org.springframework.context.annotation.Configuration;

@Configuration
public class PongDirectCallRibbonConfiguration extends RibbonClientConfiguration {

@Bean
@Override
public ServerList<Server> ribbonServerList(IClientConfig clientConfig) {
ConfigurationBasedServerList serverList = new ConfigurationBasedServerList();
serverList.initWithNiwsConfig(clientConfig);
return serverList;
}

}

and telling Ribbon to use this configuration for the specific "named client" that we are concerned about:

@RibbonClients({
@RibbonClient(name = "samplepongdirect", configuration = PongDirectCallRibbonConfiguration.class),
})

With this configuration in place, the list of servers can now be specified using configuration this way:

samplepongdirect:
ribbon:
DeploymentContextBasedVipAddresses: sample-pong
listOfServers: localhost:8082
ReadTimeout: 5000
MaxAutoRetries: 2

One thing to note is that since the Ribbon Configuration is a normal Spring configuration it will likely get picked up as part of the @ComponentScan annotation, since this is very specific for Ribbon we would not want this configuration to be picked up this way. I have avoided that by specifying a package not in the normal classpath scan "org.bk.noscan.*" package!, I am not sure if there is another clean way to do this but this approach has worked well for me.

This approach is little more extensive than the first approach, however the advantage is that once this is in place all the features of Ribbon carry over.

Conclusion

This concludes the customizations involved in using Spring Cloud with Ribbon. If you are interested in exploring the code a little further I have this integrated in my github repo here.

References

Spring Cloud reference documentation has been an awesome source of information for all the details presented here. I had mistakenly opened a github issue thinking that it is a Spring Cloud issue and got some very useful information through the discussion here

JWT - Generating and validating a token - Samples

$
0
0
JWT provides a very interesting way to represent claims between applications that can be verified and trusted. My objective here is to show a small sample to generate and validate a token using the excellent Nimbus JOSE + JWT library.

Overview

One of the best places to get an intro is here. In brief, to borrow from the material from the jwt.io site, claims are represented as an encoded json in three parts separated with a dot (.)


header.payload.signature


The header is a json that contains the type of algorithm used for signing the content(RSA in this instance) which is then url and Base64 encoded:

{
"alg": "RS512"
}

The payload is a json containing all the claims, there are claims which are reserved but private claims are also allowed:

{
"sub": "samplesubject",
"name": "John Doe",
"iss": "sampleissueer",
"admin": true,
"exp": 1451849539
}


here "sub"(subject), "iss"(issuer) and "exp"(expiry) are reserved claims but "name" and "admin" are private claims. The content is then Base64Url encoded.

Finally the header and payload together is signed using either a shared key or a private key and the signature is Base64 url encoded and appended to the token with a (.) separator.


Generating a Keypair

My sample is RSA based one, so the first step is to generate a Key pair. JWK is a neat way to store the Keys as a JSON representation and Nimbus library provides support for that:


import java.security.KeyPairGenerator
import java.security.interfaces.{RSAPrivateKey, RSAPublicKey}

import com.google.gson.{GsonBuilder, JsonElement, JsonParser}
import com.nimbusds.jose.Algorithm
import com.nimbusds.jose.jwk.{JWKSet, KeyUse, RSAKey}

object JWKGenerator {

def make(keySize: Integer, keyUse: KeyUse, keyAlg: Algorithm, keyId: String) = {
val generator = KeyPairGenerator.getInstance("RSA")
generator.initialize(keySize)
val kp = generator.generateKeyPair()
val publicKey = kp.getPublic().asInstanceOf[RSAPublicKey]
val privateKey = kp.getPrivate().asInstanceOf[RSAPrivateKey]
new RSAKey.Builder(publicKey)
.privateKey(privateKey)
.keyUse(keyUse)
.algorithm(keyAlg)
.keyID(keyId)
.build()
}
...

}

Given this Key Pair, a JWK can be generated from this using Gson:

  def generateJWKKeypair(rsaKey: RSAKey): JsonElement = {
val jwkSet = new JWKSet(rsaKey)
new JsonParser().parse(jwkSet.toJSONObject(false).toJSONString)
}

def generateJWKJson(rsaKey: RSAKey): String = {
val jsonElement = generateJWKKeypair(rsaKey)
val gson = new GsonBuilder().setPrettyPrinting().create()
gson.toJson(jsonElement)
}


A sample JWK based keypair looks like this:

{
"keys": [
{
"p": "2_Fb6K50ayAsnnQl55pPegE_JNTeAjpDo9HThZPp6daX7Cm2s2fShtWuM8JBv42qelKIrypAAVOedLCM75VoRQ",
"kty": "RSA",
"q": "ye5BeGtkx_9z3V4ImX2Pfljhye7QT2rMhO8chMcCGI4JGMsaDBGUmGz56MHvWIlcqBcYbPXIWORidtMPdzp1wQ",
"d": "gSjAIty6uDAm8ZjEHUU4wsJ8VVSJInk9iR2BSKVAAxJUQUrCVN---DKLr7tCKgWH0zlV0DjGtrfy7pO-5tcurKkK59489mOD4-1kYvnqSZmHC_zF9IrCyZWpOiHnI5VnJEeNwRz7EU8y47NjpUHWIaLl_Qsu6gOiku41Vpb14QE",
"e": "AQAB",
"use": "sig",
"kid": "sample",
"qi": "0bbcYShpGL4XNhBVrMI8fKUpUw1bWghgoyp4XeZe-EZ-wsc43REE6ZItCe1B3u14RKU2J2G57Mi9f_gGIP_FqQ",
"dp": "O_qF5d4tQUl04YErFQ2vvsW4QoMKR_E7oOEHndXIZExxAaYefK5DayG6b8L5yxMG-nSncZ1D9ximjYvX4z4LQQ",
"alg": "RS512",
"dq": "jCy-eg9i-IrWLZc3NQW6dKTSqFEFffvPWYB7NZjIVa9TlUh4HmSd2Gnd2bu2oKlKDs1pgUnk-AAicgX1uHh2gQ",
"n": "rX0zzOEJOTtv7h39VbRBoLPQ4dRutCiRn5wnd73Z1gF_QBXYkrafKIIvSUcJbMLAozRn6suVXCd8cVivYoq5hkAmcRiy0v7C4VuB1_Fou7HHoi2ISbwlv-kiZwTmXCn9YSHDBVivCwfMI87L2143ZfYUcNxNTxPt9nY6HJrtJQU"
}
]
}

Generating a JWT

Now that we have a good sample keypair, load up the private and public keys:


import java.time.{LocalDateTime, ZoneOffset}
import java.util.Date

import com.nimbusds.jose._
import com.nimbusds.jose.crypto._
import com.nimbusds.jose.jwk.{JWKSet, RSAKey}
import com.nimbusds.jwt.JWTClaimsSet.Builder
import com.nimbusds.jwt._

object JwtSample {
def main(args: Array[String]): Unit = {
val jwkSet = JWKSet.load(JwtSample.getClass.getResource("/sample.json").toURI.toURL)
val jwk = jwkSet.getKeyByKeyId("sample").asInstanceOf[RSAKey]

val publicKey = jwk.toRSAPublicKey
val privateKey = jwk.toRSAPrivateKey
...
}

Build a payload, sign it and generate the JWT:

    val claimsSetBuilder = new Builder()
.subject("samplesubject")
.claim("name", "John Doe")
.claim("admin", true)
.issuer("sampleissueer")
.expirationTime(Date.from(LocalDateTime.now().plusHours(1).toInstant(ZoneOffset.UTC)))

val signer = new RSASSASigner(privateKey)


val signedJWT: SignedJWT = new SignedJWT(
new JWSHeader(JWSAlgorithm.RS512),
claimsSetBuilder.build())

signedJWT.sign(signer)

val s = signedJWT.serialize()


The consumer of this JWT can read the payload and validate it using the public key:

    val cSignedJWT = SignedJWT.parse(s)

val verifier = new RSASSAVerifier(publicKey)

println(cSignedJWT.verify(verifier))
println(signedJWT.getJWTClaimsSet().getSubject())

Conclusion

This sample is entirely based on samples provided at the Nimbus JOSE + JWT site, you should definitely refer to the Nimbus site if you are interested in exploring this further. My samples are here

Spring Cloud with Turbine

$
0
0
Netflix Hystrix has a neat feature called the Hystrix stream that provides real-time metrics on the state of the Hystrix commands in an application. This data tends to be very raw though, a very cool interface called the Hystrix Dashboard consumes this raw data and presents a graphical information based on the underlying raw data:


Integrating Hystrix Support and Dashboard

In a Spring-Cloud project it is very trivial to expose the Hystrix stream, all it requires is a starter application for Hystrix to be added in as a dependency and the stream functionality is available to the web application.

Step 1: Add the Spring-Cloud-Starter-hystrix:

<dependency>
<groupId>org.springframework.cloud</groupId>
<artifactId>spring-cloud-starter-hystrix</artifactId>
</dependency>

Step 2: Enable Hystrix support for the Application, this will expose the hystrix stream at a "/hystrix.stream" uri:

@SpringBootApplication
@EnableHystrix
public class SpringCloudApp {

public static void main(String[] args) {
SpringApplication.run(SpringCloudApp.class, args);
}
}

Now for the Hystrix Dashboard application to graphically view the Hystrix stream, the following annotation will enable that and the application should be available at "/hystrix" uri:

@SpringBootApplication
@EnableHystrixDashboard
public class AggregateApp {

public static void main(String[] args) {
SpringApplication.run(AggregateApp.class, args);
}
}


Spring Cloud with Turbine

Hystrix stream provides information on a single application, Turbine provides a way to aggregate this information across all installations of an application in a cluster. Integrating turbine into a Spring-Cloud based application is straightforward, all it requires is information on which clusters to expose information on and how to aggregate information about the specific clusters. As before to pull in the dependencies of Turbine:

<dependency>
<groupId>org.springframework.cloud</groupId>
<artifactId>spring-cloud-starter-turbine</artifactId>
<exclusions>
<exclusion>
<groupId>javax.servlet</groupId>
<artifactId>servlet-api</artifactId>
</exclusion>
</exclusions>
</dependency>

And to enable Turbine support in a Spring Boot based application:

@SpringBootApplication
@EnableHystrixDashboard
@EnableTurbine
public class MonitorApplication {

public static void main(String[] args) {
SpringApplication.run(MonitorApplication.class, args);
}

}

This application is playing the role of both showing the Hystrix Dashboard and exposing turbine stream. Finally the configuration for turbine:

turbine:
aggregator:
clusterConfig: SAMPLE-HYSTRIX-AGGREGATE
appConfig: SAMPLE-HYSTRIX-AGGREGATE

Given this configuration a turbine stream for SAMPLE-HYSTRIX-AGGREGATE cluster is available at "/turbine.stream?cluster=SAMPLE-HYSTRIX-AGGREGATE" uri, it would figure out the instances of the cluster using Eureka, source the hystrix stream from each instance and aggregate it into the turbine stream. If we were to view the Hystrix dashboard against this stream:


If you look at the counts against the host now, it indicates the 2 hosts for which the stream is being aggregated.

I have brushed over a lot of details here, an easier way to check the details may be to check my github project here

Spring Cloud Ribbon - Making a secured call

$
0
0
Something simple, but I struggled with this recently - I had to make a Netflix Ribbon based client call to a secured remote service. It turns out there are two ways to do this using Netflix Ribbon, I will demonstrate this through Spring Cloud's excellent support for Ribbon library.

In two previous blog posts I have touched on Spring Cloud Ribbon basics and some advanced customizations, continuing with the same example, assuming that I have a configuration along these lines:

sampleservice:
ribbon:
listOfServers: someserver:80
ReadTimeout: 5000
MaxAutoRetries: 2


Given this configuration, I can call the service this way:

public class RestTemplateSample {

@Autowired
private RestTemplate restTemplate;

@Override
public MessageAcknowledgement sendMessage(Message message) {
String pongServiceUrl = "http://sampleservice/message";
HttpEntity<Message> requestEntity = new HttpEntity<>(message);
ResponseEntity<MessageAcknowledgement> response = this.restTemplate.exchange(pongServiceUrl, HttpMethod.POST, requestEntity, MessageAcknowledgement.class, Maps.newHashMap());
return response.getBody();
}

}


So now if the remote service were secured, the first approach and likely the preferred way is actually quite simple, just add an additional configuration to the "named" client to indicate that the remote service is secure, note that the port also has to be appropriately specified.

sampleservice:
ribbon:
listOfServers: someserver:443
ReadTimeout: 5000
MaxAutoRetries: 2
IsSecure: true


The second approach that also works is to simply change the url to indicate that you are calling a https endpoint, this time the "IsSecure" configuration is not required:

public class RestTemplateSample {

@Autowired
private RestTemplate restTemplate;

@Override
public MessageAcknowledgement sendMessage(Message message) {
String pongServiceUrl = "https://sampleservice/message";
HttpEntity<Message> requestEntity = new HttpEntity<>(message);
ResponseEntity<MessageAcknowledgement> response = this.restTemplate.exchange(pongServiceUrl, HttpMethod.POST, requestEntity, MessageAcknowledgement.class, Maps.newHashMap());
return response.getBody();
}

}

Marble Diagrams - Rxjava operators

$
0
0
I love the use of Marble Diagrams for representing the different ReactiveX operations. It really clarifies the behavior of some complex operations. RxJava uses these diagrams in its Javadocs and provides the following legend to explain Marble diagrams:


Keeping the marble diagrams in mind, here is a sample test for flatMap operation, written using the Rx-Scala library:

val colors = Observable.just("Red", "Green", "Blue")

val f: String => Observable[String] = (x: String) => Observable.interval(x.length() seconds).map(_ => x).take(2)

val obs: Observable[String] = colors.flatMap(f)

assert(obs.toBlocking.toList == List("Red", "Blue", "Green", "Red", "Blue", "Green"))

and the marble diagram for the operation:


Given this, the flow in the test should become very clear - we start with an Observable which emits three values "Red", "Green", "Blue", the function transforms an element to another Observable, calling the flatMap now makes this mapping and flattens the result to an Observable.

Another a little more complex variation of the flatMap operation has the following signature in scala:

def flatMap[R](onNext: (T) ⇒ Observable[R], onError: (Throwable) ⇒ Observable[R], onCompleted: () ⇒ Observable[R]): Observable[R]

or the following in Java:
public final <R> Observable<R> flatMap(Func1<? super T,? extends Observable<? extends R>> onNext,
Func1<? super java.lang.Throwable,? extends Observable<? extends R>> onError,
Func0<? extends Observable<? extends R>> onCompleted)


again best explained using its Marble diagram:


Here is a test for this variation of flatMap:

val colors = Observable.just("Red", "Green", "Blue")

val f: String => Observable[String] = (x: String) => Observable.just(x, x)

val d = () => Observable.just("done")

val e: Throwable => Observable[String] = e => Observable.just(e.getMessage)

val obs: Observable[String] = colors.flatMap(f, e, d)

assert(obs.toBlocking.toList == List("Red", "Red", "Green", "Green", "Blue", "Blue", "done"))


In conclusion, I really appreciate the effort that goes behind creating these marble diagrams by the authors of ReactiveX and feel that they clarify the purpose of the operations neatly.

Spring Boot with Scala

$
0
0
A while back I had tried out a small Spring Boot based sample with Scala as the language and found that the combination works out quite nicely - no big surprises there actually as Scala programs ultimately run in the JVM. I have now updated the sample with the latest version of Spring Boot and some of the supporting libraries.

To very quickly revisit the sample, it is a very simple web application with a UI to manage a "Hotel" domain object managed via JPA, represented in scala the following way:

import javax.persistence.Id
import javax.persistence.GeneratedValue
import java.lang.Long
import javax.persistence.Entity
import scala.beans.BeanProperty
import org.hibernate.validator.constraints.NotEmpty

@Entity
class Hotel {

@Id
@GeneratedValue
@BeanProperty
var id: Long = _

@BeanProperty
@NotEmpty
var name: String = _

@BeanProperty
@NotEmpty
var address: String = _

@BeanProperty
@NotEmpty
var zip: String = _
}

JPA annotations carry over quite well, one wrinkle may be the additional @BeanProperty annotation though, this is required for JPA implementations as this makes the scala compiler generate the normal Java Beans type getters and setters instead of the scala default getters and setters which don't follow the Java Bean conventions.

Spring Data makes it ridiculously simple to manage this domain type, all it requires is a marker interface and it generates a runtime implementation:

import org.springframework.data.repository.CrudRepository
import mvctest.domain.Hotel
import java.lang.Long

trait HotelRepository extends CrudRepository[Hotel, Long]

Now I have a toolkit available for managing the Hotel domain:

//save or update a hotel
hotelRepository.save(hotel)

//find one hotel
hotelRepository.findOne(id)

//find all hotels
val hotels = hotelRepository.findAll()

//delete a hotel
hotelRepository.delete(id)


And finally a controller to manage the UI flow with this repository:

@Controller
@RequestMapping(Array("/hotels"))
class HotelController @Autowired()(private val hotelRepository: HotelRepository) {

@RequestMapping(method = Array(RequestMethod.GET))
def list(model: Model) = {
val hotels = hotelRepository.findAll()
model.addAttribute("hotels", hotels)
"hotels/list"
}

@RequestMapping(Array("/edit/{id}"))
def edit(@PathVariable("id") id: Long, model: Model) = {
model.addAttribute("hotel", hotelRepository.findOne(id))
"hotels/edit"
}

@RequestMapping(method = Array(RequestMethod.GET), params = Array("form"))
def createForm(model: Model) = {
model.addAttribute("hotel", new Hotel())
"hotels/create"
}

@RequestMapping(method = Array(RequestMethod.POST))
def create(@Valid hotel: Hotel, bindingResult: BindingResult) = {
if (bindingResult.hasErrors()) {
"hotels/create"
} else {
hotelRepository.save(hotel)
"redirect:/hotels"
}
}

@RequestMapping(value = Array("/update"), method = Array(RequestMethod.POST))
def update(@Valid hotel: Hotel, bindingResult: BindingResult) = {
if (bindingResult.hasErrors()) {
"hotels/edit"
} else {
hotelRepository.save(hotel)
"redirect:/hotels"
}
}

@RequestMapping(value = Array("/delete/{id}"))
def delete(@PathVariable("id") id: Long) = {
hotelRepository.delete(id)
"redirect:/hotels"
}
}

There are some wrinkles here too but should mostly make sense, the way the repository is autowired is a little non-intuitive and the way an explicit Array type has to be provided for request mapping paths and methods may be confusing.

Beyond these small concerns the code just works, do play with it, I would love any feedback on ways to improve this sample. Here is the git location of this sample - https://github.com/bijukunjummen/spring-boot-scala-web

STEM project programming Language Choice - Scala

$
0
0
My daughter Sara who is in 3rd grade and I recently worked together on a school initiated STEM (Science, Technology, Engineering and Math) project and decided to do a programming challenge. I had recently got the excellent Elements book for her  and we wanted to connect the project to the Chemical Elements in some way. An idea that came to us was to try and combine the symbol of the elements and form words from them. So for eg. if you combine Phosphorus(P), Indium(In), Carbon(C), Hydrogen(H) you get PInCH. On an initial whim this sounded like an interesting and at the same time challenging enough problem for us to attempt.

Now our attention turned to the choice of programming language. I tried all the usual Educational programming environments and somehow programming pictorially or graphically did not appeal to me and I felt that it would be good to expose her to some basic programming skills. We together looked at Javascript as a possible choice, Python, Ruby, finally even Java and Scala. I am not used to programming in Python and Ruby, so that left Javascript, Java and Scala, after a little bit of more deliberation we decided to go with Scala, mainly because of the "Worksheet" support in IntelliJ which allows for small snippets of the program to be tried out without too much ceremony needing to be put in place. I would have been way more comfortable with Java as I use Java professionally, however I felt that it would be easier to explain the concepts with less verbosity to a third grader with Scala.


With the choice of language in place I was able to show her some basics of programming with Scala - declaring variables, simple functions, some basics of data types, basics of collections and simple ways to map collections.

We then jumped into the program itself, the approach we outlined and wrote was simple enough - we needed a dictionary of words, we needed a list of elements and something to generate the words by combining elements and filter them using the dictionary. The final code is fairly easy to navigate. We have avoided concepts like recursion, any complicated data structures to validate words and stuck to simple iteration to generate the words.


We found about 12000 words altogether, these are some that caught our eye:


The revelation for me though has been in how easily my daughter picked up on the Programming language concepts with a seemingly difficult language like Scala. I know there are more difficult concepts along the way once we get past the basics, however my choice of Scala was to ensure that the foundation is strong enough. I will let her explore more esoteric features by herself when she works on her STEM project for next year !

Here is the code that we came up with.


Single Page Angularjs application with Spring Boot and Yeoman

$
0
0
I am very thankful for tools like yeoman which provide a very quick way to combine different javascript libraries together into a coherent application. Yeoman provides the UI tier, if you needed to develop the services tier and a web layer for the static assets a good way to package it is to use Spring Boot. I know there are tools like JHipster which make this easy but if you are just looking just a basic template what I am outlining here should just suffice.

So this is what I do, let us start by getting a basic Spring boot web template in place, the following way:


spring init --dependencies=web spring-boot-static-sample

This assumes that you have the command line application for Spring Boot available in your machine, if you don't then just follow the instructions here

There should be a folder called spring-boot-static-sample with all the Spring Boot generated code in there, now to layer in the static content in there, I have used the yeoman gulp angular generator to generate the code, the following way inside the spring-boot-static-sample folder:

npm install -g yo gulp bower
npm install -g generator-gulp-angular
yo gulp-angular

Almost there, just modify one of the gulp configurations - instead of creating the packaged javascript distribution to dist folder, let the folder be src/main/resources/static instead. In gulp/conf.js:


This is the folder that Spring boot uses to serve out static content by default.

And that's it, when you are developing the single page apps this can be done very quickly using the convenient gulp commands

gulp serve

and when you are ready to package the application just run

gulp build

which would get the static content into a location that Spring boot understands and then run the app:

mvn spring-boot:run

and the Single page app UI should show up.


Simple and clean!

Here is a sample project with these steps already executed - https://github.com/bijukunjummen/spring-boot-static-sample


First steps to Spring Boot Cassandra

$
0
0
If you want to start using Cassandra NoSQL database with Spring Boot, the best resource is likely the Cassandra samples available here and the Spring data Cassandra documentation.

Here I will take a little more roundabout way, by actually installing Cassandra locally and running a basic test against it and I aim to develop this sample into a more comprehensive example with the next blog post.

Setting up a local Cassandra instance

Your mileage may vary, but the simplest way to get a local install of Cassandra running is to use the Cassandra cluster manager(ccm) utility, available here.

ccm create test -v 2.2.5 -n 3 -s

Or a more traditional approach may simply be to download it from the Apache site. If you are following along, the version of Cassandra that worked best for me is the 2.2.5 one.

With either of the above, start up Cassandra, using ccm:

ccm start test

or with the download from the Apache site:

bin/cassandra -f

The -f flag will keep the process in the foreground, this way stopping the process will be very easy once you are done with the samples.

Now connect to this Cassandra instance:

bin/cqlsh

and create a sample Cassandra keyspace:

CREATE KEYSPACE IF NOT EXISTS sample WITH replication = {'class':'SimpleStrategy', 'replication_factor':1};

Using Spring Boot Cassandra


Along the lines of anything Spring Boot related, there is a starter available for pulling in all the relevant dependencies of Cassandra, specified as a gradle dependency here:

compile('org.springframework.boot:spring-boot-starter-data-cassandra')

This will pull in the dependencies that trigger the Auto-configuration for Cassandra related instances - a Cassandra session mainly.

For the sample I have defined an entity called the Hotel defined the following way:

package cass.domain;

import org.springframework.data.cassandra.mapping.PrimaryKey;
import org.springframework.data.cassandra.mapping.Table;

import java.io.Serializable;
import java.util.UUID;

@Table("hotels")
public class Hotel implements Serializable {

private static final long serialVersionUID = 1L;

@PrimaryKey
private UUID id;

private String name;

private String address;

private String zip;

private Integer version;

public Hotel() {
}

public Hotel(String name) {
this.name = name;
}

public UUID getId() {
return id;
}

public String getName() {
return this.name;
}

public String getAddress() {
return this.address;
}

public String getZip() {
return this.zip;
}

public void setId(UUID id) {
this.id = id;
}

public void setName(String name) {
this.name = name;
}

public void setAddress(String address) {
this.address = address;
}

public void setZip(String zip) {
this.zip = zip;
}

public Integer getVersion() {
return version;
}

public void setVersion(Integer version) {
this.version = version;
}

}

and the Spring data repository to manage this entity:

import cass.domain.Hotel;
import org.springframework.data.repository.CrudRepository;

import java.util.UUID;

public interface HotelRepository extends CrudRepository<Hotel, UUID>{}


A corresponding cql table is required to hold this entity:

CREATE TABLE IF NOT EXISTS  sample.hotels (
id UUID,
name varchar,
address varchar,
zip varchar,
version int,
primary key((id))
);


That is essentially it, Spring data support for Cassandra would now manage all the CRUD operations of this entity and a test looks like this:

import cass.domain.Hotel;
import cass.repository.HotelRepository;
import org.junit.Test;
import org.junit.runner.RunWith;
import org.springframework.beans.factory.annotation.Autowired;
import org.springframework.boot.test.SpringApplicationConfiguration;
import org.springframework.test.context.junit4.SpringJUnit4ClassRunner;

import java.util.UUID;

import static org.hamcrest.MatcherAssert.assertThat;
import static org.hamcrest.Matchers.equalTo;

@RunWith(SpringJUnit4ClassRunner.class)
@SpringApplicationConfiguration(classes = SampleCassandraApplication.class)
public class SampleCassandraApplicationTest {

@Autowired
private HotelRepository hotelRepository;

@Test
public void repositoryCrudOperations() {
Hotel sample = sampleHotel();
this.hotelRepository.save(sample);

Hotel savedHotel = this.hotelRepository.findOne(sample.getId());

assertThat(savedHotel.getName(), equalTo("Sample Hotel"));

this.hotelRepository.delete(savedHotel);
}

private Hotel sampleHotel() {
Hotel hotel = new Hotel();
hotel.setId(UUID.randomUUID());
hotel.setName("Sample Hotel");
hotel.setAddress("Sample Address");
hotel.setZip("8764");
return hotel;
}

}

Here is the github repo with this sample. There is not much to this sample yet, in the next blog post I will enhance this sample to account for the fact that it is very important to understand the distribution of data across a cluster in a NoSQL system and how the entity like Hotel here can be modeled for efficient CRUD operations.

Scatter-Gather using Spring Reactor Core

$
0
0
I have a good working experience in using the Netflix Rx-Java libraries and have previously blogged about using Rx-Java and Java 8 CompletableFuture for a scatter-gather kind of problems. Here I want to explore applying the same pattern using the Spring Reactor Core library.

tldr - If you are familiar with Netflix Rx-Java, you already know Spring Reactor Core, the API's map beautifully and I was thrilled to see that the Spring Reactor team has diligently used Marble diagrams in their Javadoc API's

Another quick point is that rx.Observable maps to Flux or Mono based on whether many items are being emitted or whether one or none is being emitted.

With this let me directly jump into the sample - I have a simple task(simulated using a delay) that is spawned a few times, I need to execute these tasks concurrently and then collect back the results, represented the following way using a rx.Observable code:

@Test
public void testScatterGather() throws Exception {
ExecutorService executors = Executors.newFixedThreadPool(5);

List<Observable<String>> obs =
IntStream.range(0, 10)
.boxed()
.map(i -> generateTask(i, executors)).collect(Collectors.toList());


Observable<List<String>> merged = Observable.merge(obs).toList();
List<String> result = merged.toBlocking().first();

logger.info(result.toString());

}

private Observable<String> generateTask(int i, ExecutorService executorService) {
return Observable
.<String>create(s -> {
Util.delay(2000);
s.onNext( i + "-test");
s.onCompleted();
}).subscribeOn(Schedulers.from(executorService));
}


Note that I am blocking purely for the test.

Now, a similar code using Spring Reactor Core translates to the following:

@Test
public void testScatterGather() {
ExecutorService executors = Executors.newFixedThreadPool(5);

List<Flux<String>> fluxList = IntStream.range(0, 10)
.boxed()
.map(i -> generateTask(executors, i)).collect(Collectors.toList());

Mono<List<String>> merged = Flux.merge(fluxList).toList();

List<String> list = merged.get();

logger.info(list.toString());


}

public Flux<String> generateTask(ExecutorService executorService, int i) {
return Flux.<String>create(s -> {
Util.delay(2000);
s.onNext(i + "-test");
s.onComplete();
}).subscribeOn(executorService);
}

It more or less maps one to one. A small difference is in the Mono type, I personally felt that this type was a nice introduction to the reactive library as it makes it very clear whether more than 1 item is being emitted vs only a single item which I have made use of in the sample.

These are still early explorations for me and I look forward to getting far more familiar with this excellent library.

Approaches to binding a Spring Boot application to a service in Cloud Foundry

$
0
0
If you want to try out Cloud Foundry the simplest way to do that is to download the excellent PCF Dev or to create a trial account at the Pivotal Web Services site.

The rest of the post assumes that you have an installation of Cloud Foundry available to you and that you have a high level understanding of Cloud Foundry. The objective of this post is to list out of the options you have in integrating your Java application to a service instance - this demo uses mysql as a sample service to integrate with but the approach is generic enough.

Overview of the Application

The application is fairly simple Spring-Boot app, it is a REST service exposing three domain types and their relationships, representing a university - Course, Teacher and Student. The domain instances are persisted to a MySQL database. The entire source code and the approaches are available at this github location if you want to jump ahead.

To try the application locally, first install a local mysql server database, on a Mac OSX box with homebrew available, the following set of commands can be run:

brew install mysql

mysql.server start
mysql -u root
# on the mysql prompt:

CREATE USER 'univadmin'@'localhost' IDENTIFIED BY 'univadmin';
CREATE DATABASE univdb;
GRANT ALL ON univdb.* TO 'univadmin'@'localhost';

Bring up the Spring-Boot under cf-db-services-sample-auto:

mvn spring-boot:run

and an endpoint with a sample data will be available at http://localhost:8080/courses.

Trying this application on Cloud Foundry

If you have an installation of PCF Dev running locally, you can try out a deployment of the application the following way:

cf api api.local.pcfdev.io --skip-ssl-validation
cf login # login with admin/admin credentials

Create a Mysql service instance:
cf create-service p-mysql 512mb mydb

and push the app! (manifest.yml provides the binding of the app to the service instance)
cf push

An endpoint should be available at http://cf-db-services-sample-auto.local.pcfdev.io/courses

Approaches to service connectivity


Now that we have an application that works locally and on a sample local Cloud Foundry, these are the approaches to connecting to a service instance.

Approach 1 - Do nothing, let the Java buildpack handle the connectivity details


This approach is demonstrated in the cf-db-services-sample-auto project. Here the connectivity to the local database has been specified using Spring Boot and looks like this:

---

spring:
jpa:
show-sql: true
hibernate.ddl-auto: none
database: MYSQL

datasource:
driverClassName: com.mysql.jdbc.Driver
url: jdbc:mysql://localhost/univdb?autoReconnect=true&useSSL=false
username: univadmin
password: univadmin

When this application is pushed to Cloud Foundry using the Java Buildpack, a component called the java-buildpack-auto-reconfiguration is injected into the application which reconfigures the connectivity to the service based on the runtime service binding.


Approach 2 - Disable Auto reconfiguration and use runtime properties

This approach is demonstrated in the cf-db-services-sample-props project. When a service is bound to an application, there is a set of environment properties injected into the application under the key "VCAP_SERVICES". For this specific service the entry looks something along these lines:

"VCAP_SERVICES": {
"p-mysql": [
{
"credentials": {
"hostname": "mysql.local.pcfdev.io",
"jdbcUrl": "jdbc:mysql://mysql.local.pcfdev.io:3306/cf_456d9e1e_e31e_43bc_8e94_f8793dffdad5?user=**\u0026password=***",
"name": "cf_456d9e1e_e31e_43bc_8e94_f8793dffdad5",
"password": "***",
"port": 3306,
"uri": "mysql://***:***@mysql.local.pcfdev.io:3306/cf_456d9e1e_e31e_43bc_8e94_f8793dffdad5?reconnect=true",
"username": "***"
},
"label": "p-mysql",
"name": "mydb",
"plan": "512mb",
"provider": null,
"syslog_drain_url": null,
"tags": [
"mysql"
]
}
]
}

The raw json is a little unwieldy to consume, however Spring Boot automatically converts this data into a flat set of properties that looks like this:

"vcap.services.mydb.plan": "512mb",
"vcap.services.mydb.credentials.username": "******",
"vcap.services.mydb.credentials.port": "******",
"vcap.services.mydb.credentials.jdbcUrl": "******",
"vcap.services.mydb.credentials.hostname": "******",
"vcap.services.mydb.tags[0]": "mysql",
"vcap.services.mydb.credentials.uri": "******",
"vcap.services.mydb.tags": "mysql",
"vcap.services.mydb.credentials.name": "******",
"vcap.services.mydb.label": "p-mysql",
"vcap.services.mydb.syslog_drain_url": "",
"vcap.services.mydb.provider": "",
"vcap.services.mydb.credentials.password": "******",
"vcap.services.mydb.name": "mydb",

Given this, the connectivity to the database can be specified in a Spring Boot application the following way - in a application.yml file:

spring:
datasource:
url: ${vcap.services.mydb.credentials.jdbcUrl}
username: ${vcap.services.mydb.credentials.username}
password: ${vcap.services.mydb.credentials.password}

One small catch though is that since I am now explicitly taking control of specifying the service connectivity, the runtime java-buildpack-auto-reconfiguration has to be disabled, which can done by a manifest metadata:
---
applications:
- name: cf-db-services-sample-props
path: target/cf-db-services-sample-props-1.0.0.RELEASE.jar
memory: 512M
env:
JAVA_OPTS: -Djava.security.egd=file:/dev/./urandom
SPRING_PROFILES_ACTIVE: cloud
services:
- mydb

buildpack: https://github.com/cloudfoundry/java-buildpack.git

env:
JBP_CONFIG_SPRING_AUTO_RECONFIGURATION: '{enabled: false}'

Approach 3 - Using Spring Cloud Connectors

The third approach is to use the excellent Spring Cloud Connectors project and a configuration which specifies a service connectivity looks like this and is demonstrated in the cf-db-services-sample-connector sub-project:

@Configuration
@Profile("cloud")
public class CloudFoundryDatabaseConfig {

@Bean
public Cloud cloud() {
return new CloudFactory().getCloud();
}

@Bean
public DataSource dataSource() {
DataSource dataSource = cloud().getServiceConnector("mydb", DataSource.class, null);
return dataSource;
}
}

Pros and Cons


These are the Pros and Cons with each of these approaches:

ApproachesProsCons
Approach 1 - Let Buildpack handle it
1. Simple, the application that works locally will work without any changes on the cloud

1. Magical - the auto-reconfiguration may appear magical to someone who does not understand the underlying flow
2. The number of service types supported is fairly limited -
say for eg, if a connectivity is required to Cassandra then Auto-reconfiguration will not work
Approach 2 - Explicit Properties1. Fairly straightforward.
2. Follows the Spring Boot approach and uses some of the best practices of Boot based applications - for eg, there is a certain order in which datasource connection pools are created, all those best practices just flow in using this approach.
1. The Auto-reconfiguration will have to be explicitly disabled
2. Need to know what the flattened properties look like
3. A "cloud" profile may have to be manually injected through environment properties to differentiate local development and cloud deployment
4. Difficult to encapsulate reusability of connectivity to newer service types - say Cassandra or DynamoDB.
Approach 3 - Spring Cloud Connectors1. Simple to integrate
2. Easy to add in re-usable integration to newer service types
1. Bypasses the optimizations of Spring Boot connection pool logic.

Conclusion


My personal preference is to go with Approach 2 as it most closely matches the Spring Boot defaults, not withstanding the cons of the approach. If more complicated connectivity to a service is required I will likely go with approach 3. Your mileage may vary though


References

1. Scott Frederick's spring-music has been a constant guide.
2. I have generously borrowed from Ben Hale's pong_matcher_spring sample.

Spring Cloud with Turbine AMQP

$
0
0
I have previously blogged about using Spring Cloud with Turbine, a Netflix OSS library which provides a way to aggregate the information from Hystrix streams across a cluster.

The default aggregation flow is however pull-based, where Turbine requests the hystrix stream from each instance in the cluster and aggregates it together - this tends to be way more configuration heavy.


Spring Cloud Turbine AMQP offers a different model, where each application instance pushes the metrics from Hystrix commands to Turbine through a central RabbitMQ broker.


This blog post recreates the sample that I had configured previously using Spring Cloud support for AMQP - the entire sample is available at my github repo if you just want the code.

The changes are very minor for such a powerful feature, all the application which wants to feed the hystrix stream to an AMQP broker is to add these dependencies expressed in maven the following way:

<dependency>
<groupId>org.springframework.cloud</groupId>
<artifactId>spring-cloud-starter-hystrix</artifactId>
</dependency>
<dependency>
<groupId>org.springframework.cloud</groupId>
<artifactId>spring-cloud-netflix-hystrix-stream</artifactId>
</dependency>
<dependency>
<groupId>org.springframework.cloud</groupId>
<artifactId>spring-cloud-starter-stream-rabbit</artifactId>
</dependency>


These dependencies would now auto-configure all the connectivity details with RabbitMQ sample topic exchange and would start feeding in the hystrix stream data into this RabbitMQ topic.

Similarly on the Turbine end all that needs to be done is to specify the appropriate dependencies:

<dependency>
<groupId>org.springframework.cloud</groupId>
<artifactId>spring-cloud-starter-turbine-stream</artifactId>
</dependency>
<dependency>
<groupId>org.springframework.cloud</groupId>
<artifactId>spring-cloud-starter-stream-rabbit</artifactId>
</dependency>

This would consume the hystrix messages from RabbitMQ and would in turn expose an aggregated stream over an http endpoint.

Using this aggregated stream a hystrix dashboard can be displayed along these lines:


The best way to try out the sample is using docker-compose and the README with the sample explains how to build the relevant docker containers and start it up using docker-compose.

Cloud Foundry Java Client - Streaming events

$
0
0
Cloud Foundry Java Client provides Java based bindings for interacting with a running Cloud Foundry instance. One of the neat things about this project is that it has embraced the Reactive Stream based API's for its method signatures, specifically using the Reactor implementation, this is especially useful when consuming streaming data.

In this post I want to demonstrate a specific use case where this library really shines - in streaming events from Cloud Foundry

Loggregator is the subsystem in Cloud Foundry responsible for aggregating all the logs produced within the system and provides ways for this information to be streamed out to external systems. The "Traffic Controller" component within Loggregator exposes a Websocket based endpoint streaming out these events, the Cloud Foundry Java client abstracts the underlying websocket client connection details and provides a neat way to consume this information.


As a pre-requisite, you will need a running instance of Cloud Foundry to try out the sample and the best way to get it working locally is to use PCF Dev.

Assuming that you have a running instance, the way to connect to this instance from code using the cf-java-client library is along the following lines:

SpringCloudFoundryClient cfClient = SpringCloudFoundryClient.builder()
.host("api.local.pcfdev.io")
.username("admin")
.password("admin")
.skipSslValidation(true)
.build();

Using this, a client to the Traffic Controller can be created the following way:

DopplerClient dopplerClient = ReactorDopplerClient.builder()
.cloudFoundryClient(cfClient)
.build();


That is essentially it, doppler client provides methods to stream the underlying events, if you are interested in all the unfiltered information(appropriately referred to as the firehose), you can do it the following way:

Flux<Event> cfEvents = this.dopplerClient.firehose(
FirehoseRequest.builder()
.subscriptionId(UUID.randomUUID().toString()).build());

The result is a Flux type from the Reactor library encapsulating the streaming data which can be observed by attaching a subscriber, say for a basic example of a subscriber simply logging the events to the console the following way:

cfEvents.subscribe(e -> LOGGER.info(e.toString()));


However the real power of Flux is in the very powerful fluent methods that it provides, so for eg if I were interested in a subset of say just the Application level logs, I would essentially want to filter down the data, extract the log from it and print the log the following way:

cfEvents
.filter(e -> LogMessage.class.isInstance(e))
.map(e -> (LogMessage)e)
.map(LogMessage::getMessage)
.subscribe(LOGGER::info);

If you want to play with this sample which as an added bonus has been Spring Boot enabled, I have it available in my github repository.

Spring-Reactive samples

$
0
0
Spring-Reactive aims to bring reactive programming support to Spring based projects and this is expected to be available for the timelines of Spring 5. My intention here is to exercise some of the very basic signatures for REST endpoints with this model.

Before I go ahead let me acknowledge that this entire sample is completely based on the samples which Sébastien Deleuze has put together here - https://github.com/sdeleuze/spring-reactive-playground

I wanted to consider three examples, first a case where existing Java 8 CompletableFuture is returned as a type, second where RxJava's Observable is returned as a type and third with Spring Reactor Core'sFlux type.

Expected Protocol

The structure of the request and response message handled by each of the three service is along these lines, all of them will take in a request which looks like this:

{
"id":1,
"delay_by": 2000,
"payload": "Hello",
"throw_exception": false
}


The delay_by will make the response to be delayed and throw_exception will make the response to error out. A sane response will be the following:

{
"id": "1",
"received": "Hello",
"payload": "Response Message"
}

I will be ignoring the exceptions for this post.

CompletableFuture as a return type


Consider a service which returns a java 8 CompletableFuture as a return type:

public CompletableFuture<MessageAcknowledgement> handleMessage(Message message) {
return CompletableFuture.supplyAsync(() -> {
Util.delay(message.getDelayBy());
return new MessageAcknowledgement(message.getId(), message.getPayload(), "data from CompletableFutureService");
}, futureExecutor);
}

The method signature of a Controller which calls this service looks like this now:

@RestController
public class CompletableFutureController {

private final CompletableFutureService aService;

@Autowired
public CompletableFutureController(CompletableFutureService aService) {
this.aService = aService;
}

@RequestMapping(path = "/handleMessageFuture", method = RequestMethod.POST)
public CompletableFuture<MessageAcknowledgement> handleMessage(@RequestBody Message message) {
return this.aService.handleMessage(message);
}

}

When the CompletableFuture completes the framework will ensure that the response is marshalled back appropriately.

Rx Java Observable as a return type

Consider a service which returns a Rx Java Observable as a return type:

public Observable<MessageAcknowledgement> handleMessage(Message message) {
logger.info("About to Acknowledge");
return Observable.just(message)
.delay(message.getDelayBy(), TimeUnit.MILLISECONDS)
.flatMap(msg -> {
if (msg.isThrowException()) {
return Observable.error(new IllegalStateException("Throwing a deliberate exception!"));
}
return Observable.just(new MessageAcknowledgement(message.getId(), message.getPayload(), "From RxJavaService"));
});
}

The controller invoking such a service can directly return the Observable as a type now and the framework will ensure that once all the items have been emitted the response is marshalled correctly.
@RestController
public class RxJavaController {

private final RxJavaService aService;

@Autowired
public RxJavaController(RxJavaService aService) {
this.aService = aService;
}

@RequestMapping(path = "/handleMessageRxJava", method = RequestMethod.POST)
public Observable<MessageAcknowledgement> handleMessage(@RequestBody Message message) {
System.out.println("Got Message..");
return this.aService.handleMessage(message);
}

}

Note that since Observable represents a stream of 0 to many items, this time around the response is a json array.


Spring Reactor Core Flux as a return type


Finally, if the response type is a Flux type, the framework ensures that the response is handled cleanly. The service is along these lines:

public Flux<messageacknowledgement> handleMessage(Message message) {
return Flux.just(message)
.delay(Duration.ofMillis(message.getDelayBy()))
.map(msg -> Tuple.of(msg, msg.isThrowException()))
.flatMap(tup -> {
if (tup.getT2()) {
return Flux.error(new IllegalStateException("Throwing a deliberate Exception!"));
}
Message msg = tup.getT1();
return Flux.just(new MessageAcknowledgement(msg.getId(), msg.getPayload(), "Response from ReactorService"));
});
}

and a controller making use of such a service:

@RestController
public class ReactorController {

private final ReactorService aService;

@Autowired
public ReactorController(ReactorService aService) {
this.aService = aService;
}

@RequestMapping(path = "/handleMessageReactor", method = RequestMethod.POST)
public Flux<MessageAcknowledgement> handleMessage(@RequestBody Message message) {
return this.aService.handleMessage(message);
}

}

Conclusion

This is just a sampling of the kind of return types that the Spring Reactive project supports, the possible return types is way more than this - here is a far more comprehensive example.

I look forward to when the reactive programming model becomes available in the core Spring framework.

The samples presented in this blog post is available at my github repository

Spring Cloud Zuul Support - Configuring Timeouts

$
0
0
Spring Cloud provides support for Netflix Zuul - a toolkit for creating edge services with routing and filtering capabilities.

Zuul Proxy support is very comprehensively documented at the Spring Cloud site. My objective here is to focus on a small set of attributes relating to handling timeouts when dealing with the proxied services.

Target Service and Gateway


To study timeouts better I have created a sample service(code available here) which takes in a configurable "delay" parameter as part of the request body and a sample request/response looks something like this:

A sample request with a 5 second delay:

{
"id": "1",
"payload": "Hello",
"delay_by": 5000,
"throw_exception": false
}


and an expected response:

{
"id": "1",
"received": "Hello",
"payload": "Hello!"
}


This service is registered with an id of "sample-svc" in Eureka, a Spring Cloud Zuul proxy on top of this service has the following configuration:

zuul:
ignoredServices: '*'
routes:
samplesvc:
path: /samplesvc/**
stripPrefix: true
serviceId: sample-svc

Essentially forward all requests to /samplesvc/ uri to a service disambiguated with the name "sample-svc" via Eureka.

I also have a UI on top of the gateway to make testing with different delay's easier:


Service Delay Tests


The Gateway behaves without any timeout related issues when a low "delay" parameter is added to the service call, however if the delay parameter is changed as low as say 1 to 1.5 seconds the gateway would time out.

The reason is that if the Gateway is set up to use Eureka, then the Gateway uses Netflix Ribbon component to make the actual call. Further, the ribbon call is wrapped within Hystrix to ensure that the call remains fault tolerant. The first timeout that we are hitting is because Hystrix has a very low delay tolerance threshold and tweaking the hystrix settings should get us past the first timeout.

hystrix:
command:
sample-svc:
execution:
isolation:
thread:
timeoutInMilliseconds: 15000

Note that the Hystrix "Command Key" used for configuration is the name of the service as registered in Eureka.

This may be a little too fine grained for this specific Zuul call, if you are okay about tweaking it across the board then configuration along these lines should do the job:

hystrix:
command:
default:
execution:
isolation:
thread:
timeoutInMilliseconds: 15000

With this change the request to the service via the gateway with a delay of upto 5 seconds will now go through without any issues. If we were to go above 5 seconds though we would get another timeout. We are now hitting Ribbons timeout setting which again can be configured in a fine grained way for the specific service call by tweaking configuration which looks like this:

sample-svc:
ribbon:
ReadTimeout: 15000


With both these timeout tweaks in place the gateway based call should now go through

Conclusion


The purpose was not to show ways of setting arbitrarily high timeout values but just to show how to set values that may be more appropriate for your applications. Sensible timeouts are very important to ensure that bad service behaviors don't cascade upto the users. One thing to note is that if the gateway is configured without Ribbon and Eureka by specifying a direct url to a service then these timeout settings are not relevant at all.

If you are interested in exploring this further, the samples are available here.

Spring Cloud Zuul - Writing a Filter

$
0
0
Netflix OSS project Zuul serves as a gateway to backend services and provides support for adding in edge features like security, routing. In the Zuul world specific edge features are provided by components called the Zuul Filter and writing such a filter for a Spring Cloud based project is very simple. A good reference to adding a filter is here. Here I wanted to demonstrate two small features - deciding whether a filter should act on a request and secondly to add a header before forwarding the request.

Writing a Zuul Filter


Writing a Zuul Filter is very easy for Spring Cloud, all we need to do is to add a Spring bean which implements the ZuulFilter, so for this example it would look something like this:

import com.netflix.zuul.ZuulFilter;
import com.netflix.zuul.context.RequestContext;
import org.springframework.stereotype.Service;


@Service
public class PayloadTraceFilter extends ZuulFilter {

private static final String HEADER="payload.trace";

@Override
public String filterType() {
return "pre";
}

@Override
public int filterOrder() {
return 999;
}

@Override
public boolean shouldFilter() {
....
}

@Override
public Object run() {
....
}
}

Some high level details of this implementation, this has been marked as a "Filter type" of "pre" which means that this filter would be called before the request is dispatched to the backend service, filterOrder determines when this specific filter is called in the chain of filters, should Filter determines if this filter is invoked at all for this request and run contains the logic for the filter.

So to my first consideration, whether this filter should act on the flow at all - this can be done on a request by request basis, my logic is very simple - if the request uri starts with /samplesvc then this filter should act on the request.

@Override
public boolean shouldFilter() {
RequestContext ctx = RequestContext.getCurrentContext();
String requestUri = ctx.getRequest().getRequestURI();
return requestUri.startsWith("/samplesvc");
}

and the second consideration on modifying the request headers to the backend service:

@Override
public Object run() {
RequestContext ctx = RequestContext.getCurrentContext();
ctx.addZuulRequestHeader("payload.trace", "true");
return null;
}

A backing service getting such a request can look for the header and act accordingly, say in this specific case looking at the "payload.trace" header and deciding to log the incoming message:

@RequestMapping(value = "/message", method = RequestMethod.POST)
public Resource<MessageAcknowledgement> pongMessage(@RequestBody Message input, @RequestHeader("payload.trace") boolean tracePayload) {
if (tracePayload) {
LOGGER.info("Received Payload: {}", input.getPayload());
}
....

Conclusion

As demonstrated here, Spring Cloud really makes it simple to add in Zuul filters for any edge needs. If you want to explore this sample a little further I have sample projects available in my github repo.
Viewing all 250 articles
Browse latest View live