Quantcast
Channel: all and sundry
Viewing all 250 articles
Browse latest View live

Spring Enable* annotation - writing a custom Enable annotation

$
0
0
Spring provides a range of annotations with names starting with Enable*, these annotations in essence enable certain Spring managed features to be activated. One good example of such an annotation is EnableWebMvc which brings in all the beans needed to support a MVC flow in Spring based applications. Another good example is the EnableAsync annotation to activate beans to support async functionality in Spring based applications.

I was curious about how such annotations work and wanted to document my understanding. The way these annotations are supported can be considered part of the SPI and so may break if the internal implementation changes in future.

Simple Enable* Annotations

One way to think about these custom annotations is that they add a set of new beans into the Spring's application context. Let us start by defining one such custom annotation:

@Retention(RetentionPolicy.RUNTIME)
@Target(ElementType.TYPE)
@interface EnableSomeBeans {}


and apply this annotation on a Spring @Configuration class:

@Configuration
@EnableSomeBeans
public static class SpringConfig {}

So now to bring in a set of beans when this annotation is applied is as simple as adding the set of beans to bring in using @Import annotation this way:

@Retention(RetentionPolicy.RUNTIME)
@Target(ElementType.TYPE)
@Import(SomeBeanConfiguration.class)
@interface EnableSomeBeans {}

That is essentially it, if this imported @Configuration class defines any beans, they would now be part of the Application context:

@Configuration
class SomeBeanConfiguration {

@Bean
public String aBean1() {
return "aBean1";
}

@Bean
public String aBean2() {
return "aBean2";
}
}

Here is a gist with a working sample.

Enable* Annotations with Selectors


Enable annotations can be far more complex though, they can activate a different family of beans based on the context around them. An example of such an annotation is EnableCaching which activates configuration based on different caching implementations available in the classpath.

Writing such Enable* annotations is a little more involved than the simpler example earlier. As before start with a custom annotation:

@Retention(RetentionPolicy.RUNTIME)
@Target(ElementType.TYPE)
@Import(SomeBeanConfigurationSelector.class)
public @interface EnableSomeBeansSelector {
String criteria() default "default";
}

Note that in this case the custom annotation has a sample field called criteria, what I want to do is to activate two different set of beans based on this criteria. This can be achieved using a @Configuration selector which can return different @Configuration file based on the context(in this instance the value of the criteria field). This selector has a simple signature and this is a sample implementation:

import org.springframework.context.annotation.ImportSelector;
import org.springframework.core.annotation.AnnotationAttributes;
import org.springframework.core.type.AnnotationMetadata;

public class SomeBeanConfigurationSelector implements ImportSelector {
@Override
public String[] selectImports(AnnotationMetadata importingClassMetadata) {
AnnotationAttributes attributes =
AnnotationAttributes.fromMap(
importingClassMetadata.getAnnotationAttributes(EnableSomeBeansSelector.class.getName(), false));
String criteria = attributes.getString("criteria");
if (criteria.equals("default")) {
return new String[]{"enableannot.selector.SomeBeanConfigurationDefault"};
}else {
return new String[]{"enableannot.selector.SomeBeanConfigurationType1"};
}
}
}

@Configuration
class SomeBeanConfigurationType1 {

@Bean
public String aBean() {
return "Type1";
}

}

@Configuration
class SomeBeanConfigurationDefault {

@Bean
public String aBean() {
return "Default";
}

}

So if the criteria field is "default", the beans in "SomeBeanConfigurationDefault" gets added in, else the one in "SomeBeanConfigurationType1"

Here is a gist with a working sample.

Conclusion

I hope this gives an appreciation for how Spring internally implements the @Enable* annotations, as an application developer you may not need to create such annotations yourself, a simpler mechanism will be to use @Configuration classes and Spring bean profiles to compose applications.

Spring-session demonstration using docker-compose

$
0
0
I have earlier written about an exciting new project called Spring-session which provides a clean way to externalize user sessions for java based web applications.

I managed to get a good demonstration set-up for spring-session using docker-compose which shows off the strengths of this project and I wanted to write about this here. In short, this is the set-up that running docker-compose will bring up:


Two instances of the application which makes use of Spring-session are started up, these instances use the same redis container for storing the session state and are in turn fronted by an nginx server.

All that needs to be done to bring up this topology is to:

  • clone my repo available here
  • install docker-compose 
  • build the app - "mvn package -DskipTests" - skipping tests as the tests depend on a local redis-server, which may or may not be available
  • run "docker-compose up" in the cloned folder
That is it, if everything has been set-up cleanly nginx should be available at http://docker-ip  url - in my mac, it is typically http://192.168.59.103

Details and Demonstration:
Docker-compose is a tool providing a means to put together a set of docker containers into a coherent stack. The stack can be defined declaratively, and the following is a sample stack used here:

nginx:
image: nginx
volumes:
- nginx:/etc/nginx:ro
links:
- shop1
- shop2
ports:
- "80:80"

shop1:
build: .
hostname: shop1
links:
- redis
ports:
- "8081:8080"

shop2:
build: .
hostname: shop2
links:
- redis
ports:
- "8082:8080"

redis:
image: redis
hostname: redis
ports:
- "6379:6379"


This application itself makes use of the user session to maintain the state of a "shopping cart", since this application is configured to use spring-session the session will be maintained in redis database. There are two instances of the application behind nginx, either one of the servers would end up getting the request, but the externalized session state would continue to work seamlessly irrespective of the application instance handling the request.

The following is the view of the shopping cart:


The session id and the details of the instance handling the request are printed at the bottom of the page.

As can be seen in the following screenshot, even if a different instance handles the request, the session state continues to be cleanly maintained.


Netflix Archaius for property management - Basics

$
0
0
Netflix Archaius provides a neat set of features to load dynamic properties into an application.

This blog post is just a documentation of the extent of Archaius that I have understood, there is much more to it than I have documented here, but this should provide a good start:

Default Behavior

Consider a simple properties file:
stringprop=propvalue
listprop=value1, value2, value3
mapprop=key1=value1, key2=value2
longprop=100

If these entries are placed in a config.properties file in the classpath, then the following test demonstrates how each of these properties can be resolved by Archaius in code:

@Test
public void testBasicStringProps() {
DynamicStringProperty sampleProp = DynamicPropertyFactory.getInstance().getStringProperty("stringprop", "");
assertThat(sampleProp.get(), equalTo("propvalue"));
}

@Test
public void testBasicListProps() {
DynamicStringListProperty listProperty = new DynamicStringListProperty("listprop", Collections.emptyList());
assertThat(listProperty.get(), contains("value1", "value2", "value3"));
}

@Test
public void testBasicMapProps() {
DynamicStringMapProperty mapProperty = new DynamicStringMapProperty("mapprop", Collections.emptyMap());
assertThat(mapProperty.getMap(), allOf(hasEntry("key1", "value1"), hasEntry("key2", "value2")));
}

@Test
public void testBasicLongProperty() {
DynamicLongProperty longProp = DynamicPropertyFactory.getInstance().getLongProperty("longprop", 1000);
assertThat(longProp.get(), equalTo(100L));
}

Loading Properties from a non-default file in classpath

So now, how do we handle a case where the content is to be loaded from a file with a different name, say newconfig.properties but still available in the classpath. The following is one way to do that:

@Before
public void setUp() throws Exception{
ConfigurationManager.loadCascadedPropertiesFromResources("newconfig");
}

With this change the previous test will just work.

Another option is to provide a system property to indicate the name of the properties file to load from the classpath:

System.setProperty("archaius.configurationSource.defaultFileName", "newconfig.properties");

Overriding for environments


Now, how do we override the properties for different application environments - Archaius provides a neat feature where a base property file can be loaded up but then overridden based on the context. More details are here. To demonstrate this consider two files, one containing the defaults and one containing overrides for a "test" environment:

sample.properties
sampleprop=propvalue
@next=sample-${@environment}.properties

sample-test.properties
sampleprop=propvalue-test

See the notation at the end of the default file @next=sample-${@environment}.properties, it is a way to indicate to Archaius that more properties need to be loaded up based on the resolved @environment parameter. This parameter can be injected in a couple of ways and the following test demonstrates this:

@Before
public void setUp() throws Exception{
ConfigurationManager.getConfigInstance().setProperty("@environment", "test");
ConfigurationManager.loadCascadedPropertiesFromResources("sample");
}

@Test
public void testBasicStringPropsInTestEnvironment() throws Exception {
DynamicStringProperty sampleProp = DynamicPropertyFactory.getInstance().getStringProperty("sampleprop", "");
assertThat(sampleProp.get(), equalTo("propvalue-test"));
}

The base property file itself now has to be loaded in through a call to ConfigurationManager.loadCascadedPropertiesFromResources..

Conclusion

These are essentially the basics of Netflix Archaius, there is much more to it of course which can be gleaned from the wiki on the Archaius github site. If you are interested in exploring the samples shown here a little more, they are available in this github project

Docker on Mac OSX with docker-machine and VMWare fusion

$
0
0
If you use Cisco Anyconnect VPN on your Mac OSX machine you would have found your experience with docker using boot2docker not working at times. The basic issue is that the Cisco Anyconnect VPN rewrites the routing rules which map the boot2docker Virtual box network interfaces.

The fix that has worked better for me in the last few days has been to not use boot2docker, but instead to use docker-machine to create a VMWare fusion based docker VM.

So to try out this approach first ensure that you have VMWare Fusion installed. Then install docker and docker-machine. Docker and docker-machine command line can be installed using homebrew:

brew install docker
brew install docker-machine

Once the VMWare fusion, docker and docker-machine are in place, then use docker-machine to create a docker host using VMWare fusion this way:

docker-machine create -d vmwarefusion --vmwarefusion-boot2docker-url https://github.com/cloudnativeapps/boot2docker/releases/download/v1.6.0-vmw/boot2docker-1.6.0-vmw.iso fusion                       

Here I have explicitly specified the url of the VM image that has fixes for a couple of issues identified in the image that is normally installed by default.

Once the Host is properly created, verify that it is in a running state using docker-machine:

docker-machine ls

That is essentially it, to use this shiny new docker host ensure that the appropriate environment variables are set in the shell:

eval "$(docker-machine env fusion)"

and your docker commands should work with or without VPN connectivity:

docker ps -a

Akka samples with scala and Spring

$
0
0
I was looking around recently for Akka samples with Spring and found a starter project which appeared to fit the bill well. The project however utilizes Spring-Scala which is an excellent project, but is no longer maintained. So I wanted to update the sample to use core Spring java libraries instead. So here is an attempt on a fork of this starter project with core Spring instead of Spring-scala. The code is available here.

The project utilizes Akka extensions to hook in Spring based dependency injection into Akka.

Here is what the extension looks like:

package sample

import akka.actor.{ActorSystem, Props, Extension}
import org.springframework.context.ApplicationContext
/**
* The Extension implementation.
*/
class SpringExtension extends Extension {
var applicationContext: ApplicationContext = _

/**
* Used to initialize the Spring application context for the extension.
* @param applicationContext
*/
def initialize(applicationContext: ApplicationContext) = {
this.applicationContext = applicationContext
this
}

/**
* Create a Props for the specified actorBeanName using the
* SpringActorProducer class.
*
* @param actorBeanName The name of the actor bean to create Props for
* @return a Props that will create the named actor bean using Spring
*/
def props(actorBeanName: String): Props =
Props(classOf[SpringActorProducer], applicationContext, actorBeanName)

}

object SpringExtension {
def apply(system : ActorSystem )(implicit ctx: ApplicationContext) : SpringExtension = SpringExt(system).initialize(ctx)
}

So the extension wraps around a Spring application context. The extensions provides a props method which returns an Akka Props configuration object which uses the application context and the name which the actor is registered with Spring to return an instance of the Actor. The following is the SpringActorProducer:

package sample

import akka.actor.{Actor, IndirectActorProducer}
import org.springframework.context.ApplicationContext


class SpringActorProducer(ctx: ApplicationContext, actorBeanName: String) extends IndirectActorProducer {

override def produce: Actor = ctx.getBean(actorBeanName, classOf[Actor])

override def actorClass: Class[_ <: Actor] =
ctx.getType(actorBeanName).asInstanceOf[Class[Actor]]

}

Given this base code, how does Spring find the actors, I have used scanning annotations to annotate the actors this way:

package sample.actor

import akka.actor.Actor
import sample.service.CountingService
import sample.SpringExtension._
import org.springframework.stereotype.Component
import org.springframework.beans.factory.annotation.Autowired
import org.springframework.context.annotation.Scope
import akka.actor.ActorRef
import sample.SpringExtension
import org.springframework.context.ApplicationContext

@Component("countingCoordinatingActor")
@Scope("prototype")
class CountingCoordinating @Autowired() (implicit ctx: ApplicationContext) extends Actor {

import sample.messages._

var counter: Option[ActorRef] = None


def receive = {
case COUNT => countingActor() ! COUNT
case g:GET => countingActor() ! g
}

private def countingActor(): ActorRef = {
if (counter.isEmpty) {
val countingActorProp = SpringExtension(context.system).props("countingActor")
counter = Some(context.actorOf(countingActorProp, "counter"))
}

counter.get
}

}


@Component("countingActor")
@Scope("prototype")
class CountingActor @Autowired()(countingService: CountingService) extends Actor {

import sample.messages._

private var count = 0

def receive = {
case COUNT => count = countingService.increment(count)
case GET(requester: ActorRef) => requester ! RESULT(count)
}

}

The CountingService is a simple service that gets injected in by Spring. The following is the main Spring Application configuration where all the wiring takes place:

import akka.actor.ActorSystem
import org.springframework.context.ApplicationContext
import org.springframework.context.annotation.Configuration
import org.springframework.context.annotation.Bean
import org.springframework.beans.factory.annotation.Autowired
import org.springframework.context.annotation.ComponentScan

@Configuration
@ComponentScan(Array("sample.service", "sample.actor"))
class AppConfiguration {

@Autowired
implicit var ctx: ApplicationContext = _;

/**
* Actor system singleton for this application.
*/
@Bean
def actorSystem() = {
val system = ActorSystem("AkkaScalaSpring")
// initialize the application context in the Akka Spring Extension
SpringExt(system)
system
}
}

To make use of this entire set-up in a sample program:

import akka.actor.{ActorRef, ActorSystem}
import sample.SpringExtension._
import scala.concurrent.duration._
import scala.concurrent._
import scala.util._
import sample.messages._
import org.springframework.context.annotation.AnnotationConfigApplicationContext
import akka.actor.Inbox


object Main extends App {
// create a spring context
implicit val ctx = new AnnotationConfigApplicationContext(classOf[AppConfiguration])

import Config._

// get hold of the actor system
val system = ctx.getBean(classOf[ActorSystem])

val inbox = Inbox.create(system)

val prop = SpringExtension(system).props("countingCoordinatingActor")

// use the Spring Extension to create props for a named actor bean
val countingCoordinator = system.actorOf(prop, "counter")

// tell it to count three times
inbox.send(countingCoordinator, COUNT)

inbox.send(countingCoordinator, GET(inbox.getRef()))

val RESULT(count) = inbox.receive(5.seconds)

println(s"Got $count")
system.shutdown
system.awaitTermination
}

References:

Rx-netty and Karyon2 based cloud ready microservice

$
0
0
Netflix Karyon provides a clean framework for creating cloud-ready micro-services. In your organization if you use the Netflix OSS stack consisting of Eureka for service registration and discovery, Archaius for property management, then very likely you use Karyon to create your microservices.

Karyon has been undergoing quite a lot of changes recently and my objective here is to document a good sample using the newer version of Karyon. The old Karyon(call it Karyon1) was based on JAX-RS 1.0 Specs with Jersey as the implementation, the newer version of Karyon(Karyon2) still supports Jersey but also encourages the use of RX-Netty which is a customized version of Netty with support for Rx-java.

With that said, let me jump into a sample. My objective with this sample is to create a "pong" micro-service which takes a "POST"ed "message" and returns an "Acknowledgement"

The following is a sample request:

{
"id": "id",
"payload":"Ping"
}

And an expected response:

{"id":"id","received":"Ping","payload":"Pong"}


The first step is to create a RequestHandler which as the name suggests is an RX-Netty component dealing with routing the incoming request:

package org.bk.samplepong.app;

import com.fasterxml.jackson.databind.ObjectMapper;
import io.netty.buffer.ByteBuf;
import io.netty.handler.codec.http.HttpMethod;
import io.netty.handler.codec.http.HttpResponseStatus;
import io.reactivex.netty.protocol.http.server.HttpServerRequest;
import io.reactivex.netty.protocol.http.server.HttpServerResponse;
import io.reactivex.netty.protocol.http.server.RequestHandler;
import netflix.karyon.transport.http.health.HealthCheckEndpoint;
import org.bk.samplepong.domain.Message;
import org.bk.samplepong.domain.MessageAcknowledgement;
import rx.Observable;

import java.io.IOException;
import java.nio.charset.Charset;


public class RxNettyHandler implements RequestHandler<ByteBuf, ByteBuf> {

private final String healthCheckUri;
private final HealthCheckEndpoint healthCheckEndpoint;
private final ObjectMapper objectMapper = new ObjectMapper();

public RxNettyHandler(String healthCheckUri, HealthCheckEndpoint healthCheckEndpoint) {
this.healthCheckUri = healthCheckUri;
this.healthCheckEndpoint = healthCheckEndpoint;
}

@Override
public Observable<Void> handle(HttpServerRequest<ByteBuf> request, HttpServerResponse<ByteBuf> response) {
if (request.getUri().startsWith(healthCheckUri)) {
return healthCheckEndpoint.handle(request, response);
} else if (request.getUri().startsWith("/message") && request.getHttpMethod().equals(HttpMethod.POST)) {
return request.getContent().map(byteBuf -> byteBuf.toString(Charset.forName("UTF-8")))
.map(s -> {
try {
Message m = objectMapper.readValue(s, Message.class);
return m;
} catch (IOException e) {
throw new RuntimeException(e);
}
})
.map(m -> new MessageAcknowledgement(m.getId(), m.getPayload(), "Pong"))
.flatMap(ack -> {
try {
return response.writeStringAndFlush(objectMapper.writeValueAsString(ack));
} catch (Exception e) {
response.setStatus(HttpResponseStatus.BAD_REQUEST);
return response.close();
}
}
);
} else {
response.setStatus(HttpResponseStatus.NOT_FOUND);
return response.close();
}
}
}

This flow is completely asynchronous and internally managed by the RX-java libraries, Java 8 Lambda expressions also help in making the code concise. The one issue that you would see here is that the routing logic(which uri to which controller) is mixed up with the actual controller logic and I believe this is being addressed.

Given this RequestHandler, a server can be started up in a standalone java program, using raw RX-Netty this way, this is essentially it, an endpoint will be brought up at port 8080 to handle the requests:

public final class RxNettyExample {

public static void main(String... args) throws Exception {
final ObjectMapper objectMapper = new ObjectMapper();
RxNettyHandler handler = new RxNettyHandler();

HttpServer<ByteBuf, ByteBuf> server = RxNetty.createHttpServer(8080, handler);

server.start();


This is however the native Rx-netty way, for a cloud-ready micro-service a few things have to happen, the service should register with Eureka and should respond to the healthchecks back from Eureka and should be able to load up properties using Archaius.

So with Karyon2, the startup in a main program looks a little different:

package org.bk.samplepong.app;

import netflix.adminresources.resources.KaryonWebAdminModule;
import netflix.karyon.Karyon;
import netflix.karyon.KaryonBootstrapModule;
import netflix.karyon.ShutdownModule;
import netflix.karyon.archaius.ArchaiusBootstrapModule;
import netflix.karyon.eureka.KaryonEurekaModule;
import netflix.karyon.servo.KaryonServoModule;
import netflix.karyon.transport.http.health.HealthCheckEndpoint;
import org.bk.samplepong.resource.HealthCheck;

public class SamplePongApp {

public static void main(String[] args) {
HealthCheck healthCheckHandler = new HealthCheck();
Karyon.forRequestHandler(8888,
new RxNettyHandler("/healthcheck",
new HealthCheckEndpoint(healthCheckHandler)),
new KaryonBootstrapModule(healthCheckHandler),
new ArchaiusBootstrapModule("sample-pong"),
KaryonEurekaModule.asBootstrapModule(),
Karyon.toBootstrapModule(KaryonWebAdminModule.class),
ShutdownModule.asBootstrapModule(),
KaryonServoModule.asBootstrapModule()
).startAndWaitTillShutdown();
}
}

Now it is essentially cloud ready, this version of the program on startup would register cleanly with Eureka and expose a healthcheck endpoint. It additionally exposes a neat set of admin endpoints at port 8077.


Conclusion

I hope this provides a good intro on using Karyon2 to develop Netflix OSS based. The entire sample is available at my github repo here: https://github.com/bijukunjummen/sample-ping-pong-netflixoss/tree/master/sample-pong. As a follow up I will show how the same service can be developed using spring-cloud which is the Spring way to create Micro-services.

Learning Spring-Cloud - Infrastructure and Configuration

$
0
0
I got a chance to play with Spring-Cloud to create a sample set of cloud ready microservices and I am very impressed by how Spring-Cloud enables different infrastructure components and services to work together nicely.

I am used to creating microservices based on Netflix OSS based stack and typically in a Netflix stack Eureka is considered the hub using which the microservices register themselves and discover each other. In the spirit of this model, I wanted to try out a series of services which look like this:


There are 2 microservices here:


  • A sample-pong service which responds to "ping" messages
  • A sample-ping service which uses the "pong" micro-service


And there are two infrastructure components:

  • Sample-config which provides a centralized configuration for the 2 microservices
  • Eureka which is the central hub providing a way for the services to register themselves and discover other services

So to start with, here I will introduce how I went about using spring-cloud to develop the two infrastructure components and follow it up with how the microservices can be developed to use these components.
The entire project is available at my github location.


Eureka

Spring-cloud makes it very simple to bring up an instance of Eureka, all that is required is a class along the following lines:

package org.bk.eureka;

import org.springframework.boot.SpringApplication;
import org.springframework.boot.autoconfigure.SpringBootApplication;
import org.springframework.cloud.netflix.eureka.server.EnableEurekaServer;

@SpringBootApplication
@EnableEurekaServer
public class EurekaApplication {

public static void main(String[] args) {
SpringApplication.run(EurekaApplication.class, args);
}
}

Multiple instances of Eureka can be started up and can be configured to work together in a resilient way, here though I just want a demo standalone Eureka instance and this can be done using a configuration which looks like this, essentially starting up eureka on port 8761 and in a standalone mode by not trying to look for peers:

---
# application.yml
server:
port: 8761

eureka:
instance:
hostname: localhost
client:
registerWithEureka: false
fetchRegistry: false


Configuration Server

Spring-Cloud provides a centralized configuration server that microservices can use for loading up their properties. Typically microservices may want to go one of two ways:


  1. Use Eureka as a hub and find the configuration services
  2. Use Configuration services and find Eureka

I personally prefer the Eureka first approach, in this sample Configuration server registers itself with Eureka and when microservices come up they first check with Eureka, find the Configuration service and use the service to load up their properties.

The configuration server is simple to write using Spring-cloud too, the following is all the code that is required:

package org.bk.configserver;

import org.springframework.boot.SpringApplication;
import org.springframework.boot.autoconfigure.SpringBootApplication;
import org.springframework.cloud.config.server.EnableConfigServer;
import org.springframework.cloud.netflix.eureka.EnableEurekaClient;

@SpringBootApplication
@EnableConfigServer
@EnableEurekaClient
public class ConfigServerApplication {

public static void main(String[] args) {
SpringApplication.run(ConfigServerApplication.class, args);
}
}

and the configuration that registers this service with Eureka:

---
# bootstrap.yml
spring:
application:
name: sample-config
profiles:
active: native

eureka:
instance:
nonSecurePort: ${server.port:8888}
client:
serviceUrl:
defaultZone: http://${eureka.host:localhost}:${eureka.port:8761}/eureka/


---
# application.yml
spring:
cloud:
config:
server:
native:
searchLocations: classpath:/config

server:
port: 8888

The configuration server is being started at port 8888, and provides configuration from the classpath. In a real application, the configuration can be set to load from a central git repository, this way providing a clean way to version properties and the ability to centrally manage the properties. In this specific case, since it provides properties for two microservices, there are two sets of files in the classpath and provide appropriate properties to the calling application:

---
#sample-pong.yml
reply:
message: Pong

---
# sample-ping.yml
send:
message: Ping


Starting up Eureka and Configuration Server

Since both these applications are Spring-boot based, they can each be started up by running the following command:

mvn spring-boot:run

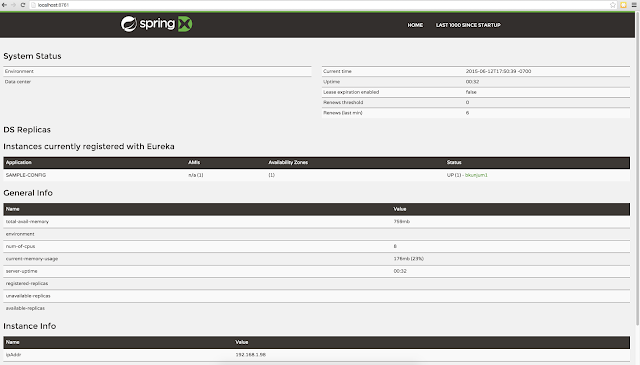
Once Eureka and Configuration server come up cleanly., Eureka provides a nice interface with details of the services registered with it, in this case the Configuration server shows up with a name of "SAMPLE-CONFIG":


The config server provides properties to the calling applications through endpoints with the pattern:
/{application}/{profile}[/{label}]

So to retrieve the properties for "sample-pong" application, the following url is used internally by the application:

http://localhost:8888/sample-pong/default

and for the "sample-ping" application the properties can be derived from http://localhost:8888/sample-ping/default


This concludes the details around bringing up the Infrastructure components of a Cloud ready system.  I will follow it up with how the microservices can be developed that make use of these infrastructure components. The code behind these samples are available at my github repository.

Rx-java subscribeOn and observeOn

$
0
0
If you have been confused by Rx-java Observable subscribeOn and observeOn, one of the blog articles that helped me understand these operations is this one by Graham Lea. I wanted to recreate a very small part of the article here, so consider a service which emits values every 200 millseconds:


package obs.threads;

import obs.Util;
import org.slf4j.Logger;
import org.slf4j.LoggerFactory;
import rx.Observable;

public class GeneralService {
private static final Logger logger = LoggerFactory.getLogger(GeneralService.class);
public Observable<String> getData() {
return Observable.<String>create(s -> {
logger.info("Start: Executing a Service");
for (int i = 1; i <= 3; i++) {
Util.delay(200);
logger.info("Emitting {}", "root " + i);
s.onNext("root " + i);
}
logger.info("End: Executing a Service");
s.onCompleted();
});
}
}

Now, if I were to subscribe to this service, this way:

@Test
public void testThreadedObservable1() throws Exception {
Observable<String> ob1 = aService.getData();

CountDownLatch latch = new CountDownLatch(1);

ob1.subscribe(s -> {
Util.delay(500);
logger.info("Got {}", s);
}, e -> logger.error(e.getMessage(), e), () -> latch.countDown());

latch.await();
}

All of the emissions and subscriptions will act on the main thread and something along the following lines will be printed:

20:53:29.380 [main] INFO  o.t.GeneralService - Start: Executing a Service
20:53:29.587 [main] INFO o.t.GeneralService - Emitting root 1
20:53:30.093 [main] INFO o.t.ThreadedObsTest - Got root 1
20:53:30.298 [main] INFO o.t.GeneralService - Emitting root 2
20:53:30.800 [main] INFO o.t.ThreadedObsTest - Got root 2
20:53:31.002 [main] INFO o.t.GeneralService - Emitting root 3
20:53:31.507 [main] INFO o.t.ThreadedObsTest - Got root 3
20:53:31.507 [main] INFO o.t.GeneralService - End: Executing a Service

By default the emissions are not asynchronous in nature. So now, what is the behavior if subscribeOn is used:

public class ThreadedObsTest {
private GeneralService aService = new GeneralService();

private static final Logger logger = LoggerFactory.getLogger(ThreadedObsTest.class);
private ExecutorService executor1 = Executors.newFixedThreadPool(5, new ThreadFactoryBuilder().setNameFormat("SubscribeOn-%d").build());

@Test
public void testSubscribeOn() throws Exception {
Observable<String> ob1 = aService.getData();

CountDownLatch latch = new CountDownLatch(1);

ob1.subscribeOn(Schedulers.from(executor1)).subscribe(s -> {
Util.delay(500);
logger.info("Got {}", s);
}, e -> logger.error(e.getMessage(), e), () -> latch.countDown());

latch.await();
}
}

Here I am using Guava's ThreadFactoryBuilder to give each thread in the threadpool a unique name pattern, if I were to execute this code, the output will be along these lines:

20:56:47.117 [SubscribeOn-0] INFO  o.t.GeneralService - Start: Executing a Service
20:56:47.322 [SubscribeOn-0] INFO o.t.GeneralService - Emitting root 1
20:56:47.828 [SubscribeOn-0] INFO o.t.ThreadedObsTest - Got root 1
20:56:48.032 [SubscribeOn-0] INFO o.t.GeneralService - Emitting root 2
20:56:48.535 [SubscribeOn-0] INFO o.t.ThreadedObsTest - Got root 2
20:56:48.740 [SubscribeOn-0] INFO o.t.GeneralService - Emitting root 3
20:56:49.245 [SubscribeOn-0] INFO o.t.ThreadedObsTest - Got root 3
20:56:49.245 [SubscribeOn-0] INFO o.t.GeneralService - End: Executing a Service

Now, the execution has moved away from the main thread and the emissions and the subscriptions are being processed in the threads borrowed from the threadpool.

And what happens if observeOn is used:
public class ThreadedObsTest {
private GeneralService aService = new GeneralService();

private static final Logger logger = LoggerFactory.getLogger(ThreadedObsTest.class);
private ExecutorService executor1 = Executors.newFixedThreadPool(5, new ThreadFactoryBuilder().setNameFormat("SubscribeOn-%d").build());

@Test
public void testObserveOn() throws Exception {
Observable<String> ob1 = aService.getData();

CountDownLatch latch = new CountDownLatch(1);

ob1.observeOn(Schedulers.from(executor2)).subscribe(s -> {
Util.delay(500);
logger.info("Got {}", s);
}, e -> logger.error(e.getMessage(), e), () -> latch.countDown());

latch.await();
}
}

the output is along these lines:

21:03:08.655 [main] INFO  o.t.GeneralService - Start: Executing a Service
21:03:08.860 [main] INFO o.t.GeneralService - Emitting root 1
21:03:09.067 [main] INFO o.t.GeneralService - Emitting root 2
21:03:09.268 [main] INFO o.t.GeneralService - Emitting root 3
21:03:09.269 [main] INFO o.t.GeneralService - End: Executing a Service
21:03:09.366 [ObserveOn-1] INFO o.t.ThreadedObsTest - Got root 1
21:03:09.872 [ObserveOn-1] INFO o.t.ThreadedObsTest - Got root 2
21:03:10.376 [ObserveOn-1] INFO o.t.ThreadedObsTest - Got root 3

The emissions are now back on the main thread but the subscriptions are being processed in a threadpool.

That is the difference, when subscribeOn is used the emissions are performed on the specified Scheduler, when observeOn is used the subscriptions are performed are on the specified scheduler!

And the output when both are specified is equally predictable. Now in all cases I had created a Scheduler using a ThreadPool with 5 threads but only 1 of the threads has really been used both for emitting values and for processing subscriptions, this is actually the normal behavior of Observables. If you want to make more efficient use of the Threadpool, one approach may be to create multiple Observable's, say for eg, if I have a service which returns pages of data this way:

public Observable<Integer> getPages(int totalPages) {
return Observable.create(new Observable.OnSubscribe<Integer>() {
@Override
public void call(Subscriber<? super Integer> subscriber) {
logger.info("Getting pages");
for (int i = 1; i <= totalPages; i++) {
subscriber.onNext(i);
}
subscriber.onCompleted();
}
});
}

and another service which acts on each page of the data:

public Observable<String> actOnAPage(int pageNum) {
return Observable.<String>create(s -> {
Util.delay(200);
logger.info("Acting on page {}", pageNum);
s.onNext("Page " + pageNum);
s.onCompleted();
});
}

a way to use a Threadpool to process each page of data would be to chain it this way:

getPages(5).flatMap(  page -> aService.actOnAPage(page).subscribeOn(Schedulers.from(executor1)) )
.subscribe(s -> {
logger.info("Completed Processing page: {}", s);
});

see how the subscribeOn is on the each Observable acting on a page. With this change, the output would look like this:

21:15:45.572 [main] INFO  o.t.ThreadedObsTest - Getting pages
21:15:45.787 [SubscribeOn-1] INFO o.t.GeneralService - Acting on page 2
21:15:45.787 [SubscribeOn-0] INFO o.t.GeneralService - Acting on page 1
21:15:45.787 [SubscribeOn-4] INFO o.t.GeneralService - Acting on page 5
21:15:45.787 [SubscribeOn-3] INFO o.t.GeneralService - Acting on page 4
21:15:45.787 [SubscribeOn-2] INFO o.t.GeneralService - Acting on page 3
21:15:45.789 [SubscribeOn-1] INFO o.t.ThreadedObsTest - Completed Processing page: Page 2
21:15:45.790 [SubscribeOn-1] INFO o.t.ThreadedObsTest - Completed Processing page: Page 1
21:15:45.790 [SubscribeOn-1] INFO o.t.ThreadedObsTest - Completed Processing page: Page 3
21:15:45.790 [SubscribeOn-1] INFO o.t.ThreadedObsTest - Completed Processing page: Page 4
21:15:45.791 [SubscribeOn-1] INFO o.t.ThreadedObsTest - Completed Processing page: Page 5

Now the threads in the threadpool are being used uniformly.

Learning Spring-Cloud - Writing a microservice

$
0
0
Continuing my Spring-Cloud learning journey, earlier I had covered how to write the infrastructure components of a typical Spring-Cloud and Netflix OSS based micro-services environment - in this specific instance two critical components, Eureka to register and discover services and Spring Cloud Configuration to maintain a centralized repository of configuration for a service. Here I will be showing how I developed two dummy micro-services, one a simple "pong" service and a "ping" service which uses the "pong" service.


Sample-Pong microservice


The endpoint handling the "ping" requests is a typical Spring MVC based endpoint:

@RestController
public class PongController {

@Value("${reply.message}")
private String message;

@RequestMapping(value = "/message", method = RequestMethod.POST)
public Resource<MessageAcknowledgement> pongMessage(@RequestBody Message input) {
return new Resource<>(
new MessageAcknowledgement(input.getId(), input.getPayload(), message));
}

}

It gets a message and responds with an acknowledgement. Here the service utilizes the Configuration server in sourcing the "reply.message" property. So how does the "pong" service find the configuration server, there are potentially two ways - directly by specifying the location of the configuration server, or by finding the Configuration server via Eureka. I am used to an approach where Eureka is considered a source of truth, so in this spirit I am using Eureka to find the Configuration server. Spring Cloud makes this entire flow very simple, all it requires is a "bootstrap.yml" property file with entries along these lines:

---
spring:
application:
name: sample-pong
cloud:
config:
discovery:
enabled: true
serviceId: SAMPLE-CONFIG

eureka:
instance:
nonSecurePort: ${server.port:8082}
client:
serviceUrl:
defaultZone: http://${eureka.host:localhost}:${eureka.port:8761}/eureka/

The location of Eureka is specified through the "eureka.client.serviceUrl" property and the "spring.cloud.config.discovery.enabled" is set to "true" to specify that the configuration server is discovered via the specified Eureka server.

Just a note, this means that the Eureka and the Configuration server have to be completely up before trying to bring up the actual services, they are the pre-requisites and the underlying assumption is that the Infrastructure components are available at the application boot time.

The Configuration server has the properties for the "sample-pong" service, this can be validated by using the Config-servers endpoint - http://localhost:8888/sample-pong/default, 8888 is the port where I had specified for the server endpoint, and should respond with a content along these lines:

"name": "sample-pong",
"profiles": [
"default"
],
"label": "master",
"propertySources": [
{
"name": "classpath:/config/sample-pong.yml",
"source": {
"reply.message": "Pong"
}
}
]
}

As can be seen the "reply.message" property from this central configuration server will be used by the pong service as the acknowledgement message

Now to set up this endpoint as a service, all that is required is a Spring-boot based entry point along these lines:

@SpringBootApplication
@EnableDiscoveryClient
public class PongApplication {
public static void main(String[] args) {
SpringApplication.run(PongApplication.class, args);
}
}

and that completes the code for the "pong" service.


Sample-ping micro-service


So now onto a consumer of the "pong" micro-service, very imaginatively named the "ping" micro-service. Spring-Cloud and Netflix OSS offer a lot of options to invoke endpoints on Eureka registered services, to summarize the options that I had:

1. Use raw Eureka DiscoveryClient to find the instances hosting a service and make calls using Spring's RestTemplate.

2. Use Ribbon, a client side load balancing solution which can use Eureka to find service instances

3. Use Feign, which provides a declarative way to invoke a service call. It internally uses Ribbon.

I went with Feign. All that is required is an interface which shows the contract to invoke the service:

package org.bk.consumer.feign;

import org.bk.consumer.domain.Message;
import org.bk.consumer.domain.MessageAcknowledgement;
import org.springframework.cloud.netflix.feign.FeignClient;
import org.springframework.http.MediaType;
import org.springframework.web.bind.annotation.RequestBody;
import org.springframework.web.bind.annotation.RequestMapping;
import org.springframework.web.bind.annotation.RequestMethod;
import org.springframework.web.bind.annotation.ResponseBody;

@FeignClient("samplepong")
public interface PongClient {

@RequestMapping(method = RequestMethod.POST, value = "/message",
produces = MediaType.APPLICATION_JSON_VALUE, consumes = MediaType.APPLICATION_JSON_VALUE)
@ResponseBody
MessageAcknowledgement sendMessage(@RequestBody Message message);
}

The annotation @FeignClient("samplepong") internally points to a Ribbon "named" client called "samplepong". This means that there has to be an entry in the property files for this named client, in my case I have these entries in my application.yml file:

samplepong:
ribbon:
DeploymentContextBasedVipAddresses: sample-pong
NIWSServerListClassName: com.netflix.niws.loadbalancer.DiscoveryEnabledNIWSServerList
ReadTimeout: 5000
MaxAutoRetries: 2

The most important entry here is the "samplepong.ribbon.DeploymentContextBasedVipAddresses" which points to the "pong" services Eureka registration address using which the service instance will be discovered by Ribbon.

The rest of the application is a routine Spring Boot application. I have exposed this service call behind Hystrix which guards against service call failures and essentially wraps around this FeignClient:

package org.bk.consumer.service;

import com.netflix.hystrix.contrib.javanica.annotation.HystrixCommand;
import org.bk.consumer.domain.Message;
import org.bk.consumer.domain.MessageAcknowledgement;
import org.bk.consumer.feign.PongClient;
import org.springframework.beans.factory.annotation.Autowired;
import org.springframework.beans.factory.annotation.Qualifier;
import org.springframework.stereotype.Service;

@Service("hystrixPongClient")
public class HystrixWrappedPongClient implements PongClient {

@Autowired
@Qualifier("pongClient")
private PongClient feignPongClient;

@Override
@HystrixCommand(fallbackMethod = "fallBackCall")
public MessageAcknowledgement sendMessage(Message message) {
return this.feignPongClient.sendMessage(message);
}

public MessageAcknowledgement fallBackCall(Message message) {
MessageAcknowledgement fallback = new MessageAcknowledgement(message.getId(), message.getPayload(), "FAILED SERVICE CALL! - FALLING BACK");
return fallback;
}
}


"Boot"ing up


I have dockerized my entire set-up, so the simplest way to start up the set of applications is to first build the docker images for all of the artifacts this way:

mvn clean package docker:build -DskipTests

and bring all of them up using the following command, the assumption being that both docker and docker-compose are available locally:

docker-compose up

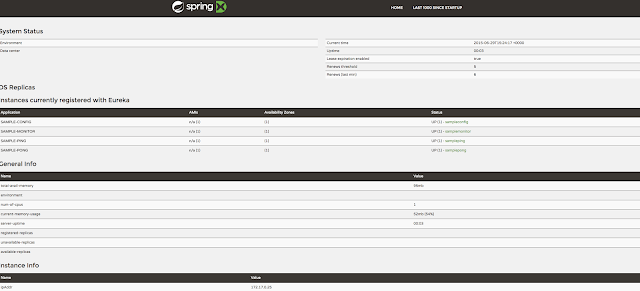
Assuming everything comes up cleanly, Eureka should show all the registered services, at http://dockerhost:8761 url -


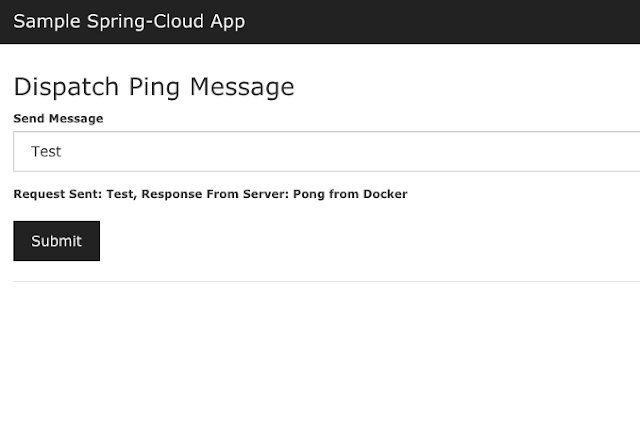
The UI of the ping application should be available at http://dockerhost:8080 url -


Additionally a Hystrix dashboard should be available to monitor the requests to the "pong" app at this url http://dockerhost:8989/hystrix/monitor?stream=http%3A%2F%2Fsampleping%3A8080%2Fhystrix.stream:


References


1. The code is available at my github location - https://github.com/bijukunjummen/spring-cloud-ping-pong-sample

2. Most of the code is heavily borrowed from the spring-cloud-samples repository - https://github.com/spring-cloud-samples

Rx-netty and Karyon2 based cloud ready microservice - Dependency Injection

$
0
0
I had previously written about using Rx-netty and Karyon2 for developing cloud ready microservices, there were a few issues with the sample though, partly reproduced here:

package org.bk.samplepong.app;

.....

public class RxNettyHandler implements RequestHandler<ByteBuf, ByteBuf> {

private final String healthCheckUri;
private final HealthCheckEndpoint healthCheckEndpoint;
private final ObjectMapper objectMapper = new ObjectMapper();

public RxNettyHandler(String healthCheckUri, HealthCheckEndpoint healthCheckEndpoint) {
this.healthCheckUri = healthCheckUri;
this.healthCheckEndpoint = healthCheckEndpoint;
}

@Override
public Observable<Void> handle(HttpServerRequest<ByteBuf> request, HttpServerResponse<ByteBuf> response) {
if (request.getUri().startsWith(healthCheckUri)) {
return healthCheckEndpoint.handle(request, response);
} else if (request.getUri().startsWith("/message") && request.getHttpMethod().equals(HttpMethod.POST)) {
return request.getContent().map(byteBuf -> byteBuf.toString(Charset.forName("UTF-8")))
.map(s -> {
try {
Message m = objectMapper.readValue(s, Message.class);
return m;
} catch (IOException e) {
throw new RuntimeException(e);
}
})
.map(m -> new MessageAcknowledgement(m.getId(), m.getPayload(), "Pong"))
.flatMap(ack -> {
try {
return response.writeStringAndFlush(objectMapper.writeValueAsString(ack));
} catch (Exception e) {
response.setStatus(HttpResponseStatus.BAD_REQUEST);
return response.close();
}
}
);
} else {
response.setStatus(HttpResponseStatus.NOT_FOUND);
return response.close();
}
}
}

The issues are:

  1. The routing logic is not centralized, the request handler has both the routing logic and the processing logic
  2. The dependencies are not injected in cleanly.


Looking at the Karyon2 samples, both of these issues are actually very cleanly addressed now which I wanted to document here.

Routing

Routing can be centralized using a custom Rx-netty RequestHandler called the SimpleUriRouter
The routes can be registered the following way using SimpleRouter which is being created here using a Guice Provider:

import com.google.inject.Inject;
import com.google.inject.Provider;
import io.netty.buffer.ByteBuf;
import netflix.karyon.health.HealthCheckHandler;
import netflix.karyon.transport.http.SimpleUriRouter;
import netflix.karyon.transport.http.health.HealthCheckEndpoint;
import org.bk.samplepong.app.ApplicationMessageHandler;
import org.bk.samplepong.common.health.HealthCheck;

public class AppRouteProvider implements Provider<SimpleUriRouter<ByteBuf, ByteBuf>> {

@Inject
private HealthCheck healthCheck;

@Inject
private ApplicationMessageHandler applicationMessageHandler;

@Override
public SimpleUriRouter get() {
SimpleUriRouter simpleUriRouter = new SimpleUriRouter();
simpleUriRouter.addUri("/healthcheck", new HealthCheckEndpoint(healthCheck));
simpleUriRouter.addUri("/message", applicationMessageHandler);
return simpleUriRouter;
}
}

This router can now be registered via a custom guice module the following way:

public class KaryonAppModule extends KaryonHttpModule<ByteBuf, ByteBuf> {

public KaryonAppModule() {
super("routerModule", ByteBuf.class, ByteBuf.class);
}

@Override
protected void configureServer() {
bindRouter().toProvider(new AppRouteProvider());

interceptorSupport().forUri("/*").intercept(LoggingInterceptor.class);

server().port(8888);
}
}

This is essentially it, now the routing logic is cleanly separated from the processing logic.

Dependency Injection


Dependency injection is handled via custom guice modules. I have a service, call it the MessageHandlerService, which takes in a message and returns an Acknowledgement, this service is defined as follows:

public class MessageHandlerServiceImpl implements MessageHandlerService {
private static final Logger logger = LoggerFactory.getLogger(MessageHandlerServiceImpl.class);

public Observable<MessageAcknowledgement> handleMessage(Message message) {
return Observable.<MessageAcknowledgement>create(s -> {
s.onNext(new MessageAcknowledgement(message.getId(), message.getPayload(), "Pong"));
s.onCompleted();
});
}


}

Now, I have a guice module which specifies the binding between MessageHandlerService interface and the concrete MessageHandlerServiceImpl:

public class AppModule extends AbstractModule {


@Override
protected void configure() {
bind(MessageHandlerService.class).to(MessageHandlerServiceImpl.class).in(Scopes.SINGLETON);
}
}


With this in place, the MessageHandlerService can be injected in:

public class ApplicationMessageHandler implements RequestHandler<ByteBuf, ByteBuf> {

private final ObjectMapper objectMapper = new ObjectMapper();

private final MessageHandlerService messageHandlerService;

@Inject
public ApplicationMessageHandler(MessageHandlerService messageHandlerService) {
this.messageHandlerService = messageHandlerService;
}

@Override
public Observable<Void> handle(HttpServerRequest<ByteBuf> request, HttpServerResponse<ByteBuf> response) {
return request.getContent().map(byteBuf -> byteBuf.toString(Charset.forName("UTF-8")))
.map(s -> {
try {
Message m = objectMapper.readValue(s, Message.class);
return m;
} catch (IOException e) {
throw new RuntimeException(e);
}
})
.flatMap(messageHandlerService::handleMessage)
.flatMap(ack -> {
try {
return response.writeStringAndFlush(objectMapper.writeValueAsString(ack));
} catch (Exception e) {
response.setStatus(HttpResponseStatus.BAD_REQUEST);
return response.close();
}
}
);
}
}


With both these features implemented, the app using Karyon2 is also greatly simplified and I have the complete working app in my github repository here: https://github.com/bijukunjummen/sample-ping-pong-netflixoss/tree/master/sample-pong

Scatter Gather - Using Java 8 CompletableFuture and Rx-Java Observable

$
0
0
I wanted to explore a simple scatter-gather scenario using Java 8 CompletableFuture and using Rx-Java Observable.


The scenario is simple - Spawn about 10 tasks, each returning a string, and ultimately collect the results into a list.

Sequential

A sequential version of this would be the following:

public void testSequentialScatterGather() throws Exception {
List<String> list =
IntStream.range(0, 10)
.boxed()
.map(this::generateTask)
.collect(Collectors.toList());

logger.info(list.toString());
}

private String generateTask(int i) {
Util.delay(2000);
return i + "-" + "test";
}

With CompletableFuture

A method can be made to return a CompletableFuture using a utility method called supplyAsync, I am using a variation of this method which accepts an explicit Executor to use, also I am deliberately throwing an exception for one of the inputs:

private CompletableFuture<String> generateTask(int i,
ExecutorService executorService) {
return CompletableFuture.supplyAsync(() -> {
Util.delay(2000);
if (i == 5) {
throw new RuntimeException("Run, it is a 5!");
}
return i + "-" + "test";
}, executorService);
}

Now to scatter the tasks:

List<CompletableFuture<String>> futures =
IntStream.range(0, 10)
.boxed()
.map(i -> this.generateTask(i, executors).exceptionally(t -> t.getMessage()))
.collect(Collectors.toList());

At the end of scattering the tasks the result is a list of CompletableFuture. Now, to obtain the list of String from this is a little tricky, here I am using one of the solutions suggested in Stackoverflow:

CompletableFuture<List<String>> result = CompletableFuture.allOf(futures.toArray(new CompletableFuture[futures.size()]))
.thenApply(v -> futures.stream()
.map(CompletableFuture::join)
.collect(Collectors.toList()));

CompletableFuture.allOf method is being used here purely to compose the next action to take once all the scattered tasks are completed, once the tasks are completed the futures are again streamed and collected into a list of string.

The final result can then be presented asynchronously:
result.thenAccept(l -> {
logger.info(l.toString());
});


With Rx-java Observable

Scatter gather with Rx-java is relatively cleaner than the CompletableFuture version as Rx-java provides better ways to compose the results together, again the method which performs the scattered task:

private Observable<String> generateTask(int i, ExecutorService executorService) {
return Observable
.<String>create(s -> {
Util.delay(2000);
if ( i == 5) {
throw new RuntimeException("Run, it is a 5!");
}
s.onNext( i + "-test");
s.onCompleted();
}).onErrorReturn(e -> e.getMessage()).subscribeOn(Schedulers.from(executorService));
}

and to scatter the tasks:

List<Observable<String>> obs =
IntStream.range(0, 10)
.boxed()
.map(i -> generateTask(i, executors)).collect(Collectors.toList());

Once more I have a List of Observable's, and what I need is a List of results, Observable provides a merge method to do just that:

Observable<List<String>> merged = Observable.merge(obs).toList();

which can be subscribed to and the results printed when available:

merged.subscribe(
l -> logger.info(l.toString()));

Spring Boot @ConfigurationProperties

$
0
0
Spring Boot provides a very neat way to load properties for an application. Consider a set of properties described using yaml format:

prefix:
stringProp1: propValue1
stringProp2: propValue2
intProp1: 10
listProp:
- listValue1
- listValue2
mapProp:
key1: mapValue1
key2: mapValue2

These entries can also be described in a traditional application.properties file the following way:

prefix.stringProp1=propValue1
prefix.stringProp2=propValue2
prefix.intProp1=10
prefix.listProp[0]=listValue1
prefix.listProp[1]=listValue2
prefix.mapProp.key1=mapValue1
prefix.mapProp.key2=mapValue2

It has taken me a little while, but I do like the hierarchical look of the properties described in a yaml format.

So now, given this property file a traditional Spring application would have loaded up the properties the following way:

public class SamplePropertyLoadingTest {
@Value("${prefix.stringProp1}")
private String stringProp1;

Note the placeholder for "prefix.stringProp" key.

This however is not ideal for loading a family of related properties, say in this specific case namespaced by the prefix conveniently named "prefix".

The approach Spring boot takes is to define a bean that can hold all the family of related properties this way:

@ConfigurationProperties(prefix = "prefix")
@Component
public class SampleProperty {
private String stringProp1;
private String stringProp2;
@Max(99)
@Min(0)
private Integer intProp1;
private List<String> listProp;
private Map<String, String> mapProp;

...
}

At runtime, all the fields would be bound to the related properties cleanly.

Additionally note the JSR-303 annotations on top of the "intProp1" field that validates that value of the field is between 0 and 99, @ConfigurationProperties will call the validator to ensure that bound bean is validated.

An integration test making use of this is the following:

package prop;

import org.junit.Test;
import org.junit.runner.RunWith;
import org.springframework.beans.factory.annotation.Autowired;
import org.springframework.beans.factory.annotation.Value;
import org.springframework.boot.test.SpringApplicationConfiguration;
import org.springframework.test.context.junit4.SpringJUnit4ClassRunner;

import static org.hamcrest.MatcherAssert.assertThat;
import static org.hamcrest.Matchers.*;

@RunWith(SpringJUnit4ClassRunner.class)
@SpringApplicationConfiguration(classes = SampleWebApplication.class)
public class SamplePropertyLoadingTest {
@Autowired
private SampleProperty sampleProperty;

@Value("${prefix.stringProp1}")
private String stringProp1;

@Test
public void testLoadingOfProperties() {
System.out.println("stringProp1 = " + stringProp1);
assertThat(sampleProperty.getStringProp1(), equalTo("propValue1"));
assertThat(sampleProperty.getStringProp2(), equalTo("propValue2"));
assertThat(sampleProperty.getIntProp1(), equalTo(10));
assertThat(sampleProperty.getListProp(), hasItems("listValue1", "listValue2"));
assertThat(sampleProperty.getMapProp(), allOf(hasEntry("key1", "mapValue1"),
hasEntry("key2", "mapValue2")));
}
}

If you are interested in exploring this sample further, I have a github repo with the code checked in here.

Working with Spring-Cloud and Netflix Archaius

$
0
0

Background

Spring Cloud provides all the tools that you require to create cloud ready microservices. One of the infrastructure components that Spring-Cloud provides is a Configuration server to centralize the properties of an application, however it is possible that you that you may be using other solutions to manage the properties. One such solution is Netflix Archaius and if you work with Netflix Archaius there is a neat way that Spring-Cloud provides to integrate with it.

Integration With Archaius

Spring Cloud provides a Spring Boot Auto-configuration for Archaius which gets triggered on finding the Archaius related libraries with the application. So first to pull in the Archaius libraries, which can be done through the following dependency entry in the POM file:
<dependency>
<groupId>com.netflix.archaius</groupId>
<artifactId>archaius-core</artifactId>
</dependency>
Not that the version of the dependency need not be specified, this information flows in from the dependency management information in the parent POM’s.
With this new library in place, Archaius Configuration, all that now needs to be done is to define Spring beans which extend Apache Commons Configuration AbstractConfiguration class and these would automatically get configured by Spring Cloud. As an example consider the following AbstractConfiguration which has one property in it:
@Bean
public AbstractConfiguration sampleArchaiusConfiguration() throws Exception {
ConcurrentMapConfiguration concurrentMapConfiguration = new ConcurrentMapConfiguration();
concurrentMapConfiguration.addProperty("testkey", "testvalue");
return concurrentMapConfiguration;
}

That is essentially it, this property should now be visible as an Archaius property and can be accessed along these lines:

DynamicPropertyFactory.getInstance().getStringProperty("testkey", "").get()


Also there are a few more neat features provided through Archaius integration in Spring-Cloud:
  1. The Spring managed properties are visible as Archaius properties
  2. An endpoint(/archaius) is provided by Spring-Cloud where all the registered archaius properties can be viewed

Conclusion

Spring Cloud natively provides all the tools to write a Cloud Ready microservice, however it is possible that the way to configure the centralized properties may be via Netflix Archaius, if that is the case Spring Cloud enables this neat way to integrate with Archiaus.

Spring boot static web resource handling for Single Page Applications

$
0
0
Javascript build tools like gulp and grunt truly boggle my mind, I look at one of the build scripts for these tools and find it difficult to get my head around it and cannot imagine writing one of these build scripts from scratch. This is where yeoman comes in, a very handy tool that quickly allows one to bootstrap a good starter project using any of the myriad combination of javascript build tools.

I wanted to explore an approach which Spring framework recommends for handling static web resources, which is to use these very capable build tools for building the static assets and using Spring for serving out the content once the static assets are built into a distributable state.

My approach was to use yeoman to generate a starter project, I chose the gulp-angular as my base and quickly generated a complete project, available here. I was able to expand this template into a fairly comprehensive angularjs based single page application which delegates back to Spring based REST calls to service the UI.

The steps that I followed are the following, mostly copied from the excellent sample created by Brian Clozel:

If you want to follow along the end result is available in my github repo.


  1. Define two modules, the "client" module to hold the generated yeoman template and a "server" module to hold the Spring Boot application.
  2. Hack away on the "client" module, in this specific instance I have created a simple angularjs based application
  3. I am using maven as the java build tool so I have a wrapper maven pom file which triggers the javascript build chain as part of the maven build cycle, then takes the built artifacts and creates a client jar out of it. The static content is cleverly placed at a location that Spring boot can get to, in this instance at the classpath:/static location.
  4. In the "server" module client is added as a dependency and "server" is set to be run as a full-fledged spring-boot project
  5. Serve out the project from the server module by executing:
    mvn spring-boot:run

Conclusion


Spring Boot has taken an excellent approach to providing an asset pipeline for static web resources which is to not interfere with the very capable build tools in the Javascript universe and providing a clean way to serve out the generated static content.

Couchbase Java SDK with Rx-Java

$
0
0
A neat thing about CouchbaseJava SDK is that it is built on top of the excellent Rx-Java library, this enables a reactive way to interact with a Couchbase server instance which is very intuitive once you get the hang of it.

Consider a very simple json document that I intend to store in Couchbase:

{"key":"1","value":"one"}


and a Java class to hold this json:

public class KeyVal {
private String key;
private String value;

...
}

The following is the code to insert an instance of KeyVal to a Couchbase bucket:

JsonObject jsonObject = JsonObject.empty().put("key", keyVal.getKey()).put("value", keyVal.getValue());
JsonDocument doc = JsonDocument.create(keyVal.getKey(), jsonObject);
Observable<JsonDocument> obs = bucket
.async()
.insert(doc);

The return type of the insert is an Observable, so if I needed to map the return type back a KeyVal I can use the extensive mapping support provided by Observable class.

Observable<KeyVal> obs = bucket
.async()
.insert(doc)
.map(jsonDoc ->
new KeyVal(jsonDoc.id(), jsonDoc.content().getString("value"))
);


Other API's follow a similar pattern, for eg. to retrieve the saved document:

bucket
.async()
.get(id)
.map(doc ->
new KeyVal(doc.id(),
doc.content().getString("value")));

If you are interested in exploring this sample further, here is my github repo with a working example - https://github.com/bijukunjummen/sample-karyon2-couch


References:


Rest client calls with Spring Cloud

$
0
0
There are a few interesting ways to make REST client calls with the Spring-Cloud project.
Spring-Cloud rest support builds on top of the core Netflix OSS libraries, but abstracts them and in the process simplifies using the libraries.

RestTemplate

As a first step let us consider the traditional way to make Rest calls through Spring based applications, using RestTemplate:

public class RestTemplateIntegrationTest {

@Autowired
private RestTemplate restTemplate;

@Test
public void testCallPongService() {
ResponseEntity<MessageAcknowledgement> ack =
restTemplate.exchange("http://servicehost/message",
HttpMethod.POST,
new HttpEntity<>(new Message("test", "hello")),
MessageAcknowledgement.class,
Collections.emptyMap());
assertThat(ack.getBody().getPayload(), equalTo("Pong From Configuration Server"));
}
}

In this specific instance, the host part of the url is expected to be completely known to the client, RestTemplate will take care of marshalling the Java object to the appropriate media type, making the REST call, and unmarshalling the response back to a Java Object.

RestTemplate with Ribbon and Eureka

Netflix Ribbon provides a library for making REST based calls, whereas with RestTemplate the host is expected to be completely known to the client, with Ribbon the host is typically resolved through the Centralized Netflix Eureka server and Ribbon takes care of load-balancing the calls if multiple hosts are found for a service. If Spring-cloud libraries and Ribbon related libraries are present in the classpath, then Spring-Cloud enhances RestTemplate to be based on Ribbon instead with no additional configuration required, with Spring-Cloud in place the call would exactly like before, with a few twists.

ResponseEntity&lt;MessageAcknowledgement&gt; ack =
restTemplate.exchange("http://sample-pong/message",
HttpMethod.POST,
new HttpEntity&lt;&gt;(new Message("test", "hello")),
MessageAcknowledgement.class,
Collections.emptyMap());

The twist is that the hostname which in this instance is "sample-pong" is significant, it is not the real host name - instead, an attempt is made to find the list of servers with this name as the registration name in Eureka and the resulting host/port is used for making the request.


If customizations are required a named client can be provided with Ribbon specific properties specified for the named client, along these lines:

ResponseEntity&lt;MessageAcknowledgement&gt; ack =
restTemplate.exchange("http://samplepong/message",
HttpMethod.POST,
new HttpEntity&lt;&gt;(new Message("test", "hello")),
MessageAcknowledgement.class,
Collections.emptyMap());

The named client above is "samplepong" and the ribbon specific properties for this client is along these lines:

samplepong:
ribbon:
DeploymentContextBasedVipAddresses: sample-pong
NIWSServerListClassName: com.netflix.niws.loadbalancer.DiscoveryEnabledNIWSServerList
ReadTimeout: 5000
MaxAutoRetries: 2

If you are interested in more low level configurations for Ribbon, refer here

Ribbon is a fairly complicated low-level way of making a REST call, RestTemplate abstracts the Ribbon implementation and makes it look easy from a clients perspective.

Netflix Feign

Netflix Feign is another simplified way to make calls to REST based services, all it requires is an interface with relevant annotations which is best demonstrated with an example:

import org.bk.consumer.domain.Message;
import org.bk.consumer.domain.MessageAcknowledgement;
import org.springframework.cloud.netflix.feign.FeignClient;
import org.springframework.http.MediaType;
import org.springframework.web.bind.annotation.RequestBody;
import org.springframework.web.bind.annotation.RequestMapping;
import org.springframework.web.bind.annotation.RequestMethod;

@FeignClient("samplepong")
public interface PongClient {

@RequestMapping(method = RequestMethod.POST, value = "/message",
produces = MediaType.APPLICATION_JSON_VALUE, consumes = MediaType.APPLICATION_JSON_VALUE)
MessageAcknowledgement sendMessage(@RequestBody Message message);
}

The annotations are Spring specific though, Spring-Cloud facilitates this by adding in encoders and decoders which support Spring MVC annotations.

@FeignClient annotation on the interface identifies this a FeignClient code. @EnableFeignClients is required in a Spring Configuration to load up all such FeignClient's.

@SpringBootApplication
@EnableEurekaClient
@EnableFeignClients
public class PingApplication {

public static void main(String[] args) {
SpringApplication.run(PingApplication.class, args);
}
}


References


Spring Cloud Sidecar

$
0
0
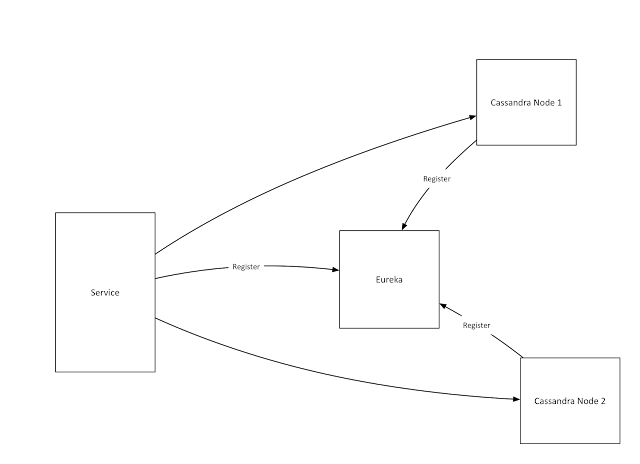
I have an application deployed to a NetflixOSS based cloud which has a structure along these lines:

Essentially a service which persists information to a Cassandra cluster. All the applications are registered to Eureka - so in this instance the service as well as the Cassandra nodes are registered with Eureka, further the service connects to the Cassandra cluster by looking up the nodes via Eureka. 

I will deal with this in two parts - 

  1. Registering Cassandra nodes with Eureka
  2. Service using Eureka to connect to the Cassandra Cluster


Registering Cassandra Nodes with Eureka

This is where a Sidecar application fits in - the purpose of  Sidecar is to facilitate some of things that make an application a good citizen in a Cloud environment, in this specific instance it enables Cassandra to register with Eureka, respond to health checks. Spring Cloud Netflix Sidecar project provides the necessary support to create a Sidecar application.

The amount of coding required to get a Sidecar application up and running is very minimal, Sidecar behaves like a typically Spring Cloud application except that instead of registering itself to Eureka it has to register another application, so the configuration is mostly the same. 

This is my entire code for the Sidecar application!:

import org.springframework.boot.SpringApplication;
import org.springframework.boot.autoconfigure.SpringBootApplication;
import org.springframework.cloud.netflix.sidecar.EnableSidecar;

@SpringBootApplication
@EnableSidecar
public class SampleSidecarApplication {

public static void main(String[] args) {
SpringApplication.run(SampleSidecarApplication.class, args);
}
}


and the properties to go with this:

application.yml
eureka:
instance:
virtual-host-name: samplecassandra.vip

spring:
application:
name: samplecassandra

sidecar:
port: 9042

Here the port is declared to be the port that is relevant to Cassandra.

There is one more aspect to handle, healthcheck, the Sidecar exposes an endpoint which can test the health of the supported application in whatever makes sense for the application. For Cassandra it could be connecting to the local node and firing a small CQL query.

Conclusion

Assuming that the Cassandra nodes are now registered with Eureka, there is a good level of complication in trying to create a Cassandra Session on the consuming service side, this is mainly because of the timing involved in instantiating the Eureka client and the point at which the code tries to find the list of nodes. I will cover this in a subsequent post. If you would like to explore this sample further, here is the github repo.

Spring Cloud Sidecar - Initialization of Nodes

$
0
0
In the last blog post I had described how the Sidecar application can be used for registering the Cassandra nodes with Eureka and more generally can be used for registering any non-JVM application with Eureka.

In this post I will cover how an application can go about querying the Sidecar registered nodes.

Discovering Registered Nodes - Post Initialization

If the registered nodes are not required during the bean initialization phase then discovering the nodes is fairly straightforward along these lines:

@Component
public class SampleCommandLineRunner implements CommandLineRunner {

@Autowired
private DiscoveryClient discoveryClient;

@PostConstruct
public void postConstruct() {
// System.out.println("Printing from postConstruct");
// printDiscoveredNodes();
}

@Override
public void run(String... strings) throws Exception {
System.out.println("Printing from run method");
printDiscoveredNodes();
}

public void printDiscoveredNodes() {
System.out.println(" Printing Discovered Nodes ");

for (ServiceInstance instance: discoveryClient.getInstances("samplecassandra.vip")) {
System.out.println("Host: Port = " + instance.getHost() + ":" + instance.getPort());
}
}
}

These would print the nodes registered with a name of "samplecasssandra.vip" VIP.

Note that the nodes are being printed from the run method which gets called past the initialization of Spring container. If however the nodes were attempted to be listed from one of the lifecycle stages say the postConstruct method then very likely an exception will be thrown (this behavior is seen with "Angel.SR3" release of Spring Cloud, but appears to work cleanly with "Brixton.*" versions)

Discovering Registered Nodes - During Initialization

Now if an application needs to discover the nodes during initialization the flow is a little more complicated, for a potential issue look at this ticket.

The DiscoveryClient is initialized very late in the Spring Lifecycle and if DiscoveryClient is used in any post-processing activity of a bean it is likely to give an exception.

As an example, say the Cassandra nodes registered using Sidecar is now used by an application to initialize Cassandra connectivity, a way to do it would be to create a wrapper around Cassandra connectivity this way:

import org.springframework.data.cassandra.core.CassandraTemplate;


public class CassandraTemplateWrapper extends CassandraTemplate {

@Override
public void afterPropertiesSet() {

}
}

Here CassandraTemplate is being overridden to prevent the check in afterPropertiesSet method that a Cassandra session exists, as a session will be established much later in the start-up cycle.

A Cassandra session can be injected into this custom CassandraTemplate lazily in a bean that implements SmartLifecyle along these lines:

package mvctest.cassandra;

import com.datastax.driver.core.Cluster;
import com.datastax.driver.core.Session;
import org.slf4j.Logger;
import org.slf4j.LoggerFactory;
import org.springframework.beans.factory.FactoryBean;
import org.springframework.beans.factory.annotation.Autowired;
import org.springframework.context.SmartLifecycle;
import org.springframework.core.Ordered;
import org.springframework.data.cassandra.core.CassandraTemplate;
import org.springframework.stereotype.Component;

@Component("cassandraTemplate")
public class EurekaCassandraTemplateFactoryBean implements SmartLifecycle, FactoryBean<CassandraTemplate>, Ordered {

....


@Override
public boolean isAutoStartup() {
return true;
}

@Override
public void start() {
LOGGER.info("About to start Discovery client lookup of Cassandra Cluster!!!");
final Cluster cluster = this.eurekaClusterBuilder.build();
Session session = cluster.connect(this.cassandraProperties.getKeyspace());
this.cassandraTemplateWrapper.setSession(session);
LOGGER.info("Completed Discovery client lookup of Cassandra Cluster!!!");
running = true;
}

@Override
public boolean isRunning() {
return this.running;
}

@Override
public int getPhase() {
return Integer.MAX_VALUE;
}

@Override
public int getOrder() {
return 1;
}
}

This way the Cassandra session can be created very late in the cycle. Somewhat rough, but the approach works.

If you are interested in exploring this sample further I have this code available in my github repo here.

Gentle Introduction to Hystrix - Motivation

$
0
0
In the last few days I have been exploring the Netflix Hystrix library and have come to appreciate the features provided by this excellent library.

To quote from the Hystrix site:

Hystrix is a latency and fault tolerance library designed to isolate points of access to remote systems, services and 3rd party libraries, stop cascading failure and enable resilience in complex distributed systems where failure is inevitable.

There are a whole lot of keywords to parse here, however the best way to experience Hystrix in my mind is to try out a sample use case.


An unpredictable Service

Consider a service, an odd one, which takes a json message of the following structure and returns an acknowledgement:


{
"id":"1",
"payload": "Sample Payload",
"throw_exception":false,
"delay_by": 0
}

The service takes in a payload, but additionally takes in two fields - delay_by which makes the service acknowledge a response after the delay in milliseconds and a "throw_exceptions" field which will result in an exception after the specified delay!

Here is a sample response:

{
"id":"1",
"received":"Sample Payload",
"payload":"Reply Message"
}


If you are following along, here is my github repo with this sample, I have used Netflix Karyon 2 for this sample and the code which handles the request can be expressed very concisely the following way - see how the rx-java library is being put to good use here:

import com.netflix.governator.annotations.Configuration;
import rx.Observable;
import service1.domain.Message;
import service1.domain.MessageAcknowledgement;

import java.util.concurrent.TimeUnit;

public class MessageHandlerServiceImpl implements MessageHandlerService {

@Configuration("reply.message")
private String replyMessage;

public Observable<MessageAcknowledgement> handleMessage(Message message) {
logger.info("About to Acknowledge");
return Observable.timer(message.getDelayBy(), TimeUnit.MILLISECONDS)
.map(l -> message.isThrowException())
.map(throwException -> {
if (throwException) {
throw new RuntimeException("Throwing an exception!");
}
return new MessageAcknowledgement(message.getId(), message.getPayload(), replyMessage);
});
}


}


At this point we have a good candidate service which can be made to respond with an arbitrary delay and failure.


A client to the Service

Now onto a client to this service. I am using Netflix Feign to make this call, yet another awesome library, all it requires is a java interface annotated the following way:

package aggregate.service;

import aggregate.domain.Message;
import aggregate.domain.MessageAcknowledgement;
import feign.RequestLine;

public interface RemoteCallService {
@RequestLine("POST /message")
MessageAcknowledgement handleMessage(Message message);
}

It creates the necessary proxy implementing this interface using configuration along these lines:

RemoteCallService remoteCallService = Feign.builder()
.encoder(new JacksonEncoder())
.decoder(new JacksonDecoder())
.target(RemoteCallService.class, "http://127.0.0.1:8889");


I have multiple endpoints which delegate calls to this remote client, all of them expose a url pattern along these lines - http://localhost:8888/noHystrix?message=Hello&delay_by=0&throw_exception=false, this first one is an example where the endpoint does not use Hystrix.


No Hystrix Case


As a first example, consider calls to the Remote service without Hystrix, if I were to try a call to http://localhost:8888/noHystrix?message=Hello&delay_by=5000&throw_exception=false or say to http://localhost:8888/noHystrix?message=Hello&delay_by=5000&throw_exception=true, in both instances the user request to the endpoints will simply hang for 5 seconds before responding.


There should be a few things immediately apparent here:

1. If the service responds slowly, then the client requests to the service will be forced to wait for the response to come back.

2. Under heavy load it is very likely that all threads handling user traffic will be exhausted, thus failing further user requests.

2. If the service were to throw an exception, the client does not handle it gracefully.

Clearly there is a need for something like Hystrix which handles all these issues.

Hystrix command wrapping Remote calls


I conducted a small load test using a 50 user load on the previous case and got a result along these lines:

================================================================================
---- Global Information --------------------------------------------------------
> request count 50 (OK=50 KO=0 )
> min response time 5007 (OK=5007 KO=- )
> max response time 34088 (OK=34088 KO=- )
> mean response time 17797 (OK=17797 KO=- )
> std deviation 8760 (OK=8760 KO=- )
> response time 50th percentile 19532 (OK=19532 KO=- )
> response time 75th percentile 24386 (OK=24386 KO=- )
> mean requests/sec 1.425 (OK=1.425 KO=- )

Essentially a 5 second delay from the service results in a 75th percentile time of 25 seconds!, now consider the same test with Hystrix command wrapping the service calls:

================================================================================
---- Global Information --------------------------------------------------------
> request count 50 (OK=50 KO=0 )
> min response time 1 (OK=1 KO=- )
> max response time 1014 (OK=1014 KO=- )
> mean response time 22 (OK=22 KO=- )
> std deviation 141 (OK=141 KO=- )
> response time 50th percentile 2 (OK=2 KO=- )
> response time 75th percentile 2 (OK=2 KO=- )
> mean requests/sec 48.123 (OK=48.123 KO=- )

Strangely the 75th percentile time now is 2 millseconds!, how is this possible, and the answer becomes obvious using the excellent tools that Hystrix provides, here is a Hystrix dashboard view for this test:


What happened here is that the first 10 requests timed out, anything more than a second by default times out with Hystrix command in place, once the first ten transactions failed Hystrix short circuited the command thus blocking anymore requests to the remote service and hence the low response time. On why these transactions were not showing up as failed, this is because there is a fallback in place here which responds to the user request gracefully on failure.

Conclusion

The purpose here was to set the motivation for why a library like Hystrix is required, I will follow this up with the specifics of what is needed to integrate Hystrix into an application and the breadth of features that this excellent library provides.

Scala extractors infix sample with Rational numbers

$
0
0
I keep coming back to the awesome introductory material on Scala put together by Daniel Westheide. One of the examples that he provides for extractors using an infix operation pattern is the Streams API -

val xs = 58 #:: 43 #:: 93 #:: Stream.empty
xs match {
  case first #:: second #:: _ => first - second
  case _ => -1
}

where the extractor is defined this way:

object #:: {
def unapply[A](xs: Stream[A]): Option[(A, Stream[A])] =
if (xs.isEmpty) None
else Some((xs.head, xs.tail))
}

Given this I wanted to try an extractor on the Rational number samples from the Scala by Example book, this is how the Rational number looks:

class Rational(n: Int, d: Int) {
private def gcd(x: Int, y: Int): Int = {
if (x == 0) y
else if (x < 0) gcd(-x,y)
else if (y < 0) -gcd(x, -y)
else gcd(y % x, x)
}
private val g = gcd(n, d)

val numer: Int = n/g
val denom: Int = d/g

def +(that: Rational) =
new Rational(numer * that.denom + that.numer * denom,
denom * that.denom)

def -(that: Rational) =
new Rational(numer * that.denom - that.numer * denom,
denom * that.denom)

def *(that: Rational) =
new Rational(numer * that.numer, denom * that.denom)

def /(that: Rational) =
new Rational(numer * that.denom, denom * that.numer)


override def toString = "" + numer + "/" + denom + ""

def square = new Rational(numer*numer, denom*denom)
}

and I wanted an extractor which would behave the following way:

val r = new Rational(2, 3)  

r match {
case num / denom => num + "/" + denom
}

This is absolutely feasible in Scala given the flexibility in the names of identifiers. Given this an extractor called "/" can be defined the following way:

object / {
def unapply(r: Rational): Option[(Int, Int)] = Some(r.numer, r.denom)
}

and used for extracting the numerator and denominator of the rational number!

r match {
case /(num, denom) => num + "/" + denom
}

//using infix
r match {
case num / denom => num + "/" + denom
}

Viewing all 250 articles
Browse latest View live