Quantcast
Channel: all and sundry
Viewing all 250 articles
Browse latest View live

Introducing "Yet another" Cloud foundry Gradle plugin

$
0
0
In the process of working on an automated Jenkins pipeline for deploying a Cloud Foundry application with two of my colleagues(Thanks Mark Alston, Dave Malone !) I decided to try my hand on writing a Gradle plugin to perform some of the tasks that are typically done using a command line Cloud Foundry Client.

Introducing the totally unimaginatively named "ya-cf-app-gradle-plugin" with a set of gradle tasks(dare I say opinionated!) that should help automate some of the routine steps involved in deploying a java application to a Cloud Foundry environment. The "ya" or the yet-another part is because this is just a stand-in plugin, the authoritative plugin for Cloud Foundry will ultimately reside with the excellent CF-Java-Client project.


I have provided an extensive README with the projects documentation that should help in getting started with using the plugin, the tasks should be fairly intuitive if you have previously worked with the CF cli.

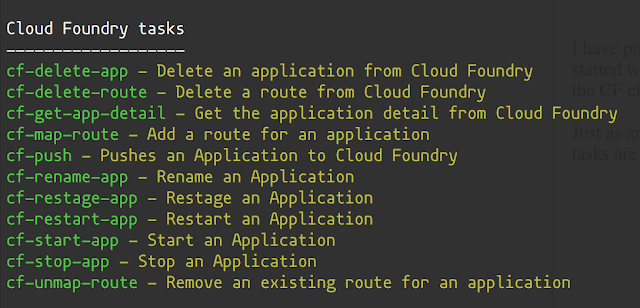
Just as an example, once the gradle plugin is cleanly added into the build script, the following gradle tasks are available when listed by running "./gradlew tasks" command:


All the tasks work off a configuration provided the following way in a cfConfig block in the buildscript:

apply plugin: 'cf-app'

cfConfig {
//CF Details
ccHost = "api.local.pcfdev.io"
ccUser = "admin"
ccPassword = "admin"
org = "pcfdev-org"
space = "pcfdev-space"

//App Details
name = "cf-show-env"
hostName = "cf-show-env"
filePath = "build/libs/cf-show-env-0.1.2-SNAPSHOT.jar"
path = ""
domain = "local.pcfdev.io"
instances = 2
memory = 512

//Env and services
buildpack = "https://github.com/cloudfoundry/java-buildpack.git"
environment = ["JAVA_OPTS": "-Djava.security.egd=file:/dev/./urandom", "SPRING_PROFILES_ACTIVE": "cloud"]
services = ["mydb"]
}

Any overrides on top of the base configuration provided this way can be done by specifying gradle properties with a "cf.*" pattern. For eg. a normal push of an application would look like this:

./gradlew cf-push

and a push with the name of the application and the host name overridden would look like this:

./gradlew cf-push -Pcf.name=Green -Pcf.hostName=demo-time-temp


All of the tasks follow the exact same pattern, depending on the cfConfig block as the authoritative source of properties along with the command line overrides. There is one task that can be used for retrieving back some of the details of an app in CloudFoundry, the task is "cf-get-app-detail", say after deploying a canary instance of an app you wanted to run a quick test against it, the task would look along these lines, a structure "project.cfConfig" is populated with the app details once successfully invoked:

task acceptanceTest(type: Test, dependsOn: "cf-get-app-detail")  {
doFirst() {
systemProperty "url", "https://${project.cfConfig.applicationDetail.urls[0]}"
}
useJUnit {
includeCategories 'test.AcceptanceTest'
}
}


References:


1. The plugin is built on top of the excellent CF-Java-Client project
2. I have borrowed a lot of ideas from gradle-cf-plugin but is more or less a clean room implementation
3. Here is a sample project which makes use of the plugin.

No downtime deployment using "Yet another" Cloud Foundry Gradle plugin

$
0
0
I have been trying my hand at writing a gradle plugin for deploying applications to Cloud Foundry and wrote about this plugin in my previous post. I have now enhanced this plugin with support for no-downtime deploys into Cloud Foundry using two approaches - an Autopilot style deployment and a more commonly used Blue-Green style deployment.

To jump into the meat of the plugin, once it is configured cleanly all you have to do is the following:

For an autopilot style

./gradlew cf-push-autopilot

and for a Blue-Green deployment:

./gradlew cf-push-blue-green

and the plugin tasks would take care of the rest.

What is being solved


If you use Cloud Foundry CLI to push an application to Cloud Foundry, then existing instances of the application is stopped, replaced and started up. This introduces a downtime for the application until the new instance of the application is up. Just to demonstrate this behavior, the following graph represents a steady traffic to a website while an application is pushed to Cloud Foundry - the 30 second blip is when the new app is being started up.


Autopilot and Blue-Green style deployments


Autopilot and Blue-Green styles of deployment fix the issue by carefully orchestrating the deployment of an application such that the external facing route always points to a working version of the application.

The plugin now natively performs all the steps needed for these two styles of no-downtime deployments.

Here is how the same graph looks with an Autopilot style type deployment using the plugin, note that there is a slightly higher response time around the time the new application switches in. Once primed though the response times smooth out:


and with a Blue-Green style deployment using this plugin


References:


1. The details about how to install and configure the plugin is available here - https://github.com/pivotalservices/ya-cf-app-gradle-plugin

2. A sample application configured with the plugin is here - https://github.com/bijukunjummen/cf-show-env

3. The load test using gatling is available here

Integrating with Rabbit MQ using Spring Integration Java DSL

$
0
0
I recently attended the Spring One conference 2016 in Las Vegas and had the good fortune to see from near and far some of the people that I have admired for a long time in the Software World. I personally met two of them who have actually merged some of my Spring Integration related minor contributions from a few years ago - Gary Russel and Artem Bilan and they inspired me to look again at Spring Integration which I have not used for a while.

I was once more reminded of how Spring Integration makes any complex Enterprise integration scenario look easy. I am happy to see that Spring Integration Java based DSL is now fully integrated into the Spring Integration umbrella and higher level abstractions like Spring Cloud Stream(introductions thanks to my good friend and a contributor to this project Soby Chacko) which makes some of the message driven scenarios even easier.

In this post I am just revisiting a very simple integration scenario with RabbitMQ and in a later post will re-implement it using Spring Cloud Stream.

Consider a scenario where two services are talking to each other via a RabbitMQ broker in between, one of them generating some kind of a work, the other processing this work.


Producer


The Work unit producing/dispatching part can be expressed in code using Spring Integration Java DSL the following way:


@Configuration
public class WorksOutbound {

@Autowired
private RabbitConfig rabbitConfig;

@Bean
public IntegrationFlow toOutboundQueueFlow() {
return IntegrationFlows.from("worksChannel")
.transform(Transformers.toJson())
.handle(Amqp.outboundAdapter(rabbitConfig.worksRabbitTemplate()))
.get();
}
}

This is eminently readable - the flow starts by reading a message off a channel called "worksChannel", transforms the message into a json and dispatches it off using an Outbound channel adapter to a RabbitMQ exchange. Now, how does the message get to the channel called "worksChannel" - I have configured it via a Messaging gateway, an entry point to the Spring Integration world -

@MessagingGateway
public interface WorkUnitGateway {
@Gateway(requestChannel = "worksChannel")
void generate(WorkUnit workUnit);

}

So now if a java client wanted to dispatch a "work unit" to rabbitmq, the call would look like this :

WorkUnit sampleWorkUnit = new WorkUnit(UUID.randomUUID().toString(), definition);
workUnitGateway.generate(sampleWorkUnit);

I have brushed over a few things here - specifically the Rabbit MQ configuration, that is run of the mill however and is available here

Consumer

Along the lines of a producer, a consumers flow would start by receiving a message from RabbitMQ queue, transforming it to a domain model and then processing the message, expressed using Spring Integration Java DSL the following way:

@Configuration
public class WorkInbound {

@Autowired
private RabbitConfig rabbitConfig;

@Autowired
private ConnectionFactory connectionFactory;

@Bean
public IntegrationFlow inboundFlow() {
return IntegrationFlows.from(
Amqp.inboundAdapter(connectionFactory, rabbitConfig.worksQueue()).concurrentConsumers(3))
.transform(Transformers.fromJson(WorkUnit.class))
.handle("workHandler", "process")
.get();
}
}

The code should be intuitive, the workHandler above is a simple Java pojo and looks like this, doing the very important job of just logging the payload:

@Service
public class WorkHandler {
private static final Logger LOGGER = LoggerFactory.getLogger(WorkHandler.class);

public void process(WorkUnit workUnit) {
LOGGER.info("Handling work unit - id: {}, definition: {}", workUnit.getId(), workUnit.getDefinition());
}
}


That is essentially it, Spring Integration provides an awesome facade to what would have been a fairly complicated code had it been attempted using straight Java and raw RabbitMQ libraries. Spring Cloud Stream makes this entire set-up even simpler and would be the topic of a future post.


I have posted this entire code at my github repo if you are interested in taking this for a spin.

Integrating with RabbitMQ using Spring Cloud Stream

$
0
0
In my previous post I wrote about a very simple integration scenario between two systems - one generating a work unit and another processing that work unit and how Spring Integration makes such integration very easy.


Here I will demonstrate how this integration scenario can be simplified even further using Spring Cloud Stream

I have the sample code available here - the right maven dependencies for Spring Cloud Stream is available in the pom.xml.

Producer


So again starting with the producer responsible for generating the work units. All that needs to be done code wise to send messages to RabbitMQ is to have a java configuration along these lines:

@Configuration
@EnableBinding(WorkUnitsSource.class)
@IntegrationComponentScan
public class IntegrationConfiguration {}

This looks deceptively simple but does a lot under the covers, from what I can understand and glean from the documentation these are what this configuration triggers:

1. Spring Integration message channels based on the classes that are bound to the @EnableBinding annotation are created. The WorkUnitsSource class above is the definition of a custom channel called "worksChannel" and looks like this:

import org.springframework.cloud.stream.annotation.Output;
import org.springframework.messaging.MessageChannel;

public interface WorkUnitsSource {

String CHANNEL_NAME = "worksChannel";

@Output
MessageChannel worksChannel();

}

2. Based on which "binder" implementation is available at runtime(say RabbitMQ, Kaffka, Redis, Gemfire), the channel in the previous step will be connected to the appropriate structures in the system - so for eg, I am want my "worksChannel" to in turn send messages to RabbitMQ, Spring Cloud Stream would take care of automatically creating a topic exchange in RabbitMQ

I wanted some further customizations in terms of how the data is sent to RabbitMQ - specifically I wanted my domain objects to be serialized to json before being sent across and I want to specify the name of the RabbitMQ exchange that the payload is sent to, this is controlled by certain configurations that can be attached to the channel the following way using a yaml file:

spring:
cloud:
stream:
bindings:
worksChannel:
destination: work.exchange
contentType: application/json
group: testgroup

One final detail is a way for the rest of the application to interact with Spring Cloud Stream, this can be done directly in Spring Integration by defining a message gateway:

import org.springframework.integration.annotation.Gateway;
import org.springframework.integration.annotation.MessagingGateway;
import works.service.domain.WorkUnit;

@MessagingGateway
public interface WorkUnitGateway {
@Gateway(requestChannel = WorkUnitsSource.CHANNEL_NAME)
void generate(WorkUnit workUnit);

}

That is essentially it, Spring Cloud Stream would now wire up the entire Spring integration flow, create the appropriate structures in RabbitMQ.


Consumer


Similar to the Producer, first I want to define the channel called "worksChannel" which would handle the incoming message from RabbitMQ:

import org.springframework.cloud.stream.annotation.Input;
import org.springframework.messaging.SubscribableChannel;

public interface WorkUnitsSink {
String CHANNEL_NAME = "worksChannel";

@Input
SubscribableChannel worksChannel();
}

and let Spring Cloud Stream create the channels and RabbitMQ bindings based on this definition:

import org.springframework.cloud.stream.annotation.EnableBinding;
import org.springframework.context.annotation.Configuration;

@Configuration
@EnableBinding(WorkUnitsSink.class)
public class IntegrationConfiguration {}

To process the messages, Spring Cloud Stream provides a listener which can be created the following way:

@Service
public class WorkHandler {
private static final Logger LOGGER = LoggerFactory.getLogger(WorkHandler.class);

@StreamListener(WorkUnitsSink.CHANNEL_NAME)
public void process(WorkUnit workUnit) {
LOGGER.info("Handling work unit - id: {}, definition: {}", workUnit.getId(), workUnit.getDefinition());
}
}

And finally the configuration which connects this channel to the RabbitMQ infrastructure expressed in a yaml file:

spring:
cloud:
stream:
bindings:
worksChannel:
destination: work.exchange
group: testgroup


Now if the producer and any number of consumers were started up, the message sent via the producer would be sent to a Rabbit MQ topic exchange as a json, retrieved by the consumer, deserialized to an object and passed to the work processor.

A good amount of the boiler plate involved in creating the RabbitMQ infrastructure is now handled purely by convention by the Spring Cloud Stream libraries. Though Spring Cloud Stream attempts to provide a facade over the raw Spring Integration, it is useful to have a basic knowledge of Spring integration to use Spring Cloud Stream effectively.

The sample described here is available at my github repository

RabbitMQ retries using Spring Integration

$
0
0
I recently read about an approach to retry with RabbitMQ here and wanted to try a similar approach with Spring Integration, which provides an awesome set of integration abstractions.

TL;DR the problem being solved is to retry a message(in case of failures in processing) a few times with a large delay between retries(say 10 mins +). The approach makes use of the RabbitMQ support for Dead Letter Exchanges and looks something like this


The gist of the flow is :
1. A Work dispatcher creates "Work Unit"(s) and sends it to a RabbitMQ queue via an exchange.
2. The Work queue is set with a Dead Letter exchange. If the message processing fails for any reason the "Work Unit" ends up with the Work Unit Dead Letter Queue.
3. Work Unit Dead Letter queue is in-turn set with the Work Unit exchange as the Dead Letter Exchange, this way creating a cycle. Further, the expiration of messages in the dead letter queue is set to say 10 mins, this way once the message expires it will be back again in the Work unit queue.
4. To break the cycle the processing code has to stop processing once a certain count threshold is exceeded.


Implementation using Spring Integration


I have covered a straight happy path flow using Spring Integration and RabbitMQ before, here I will mostly be building on top of this code.

A good part of the set-up is the configuration of the appropriate dead letter exchanges/queues, and looks like this when expressed using Spring's Java Configuration:

@Configuration
public class RabbitConfig {

@Autowired
private ConnectionFactory rabbitConnectionFactory;

@Bean
Exchange worksExchange() {
return ExchangeBuilder.topicExchange("work.exchange")
.durable()
.build();
}


@Bean
public Queue worksQueue() {
return QueueBuilder.durable("work.queue")
.withArgument("x-dead-letter-exchange", worksDlExchange().getName())
.build();
}

@Bean
Binding worksBinding() {
return BindingBuilder
.bind(worksQueue())
.to(worksExchange()).with("#").noargs();
}

// Dead letter exchange for holding rejected work units..
@Bean
Exchange worksDlExchange() {
return ExchangeBuilder
.topicExchange("work.exchange.dl")
.durable()
.build();
}

//Queue to hold Deadletter messages from worksQueue
@Bean
public Queue worksDLQueue() {
return QueueBuilder
.durable("works.queue.dl")
.withArgument("x-message-ttl", 20000)
.withArgument("x-dead-letter-exchange", worksExchange().getName())
.build();
}

@Bean
Binding worksDlBinding() {
return BindingBuilder
.bind(worksDLQueue())
.to(worksDlExchange()).with("#")
.noargs();
}
...
}


Note that here I have set the TTL of the Dead Letter queue to 20 seconds, this means that after 20 seconds a failed message will be back in the processing queue. Once this set-up is in place and the appropriate structures are created in RabbitMQ, the consuming part of the code looks like this, expressed using Spring Integration Java DSL:

@Configuration
public class WorkInbound {

@Autowired
private RabbitConfig rabbitConfig;

@Bean
public IntegrationFlow inboundFlow() {
return IntegrationFlows.from(
Amqp.inboundAdapter(rabbitConfig.workListenerContainer()))
.transform(Transformers.fromJson(WorkUnit.class))
.log()
.filter("(headers['x-death'] != null) ? headers['x-death'][0].count <= 3: true", f -> f.discardChannel("nullChannel"))
.handle("workHandler", "process")
.get();
}

}

Most of the retry logic here is handled by the RabbitMQ infrastructure, the only change here is to break the cycle by explicitly discarding the message after a certain 2 retries. This break is expressed as a filter above, looking at the header called "x-death" that RabbitMQ adds to the message once it is sent to Dead Letter exchange. The filter is admittedly a little ugly - it can likely be expressed a little better in Java code.


One more thing to note is that the retry logic could have been expressed in-process using Spring Integration, however I wanted to investigate a flow where the retry times can be high (say 15 to 20 mins) which will not work well in-process and is also not cluster safe as I want any instances of an application to potentially handle the retry of a message.

If you want to explore further, do try the sample at my github repo - https://github.com/bijukunjummen/si-dsl-rabbit-sample

Reference:

Retry With RabbitMQ: http://dev.venntro.com/2014/07/back-off-and-retry-with-rabbitmq

Spring-Reactive samples - Mono and Single

$
0
0
This is just a little bit of a learning from my previous post where I had tried out the Spring's native support for  reactive programming.

Just to quickly recap, my objective was to develop a reactive service which takes in a request which looks like this:

{
"id":1,
"delay_by": 2000,
"payload": "Hello",
"throw_exception": false
}

and returns a response along these lines:

{
"id": "1",
"received": "Hello",
"payload": "Response Message"
}

I had demonstrated this in two ways that the upcoming Spring's reactive model supports, using the Reactor-CoreFlux type as a return type and using Rx-javaObservable type

However the catch with these types is that the response would look something like this:

[{"id":"1","received":"Hello","payload":"From RxJavaService"}]

Essentially an array, and the reason is obvious - Flux and Observable represent zero or more asynchronous emissions and so Spring Reactive Web framework has to represent such a result as an array.

The fix to return the expected json is to essentially return a type which represents 1 value - such a type is the Mono in Reactor-Core OR a Single in Rx-java. Both these types are as capable as their multi-valued counterparts in providing functions which combine, transform their elements.

So with this change the controller signature with Mono looks like this:

@RequestMapping(path = "/handleMessageReactor", method = RequestMethod.POST)
public Mono<MessageAcknowledgement> handleMessage(@RequestBody Message message) {
return this.aService.handleMessageMono(message);
}


and with Single like this:

@RequestMapping(path = "/handleMessageRxJava", method = RequestMethod.POST)
public Single<MessageAcknowledgement> handleMessage(@RequestBody Message message) {
return this.aService.handleMessageSingle(message);
}

I have the sample code available in my github repo

Tracing Spring Integration Flow with Spring Cloud Sleuth

$
0
0
Spring Cloud Sleuth is an awesome project that provides a way to trace requests that span multiple systems. Spring Cloud sleuth can optionally export this trace data to Zipkin where it can be visualized in a neat way. I especially love the fact that Spring Cloud Sleuth integrates deeply with Spring Integration and can nicely trace out the flow of a message.


Consider the following -


I have two different systems here - a work dispatcher producing "Work Unit"s and a Work Handler consuming them. They talk over a RabbitMQ broker. Just to mix the flow up a bit, I also have a retry mechanism in place which retries the message every 20 seconds in case of a processing failure


Both these systems are described using Spring Integration Java DSL, the outbound flow dispatching the WorkUnits looks like this:

@Configuration
public class WorksOutbound {

@Autowired
private RabbitConfig rabbitConfig;

@Bean
public IntegrationFlow toOutboundQueueFlow() {
return IntegrationFlows.from("worksChannel")
.transform(Transformers.toJson())
.log()
.handle(Amqp.outboundGateway(rabbitConfig.worksRabbitTemplate()))
.transform(Transformers.fromJson(WorkUnitResponse.class))
.get();
}

@Bean
public IntegrationFlow handleErrors() {
return IntegrationFlows.from("errorChannel")
.transform((MessagingException e) -> e.getFailedMessage().getPayload())
.transform(Transformers.fromJson(WorkUnit.class))
.transform((WorkUnit failedWorkUnit) -> new WorkUnitResponse(failedWorkUnit.getId(), failedWorkUnit.getDefinition(), false))
.get();
}

}

This is eminently readable - the "Work Unit" comes through a "works channel" and is dispatched to a RabbitMQ queue after tranforming to json. Note that the dispatch is via an outbound gateway, this means that the Spring integration would put the necessary infrastructure in place to wait for a reply to be back from the remote system. In case of an error, say if the reply does not appear in time, a stock response is provided back to the user.

On the Work Handler side a similar flow handles the message:

@Configuration
public class WorkInbound {

@Autowired
private RabbitConfig rabbitConfig;

@Bean
public IntegrationFlow inboundFlow() {
return IntegrationFlows.from(
Amqp.inboundGateway(rabbitConfig.workListenerContainer()))
.transform(Transformers.fromJson(WorkUnit.class))
.log()
.filter("(headers['x-death'] != null) ? headers['x-death'][0].count < 3: true", f -> f.discardChannel("nullChannel"))
.handle("workHandler", "process")
.transform(Transformers.toJson())
.get();
}

}

The only wrinkle in this flow is the retry logic which discards the message after 3 retries. If you are interested in the details of how the retry is being hooked up, I have more details here.


So now, given this fairly involved flow, here is how Spring Cloud Sleuth with Zipkin integrated looks like:


Spring Cloud Sleuth intercepts every message channel and tags the message as it flows through the channel.


Now for something a little more interesting, if the flow were more complex with 3 retries each 20 seconds apart, again the flow is beautifully brought out by Spring Cloud Sleuth and its integration with Zipkin.


Conclusion


If you maintain a Spring Integration based flow, Spring Cloud Sleuth is an addition to the project and can trace the runtime path of a message and show it visually using the Zipkin UI. I look forward to exploring more of the nuances of this excellent project.


The sample that I have demonstrated here is available in my github repo - https://github.com/bijukunjummen/si-with-sleuth-sample

Parallelizing Hystrix calls

$
0
0
This is more common sense than anything else. If you make calls to multiple remote systems and aggregate the results in some way, represented as a marble diagram here:


And you protect each of the remote calls using the awesome Hystrix libraries, then the best way to aggregate the results is using native rx-java operators.

So consider a Hystrix command, assume that such a command in reality would wrap around a remote call:

public class SampleRemoteCallCommand1 extends HystrixCommand<String> {

public SampleRemoteCallCommand1() {
super(Setter.withGroupKey(
HystrixCommandGroupKey.Factory.asKey("sample1"))
.andCommandKey(HystrixCommandKey.Factory.asKey("sample1")
)
);
}

@Override
protected String run() throws Exception {
DelayUtil.delay(700);
return "something";
}

@Override
protected String getFallback() {
return "error";
}
}


a service which would aggregate responses from multiple such remote calls together would look like this:

SampleRemoteCallCommand1 command1 = new SampleRemoteCallCommand1();
SampleRemoteCallCommand2 command2 = new SampleRemoteCallCommand2();

Observable<String> result1Obs = command1.toObservable();
Observable<Integer> result2Obs = command2.toObservable();

Observable<String> result =
Observable.zip(result1Obs, result2Obs, (result1, result2) -> result1 + result2);


Essentially instead of synchronously executing the Hystrix command, we just use the "toObservable()" method to return a Rx-Java Observable representation of the result and use the different ways that Observable provides to aggregate the results together, in this specific instance the zip operator.

The main advantage of this approach is that we re-use the hystrix threadpool that each command uses to run the tasks in parallel. Here is a sample project which demonstrates this - https://github.com/bijukunjummen/sample-hystrix-parallel

Just a note of caution - if your Hystrix command does not have a fallback and if you use this approach with one of the remote calls failing, you may see a memory leak in your app - I had opened an issue regarding this leak, which the excellent Netflix Team has already addressed.

Spring Kafka Producer/Consumer sample

$
0
0
My objective here is to show how Spring Kafka provides an abstraction to raw Kafka Producer and Consumer API's that is easy to use and is familiar to someone with a Spring background.

Sample scenario


The sample scenario is a simple one, I have a system which produces a message and another which processes it


Implementation using Raw Kafka Producer/Consumer API's

To start with I have used raw Kafka Producer and Consumer API's to implement this scenario. If you would rather look at the code, I have it available in my github repo here.

Producer

The following sets up a KafkaProducer instance which is used for sending a message to a Kafka topic:

KafkaProducer<String, WorkUnit> producer 
= new KafkaProducer<>(kafkaProps, stringKeySerializer(), workUnitJsonSerializer());

I have used a variation of the KafkaProducer constructor which takes in a custom Serializer to convert the domain object to a json representation.

Once an instance of KafkaProducer is available, it can be used for sending a message to the Kafka cluster, here I have used a synchronous version of the sender which waits for a response to be back.

ProducerRecord<String, WorkUnit> record 
= new ProducerRecord<>("workunits", workUnit.getId(), workUnit);

RecordMetadata recordMetadata = this.workUnitProducer.send(record).get();

Consumer

On the Consumer side we create a KafkaConsumer with a variation of the constructor taking in a Deserializer which knows how to read a json message and translate that to the domain instance:

KafkaConsumer<String, WorkUnit> consumer 
= new KafkaConsumer<>(props, stringKeyDeserializer()
, workUnitJsonValueDeserializer());

Once an instance of KafkaConsumer is available a listener loop can be put in place which reads a batch of records, processes them and waits for more records to come through:

consumer.subscribe("workunits);

try {
while (true) {
ConsumerRecords<String, WorkUnit> records = this.consumer.poll(100);
for (ConsumerRecord<String, WorkUnit> record : records) {
log.info("consuming from topic = {}, partition = {}, offset = {}, key = {}, value = {}",
record.topic(), record.partition(), record.offset(), record.key(), record.value());

}
}
} finally {
this.consumer.close();
}


Implementation using Spring Kafka 


I have the implementation using Spring-kafka available in my github repo.

Producer

Spring-Kafka provides a KafkaTemplate class as a wrapper over the KafkaProducer to send messages to a Kafka topic:

@Bean
public ProducerFactory<String, WorkUnit> producerFactory() {
return new DefaultKafkaProducerFactory<>(producerConfigs(), stringKeySerializer(), workUnitJsonSerializer());
}

@Bean
public KafkaTemplate<String, WorkUnit> workUnitsKafkaTemplate() {
KafkaTemplate<String, WorkUnit> kafkaTemplate = new KafkaTemplate<>(producerFactory());
kafkaTemplate.setDefaultTopic("workunits");
return kafkaTemplate;
}

One thing to note is that whereas earlier I had implemented a custom Serializer/Deserializer to send a domain type as json and then to convert it back, Spring-Kafka provides Seralizer/Deserializer for json out of the box.

And using KafkaTemplate to send a message:

SendResult<String, WorkUnit> sendResult = 
workUnitsKafkaTemplate.sendDefault(workUnit.getId(), workUnit).get();

RecordMetadata recordMetadata = sendResult.getRecordMetadata();

LOGGER.info("topic = {}, partition = {}, offset = {}, workUnit = {}",
recordMetadata.topic(), recordMetadata.partition(), recordMetadata.offset(), workUnit);

Consumer

The consumer part is implemented using a Listener pattern that should be familiar to anybody who has implemented listeners for RabbitMQ/ActiveMQ. Here is first the configuration to set-up a listener container:

@Bean
public ConcurrentKafkaListenerContainerFactory<String, WorkUnit> kafkaListenerContainerFactory() {
ConcurrentKafkaListenerContainerFactory<String, WorkUnit> factory =
new ConcurrentKafkaListenerContainerFactory<>();
factory.setConcurrency(1);
factory.setConsumerFactory(consumerFactory());
return factory;
}

@Bean
public ConsumerFactory<String, WorkUnit> consumerFactory() {
return new DefaultKafkaConsumerFactory<>(consumerProps(), stringKeyDeserializer(), workUnitJsonValueDeserializer());
}


and the service which responds to messages read by the container:

@Service
public class WorkUnitsConsumer {
private static final Logger log = LoggerFactory.getLogger(WorkUnitsConsumer.class);

@KafkaListener(topics = "workunits")
public void onReceiving(WorkUnit workUnit, @Header(KafkaHeaders.OFFSET) Integer offset,
@Header(KafkaHeaders.RECEIVED_PARTITION_ID) int partition,
@Header(KafkaHeaders.RECEIVED_TOPIC) String topic) {
log.info("Processing topic = {}, partition = {}, offset = {}, workUnit = {}",
topic, partition, offset, workUnit);
}
}

Here all the complexities of setting up a listener loop like with the raw consumer is avoided and is nicely hidden by the listener container.


Conclusion

I have brushed over a lot of the internals of setting up batch sizes, variations in acknowledgement, different API signatures. My intention is just to demonstrate a common use case using the raw Kafka API's and show how Spring-Kafka wrapper simplifies it.

If you are interested in exploring further, the raw producer consumer sample is available here and the Spring Kafka one here

Recipe for getting started with Spring Boot and Angular 2

$
0
0
I am primarily a service developer who has to create some passable UI's once in a while. I was adept at basic AngularJS1 based UI's and could get stuff done by using an approach that I have outlined before. With the advent of Angular 2 I had to unfortunately throw my previous approach out of the window and now have an approach with Spring Boot/ Angular 2 that works equally well.

The approach essentially works on the fact that a Spring Boot web application looks for static content in a very specific location - src/main/resources/static folder from the root of the project, so if I can get the final js content into this folder, then I am golden.

So let us jump into it.

Pre-requisites

There is primarily one pre-requisite - the excellent angular-cli tool which is a blessing for UI ignorant developers like me.

The second optional but useful pre-requisite is the Spring-Boot CLI tool described here


Generating a SPA Project


Given these two tools, first create a Spring Boot web project either by starting from http://start.spring.io or using the following CLI command:

spring init --dependencies=web spring-boot-angular2-static-sample

At this point a starter project should have been generated in the spring-boot-angular2-static-sample folder. From that folder generate a Angular 2 project using the angular-cli.

ng init

Change the location where angular-cli builds the artifacts, edit angular-cli.json and modify as follows:


Now build the static content:

ng build

this should get the static content to the src/main/resources/static folder.

And start up the Spring-Boot app:

mvn spring-boot:run

and the AngularJS2 based UI should render cleanly!

Live Reload

One of the advantages of using the Angular-cli is the excellent tool-chain that it comes with - one of them being the ability to make changes and view it reflected on the UI. This ability is lost with the approach documented here where the UI may be primarily driven by services hosted on the Spring-Boot project. To get back the live reload feature on the AngularJS2 development is however a cinch.

First proxy the backend, create a proxy.conf.json file with entry which looks like this:

{
"/api": {
"target": "http://localhost:8080",
"secure": false
}
}

and start up the Angular-cli server using the command:

ng serve --proxy-config proxy.conf.json

and start up the server part independently using:

mvn spring-boot:run

That is it, now the UI development can be carried out independent of the server side API's!. For an even greater punch just use the excellent devtools that is packaged with Spring Boot to get a live reload(more a restart) feature on the server side also.

Conclusion

This is the recipe I use for any basic UI that I may have to create, this approach probably is not ideal for large projects but should be a perfect fit for small internal projects. I have a sample starter with a backend call hooked up available in my github repo here.

Using Kafka with Junit

$
0
0
One of the neat features that the excellent Spring Kafka project provides, apart from a easier to use abstraction over raw Kafka Producer and Consumer, is a way to use Kafka in tests. It does this by providing an embedded version of Kafka that can be set-up and torn down very easily.

All that a project needs to include this support is the "spring-kafka-test" module, for a gradle build the following way:

testCompile "org.springframework.kafka:spring-kafka-test:1.1.2.BUILD-SNAPSHOT"

Note that I am using a snapshot version of the project as this has support for Kafka 0.10+.

With this dependency in place, an Embedded Kafka can be spun up in a test using the @ClassRule of JUnit:

@ClassRule
public static KafkaEmbedded embeddedKafka = new KafkaEmbedded(2, true, 2, "messages");

This would start up a Kafka Cluster with 2 brokers, with a topic called "messages" using 2 partitions and the class rule would make sure that a Kafka cluster is spun up before the tests are run and then shutdown at the end of it.

Here is how a sample with Raw Kafka Producer/Consumer using this embedded Kafka cluster looks like, the embedded Kafka can be used for retrieving the properties required by the Kafka Producer/Consumer:

Map<String, Object> senderProps = KafkaTestUtils.producerProps(embeddedKafka);
KafkaProducer<Integer, String> producer = new KafkaProducer<>(senderProps);
producer.send(new ProducerRecord<>("messages", 0, 0, "message0")).get();
producer.send(new ProducerRecord<>("messages", 0, 1, "message1")).get();
producer.send(new ProducerRecord<>("messages", 1, 2, "message2")).get();
producer.send(new ProducerRecord<>("messages", 1, 3, "message3")).get();


Map<String, Object> consumerProps = KafkaTestUtils.consumerProps("sampleRawConsumer", "false", embeddedKafka);
consumerProps.put("auto.offset.reset", "earliest");

final CountDownLatch latch = new CountDownLatch(4);
ExecutorService executorService = Executors.newSingleThreadExecutor();
executorService.execute(() -> {
KafkaConsumer<Integer, String> kafkaConsumer = new KafkaConsumer<>(consumerProps);
kafkaConsumer.subscribe(Collections.singletonList("messages"));
try {
while (true) {
ConsumerRecords<Integer, String> records = kafkaConsumer.poll(100);
for (ConsumerRecord<Integer, String> record : records) {
LOGGER.info("consuming from topic = {}, partition = {}, offset = {}, key = {}, value = {}",
record.topic(), record.partition(), record.offset(), record.key(), record.value());
latch.countDown();
}
}
} finally {
kafkaConsumer.close();
}
});

assertThat(latch.await(90, TimeUnit.SECONDS)).isTrue();

A little more comprehensive test is available here

Spring Boot and Application Context Hierarchy

$
0
0
Spring Boot supports a simple way of specifying a Spring application context hierarchy.

This post is simply demonstrating this feature, I am yet to find a good use of it in the projects I have worked on. Spring Cloud uses this feature for creating a bootstrap context where properties are loaded up, if required, from an external configuration server which is made available to the main application context later on.

To quickly take a step back - a Spring Application Context manages the lifecycle of all the beans registered with it. Application Context hierarchies provide a way to reuse beans, beans defined in the parent context is accessible in the child contexts.

Consider a contrived use-case of using multiple application contexts and application context hierarchy - this is to provide two different ports with different set of endpoints at each of these ports.


Child1 and Child2 are typical Spring Boot Applications, along these lines:

package child1;

import org.springframework.beans.factory.annotation.Value;
import org.springframework.boot.autoconfigure.SpringBootApplication;
import org.springframework.context.annotation.Bean;
import org.springframework.context.annotation.PropertySource;
import root.RootBean;

@SpringBootApplication
@PropertySource("classpath:/child1.properties")
public class ChildContext1 {

@Bean
public ChildBean1 childBean(RootBean rootBean, @Value("${root.property}") String someProperty) {
return new ChildBean1(rootBean, someProperty);
}
}


Each of the application resides in its own root package to avoid collisions when scanning for beans. Note that the bean in the child contexts depend on a bean that is expected to come from the root context.

The port to listen on is provided as properties, since the two contexts are expected to listen on different ports I have explicitly specified the property file to load with a content along these lines:

server.port=8080
spring.application.name=child1

Given this set-up, Spring Boot provides a fluid interface to load up the root context and the two child contexts:

SpringApplicationBuilder appBuilder =
new SpringApplicationBuilder()
.parent(RootContext.class)
.child(ChildContext1.class)
.sibling(ChildContext2.class);

ConfigurableApplicationContext applicationContext = appBuilder.run();

The application context returned by the SpringBootApplicationBuilder appears to be the final one in the chain, defined via ChildContext2 above.

If the application is now started up, there would be a root context with two different child contexts each exposing an endpoint via a different port. A visualization via the /beans actuator endpoint shows this:


Not everything is clean though, there are errors displayed in the console related to exporting jmx endpoints, however these are informational and don't appear to affect the start-up.

Samples are available in my github repo

Practical Reactor operations - Retrieve Details of a Cloud Foundry Application

$
0
0
CF-Java-Client is a library which enables programatic access to a Cloud FoundryCloud Controller API. It is built on top of Project Reactor, an implementation of Reactive Streams specification and it is a fun exercise using this library to do something practical in a Cloud Foundry environment.

Consider a sample use case - Given an application id I need to find a little more detail of this application, more details of the application along with the details of the organization and the space that it belongs to.

To start with, the basis of all API operations with cf-java-client is a type unsurprisingly called the CloudFoundryClient(org.cloudfoundry.client.CloudFoundryClient), cf-java-client's github page has details on how to get hold of an instance of this type.

Given a CloudFoundryClient instance, the details of an application given its id can be obtained as follows:

Mono<GetApplicationResponse> applicationResponseMono = this.cloudFoundryClient
.applicationsV2().get(GetApplicationRequest.builder().applicationId(applicationId).build());

Note that the API returns a reactor "Mono" type, this is in general the behavior of all the API calls of cf-java-client.


  • If an API returns one item then typically a Mono type is returned
  • If the API is expected to return more than one item then a Flux type is returned, and
  • If the API is called purely for side effects - say printing some information then it returns a Mono<Void> type


The next step is to retrieve the space identifier from the response and make an API call to retrieve the details of the space and looks like this:

Mono<Tuple2<GetApplicationResponse, GetSpaceResponse>> appAndSpaceMono = applicationResponseMono
.and(appResponse -> this.cloudFoundryClient.spaces()
.get(GetSpaceRequest.builder()
.spaceId(appResponse.getEntity().getSpaceId()).build()));


Here I am using an "and" operator to combine the application response with another Mono that returns the space information, the result is a "Tuple2" type holding both the pieces of information - the application detail and the detail of the space that it is in.

Finally to retrieve the Organization that the app is deployed in:

Mono<Tuple3<GetApplicationResponse, GetSpaceResponse, GetOrganizationResponse>> t3 =
appAndSpaceMono.then(tup2 -> this.cloudFoundryClient.organizations()
.get(GetOrganizationRequest.builder()
.organizationId(tup2.getT2().getEntity()
.getOrganizationId())
.build())
.map(orgResp -> Tuples.of(tup2.getT1(), tup2.getT2(),
orgResp)));

Here a "then" operation is being used to retrieve the organization detail given the id from the previous step and the result added onto the previous tuple to create a Tuple3 type holding the "Application Detail", "Space Detail" and the "Organization Detail". "then" is the equivalent of flatMap operator familiar in the Scala and ReactiveX world.

This essentially covers the way you would typically deal with "cf-java-client" library and use the fact that it is built on the excellent "Reactor" library and its collection of very useful operators to get results together. Just to take the final step of transforming the result to a type that may be more relevant to your domain and to handle any errors along the way:

Mono<AppDetail> appDetail =  
t3.map(tup3 -> {
String appName = tup3.getT1().getEntity().getName();
String spaceName = tup3.getT2().getEntity().getName();
String orgName = tup3.getT3().getEntity().getName();
return new AppDetail(appName, orgName, spaceName);
}).otherwiseReturn(new AppDetail("", "", ""));


If you are interested in trying out a working sample, I have an example available in my github repo here - https://github.com/bijukunjummen/boot-firehose-to-syslog

And the code shown in the article is available here - https://github.com/bijukunjummen/boot-firehose-to-syslog/blob/master/src/main/java/io.pivotal.cf.nozzle/service/CfAppDetailsService.java


Deploying akka-http app to Cloud Foundry - Part 1

$
0
0
It is easy to deploy an akka-http application to Cloud Foundry. I experimented with a few variations recently and will cover ways to deploy an Akka-http based REST app in two parts - first a simple app with no external resource dependencies, the second a little more complex CRUD app that maintains state in a MySQL database.


Pre Requisites


A quick way to get a running Cloud Foundry instance is using PCF Dev, a small footprint distribution of Cloud Foundry that can be started up on a developer laptop.

The sample app that I am using is a stock demo app available via the Lightbend Activator, if you have activator binaries available locally, you can create a quick project using the following command:


Generating the sample App and running it locally

activator new sample-akka-http akka-http-microservice


The application can be brought up by running sbt and using the "re-start" task

$ sbt
> re-start

By default the app comes up on port 9000 and can be tested with a sample CURL call - more here:

$ curl http://localhost:9000/ip/8.8.8.8
{
"city": "Mountain View",
"query": "8.8.8.8",
"country": "United States",
"lon": -122.0881,
"lat": 37.3845
}


Deploying to Cloud Foundry

There is one change that needs to be made to the application to get it to work in Cloud Foundry - adjusting the port where the application listens on. When the app is deployed to Cloud Foundry, an environment variable called "PORT" is the port that the application is expected to listen on. This change is the following for the sample app:

val port = if (sys.env.contains("PORT")) sys.env("PORT").toInt else config.getInt("http.port")
Http().bindAndHandle(routes, config.getString("http.interface"), port)

Here I look for the PORT environment variable and use that port if available.

There is already the "assembly" sbt plugin available which creates a fat jar with the appropriate entries, to be able to start up the main class of the application

> assembly

Go to "target/scala-2.11" folder and run the fat jar:
$ java -jar sample-akka-http-assembly-1.0.jar

And the application should come up cleanly.

Having a fat jar greatly simplifies the deployment to Cloud Foundry - In the Cloud Foundry world, a buildpack takes the application binaries and layers in the runtime(jvm, a container like tomcat, application certs, monitoring agents etc). Given this fat jar all that is needed to deploy to Cloud Foundry is a command which looks like this:

$ cf push -p sample-akka-http-assembly-1.0.jar sample-akka-http  

Assuming that you are targeting the local PCF Dev environment the application should get cleanly deployed using the appropriate buildpack(java buildpack in this instance) and be available to handle requests in a few minutes:


Which I can test using a curl command similar to what I had before:
$ curl http:// sample-akka-http.local.pcfdev.io/ip/8.8.8.8
{
"city": "Mountain View",
"query": "8.8.8.8",
"country": "United States",
"lon": -122.0881,
"lat": 37.3845
}

That is all there is to it - if say some customizations need to be made to the application, say more jvm heap size, this can be easily done via other command line flags or using an application manifest. The process to deploy with external resource dependencies is a little more complex and I will cover this in a follow up post.

Deploying akka-http app to Cloud Foundry - Part 2

$
0
0
In a preceding post I had gone over the steps to deploy a simple akka-http app to Cloud Foundry. The gist of it was that as long there is a way to create a runnable fat(uber) jar, the deployment is very straightforward - Cloud Foundry's Java buildpack can take the bits and wire up everything needed to get it up an running in the Cloud Foundry environment.

Here I wanted to go over a slightly more involved scenario - this is where the app has an external database dependency say to a MySQL database.

In a local environment the details of the database would have been resolved using a configuration typically specified like this:

sampledb = {
url = "jdbc:mysql://localhost:3306/mydb?useSSL=false"
user = "myuser"
password = "mypass"
}

If the Mysql database were to be outside of Cloud Foundry environment this approach of specifying the database configuration will continue to work nicely. However if the service resides in a Cloud Foundry market place , then the details of the service is created dynamically at bind time with the Application.

Just to make this a little more concrete, in my local PCF Dev, I have a marketplace with "p-mysql" service available.


And if I were to create a "service instance" out of this:


and bind this instance to an app:


essentially what happens at this point is that the application has an environment variable called VCAP_SERVICES available to it and this has to be parsed to get the db creds. VCAP_SERVICES in the current scenario looks something like this:

{
"p-mysql": [
{
"credentials": {
"hostname": "mysql-broker.local.pcfdev.io",
"jdbcUrl": "jdbc:mysql://mysql-broker.local.pcfdev.io:3306/myinstance?user=user\u0026password=pwd",
"name": "myinstance",
"password": "pwd",
"port": 3306,
"uri": "mysql://user:pwd@mysql-broker.local.pcfdev.io:3306/myinstance?reconnect=true",
"username": "user"
},
"label": "p-mysql",
"name": "mydb",
"plan": "512mb",
"provider": null,
"syslog_drain_url": null,
"tags": [
"mysql"
]
}
]
}

This can be parsed very easily using Typesafe config, a sample (admittedly hacky) code looks like this:

  def getConfigFor(serviceType: String, name: String): Config = {
val vcapServices = env("VCAP_SERVICES")
val rootConfig = ConfigFactory.parseString(vcapServices)
val configs = rootConfig.getConfigList(serviceType).asScala
.filter(_.getString("name") == name)
.map(instance => instance.getConfig("credentials"))

if (configs.length > 0) configs.head
else ConfigFactory.empty()
}

and called the following way:
val dbConfig = cfServicesHelper.getConfigFor("p-mysql", "mydb")

This would dynamically resolve the credentials for mysql and would allow the application to connect to the database.

An easier way to follow all this may be to look at a sample code available in my github repo here - https://github.com/bijukunjummen/sample-akka-http-rest.

Gradle Plugins DSL and Spring-Boot Plugin

$
0
0
Gradle Plugins DSL is a new gradle feature which provides a very succinct way of adding a plugin to a Gradle based project. A good way to show the utility of this new mechanism is in how it simplifies a sample Spring Boot based gradle build file.

If I were to generate a sample gradle based Spring boot project from the excellent http://start.spring.io site, a snippet of the gradle file which adds in the Spring Boot gradle plugin looks like this:

buildscript {
ext {
springBootVersion = '1.4.3.RELEASE'
}
repositories {
mavenCentral()
}
dependencies {
classpath("org.springframework.boot:spring-boot-gradle-plugin:${springBootVersion}")
}
}

apply plugin: 'org.springframework.boot'

The new Gradle Plugins DSL simplifies this boilerplate drastically. An equivalent declaration using the new Plugins DSL is the following:

plugins {
id "org.springframework.boot" version "1.4.3.RELEASE"
}

This IMHO reads far better, though it does require some level of mental parsing. The best way to understand this new syntax though may to know that this works in concert with the Gradle plugins portal, a centralized repository of plugins, to resolve the plugin related dependencies. The page for the Spring Boot plugin is here - https://plugins.gradle.org/plugin/org.springframework.boot.

Spring Data support for Cassandra 3

$
0
0
One of the items that caught my eye from the announcement of the new Spring Data release train named Ingalls was that the Spring Data Cassandra finally supports Cassandra 3+. So I revisited one of my old samples and tried it with a newer version of Cassandra.


Installing Cassandra


The first step is to install a local version of Cassandra and I continue to find the ccm tool to be outstanding in being able to bring up and tear down a small cluster. Here is the command that I am running to bring up a 3 node Apache Cassandra 3.9 based cluster.

ccm create test -v 3.9 -n 3 -s --vnodes


Create Schemas


Connect to a node in the cluster:
ccm node1 cqlsh

CREATE KEYSPACE IF NOT EXISTS sample WITH replication = {'class':'SimpleStrategy', 'replication_factor':1};

Next, I need to create the tables to hold the data. A general Cassandra recommendation is to model the tables based on query patterns - given this let me first define a table to hold the basic "hotel" information:

CREATE TABLE IF NOT EXISTS  sample.hotels (
id UUID,
name varchar,
address varchar,
state varchar,
zip varchar,
primary key((id), name)
);


Assuming I have to support two query patterns - a retrieval of hotels based on say the first letter, and a retrieval of hotels by state, I have a "hotels_by_letter" denormalized table to support retrieval by "first letter":


CREATE TABLE IF NOT EXISTS sample.hotels_by_letter (
first_letter varchar,
hotel_name varchar,
hotel_id UUID,
address varchar,
state varchar,
zip varchar,
primary key((first_letter), hotel_name, hotel_id)
);


And just for variety a "hotels_by_state" materialized view to support retrieval by state that the hotels are in:

CREATE MATERIALIZED VIEW sample.hotels_by_state AS
SELECT id, name, address, state, zip FROM hotels
WHERE state IS NOT NULL AND id IS NOT NULL AND name IS NOT NULL
PRIMARY KEY ((state), name, id)
WITH CLUSTERING ORDER BY (name DESC)


Coding Repositories


On the Java side, since I am persisting and querying a simple domain type called "Hotel", it looks like this:

@Table("hotels")
public class Hotel implements Serializable {
@PrimaryKey
private UUID id;
private String name;
private String address;
private String state;
private String zip;
...
}

Now, to be able to perform a basic CRUD operation on this entity all that is required is a repository interface as shown in the following code:
import cass.domain.Hotel;
import org.springframework.data.repository.CrudRepository;

import java.util.UUID;

public interface HotelRepository extends CrudRepository<Hotel, UUID>, HotelRepositoryCustom {}

This repository is additionally inheriting from a HotelRepositoryCustom interface which is to provide the custom finders to support retrieval by first name and state.

Now to persist a Hotel entity all I have to do is to call the repository method:

hotelRepository.save(hotel);

The data in the materialized view is automatically synchronized and maintained by Cassandra, however the data in the "hotels_by_letter" table has to be managed through code, so I have another repository defined to maintain data in this table:

public interface HotelByLetterRepository 
extends CrudRepository<HotelByLetter, HotelByLetterKey>, HotelByLetterRepositoryCustom {}


The custom interface and its implementation is to facilitate searching this table on queries based on first letter of the hotel name and is implemented this way through the a custom repository implementation feature of Spring data Cassandra.

import com.datastax.driver.core.querybuilder.QueryBuilder;
import com.datastax.driver.core.querybuilder.Select;
import org.springframework.beans.factory.annotation.Autowired;
import org.springframework.data.cassandra.core.CassandraTemplate;
import org.springframework.stereotype.Repository;

import java.util.List;

@Repository
public class HotelRepositoryImpl implements HotelRepositoryCustom {

private final CassandraTemplate cassandraTemplate;

@Autowired
public HotelRepositoryImpl(CassandraTemplate cassandraTemplate) {
this.cassandraTemplate = cassandraTemplate;
}

@Override
public List<Hotel> findByState(String state) {
Select select = QueryBuilder.select().from("hotels_by_state");
select.where(QueryBuilder.eq("state", state));
return this.cassandraTemplate.select(select, Hotel.class);
}
}

@Repository
public class HotelByLetterRepositoryImpl implements HotelByLetterRepositoryCustom {
private final CassandraTemplate cassandraTemplate;

public HotelByLetterRepositoryImpl(CassandraTemplate cassandraTemplate) {
this.cassandraTemplate = cassandraTemplate;
}

@Override
public List<HotelByLetter> findByFirstLetter(String letter) {
Select select = QueryBuilder.select().from("hotels_by_letter");
select.where(QueryBuilder.eq("first_letter", letter));
return this.cassandraTemplate.select(select, HotelByLetter.class);
}

}


Given these repository classes, custom repositories that provide query support, the rest of the code is to wire everything together which Spring Boot's Cassandra Auto Configuration facilitates.

That is essentially all there is to it, the Spring Data Cassandra makes it ridiculously simple to interact with Cassandra 3+.

A complete working project is I believe a far better way to get familiar with this excellent library and I have such a sample available in my github repo here - https://github.com/bijukunjummen/sample-boot-with-cassandra


Bootstrapping an OAuth2 Authorization server using UAA

$
0
0
A quick way to get a robust OAuth2 server running in your local machine is to use the excellent Cloud Foundry UAA project. UAA is used as the underlying OAUth2 authorization server in Cloud Foundry deployments and can scale massively, but is still small enough that it can be booted up on modest hardware.

I will cover using the UAA in two posts. In this post, I will go over how to get a local UAA server running and populate it with some of the actors involved in an OAuth2 authorization_code flow - clients and users, and in a follow up post I will show how to use this Authorization server with a sample client application and in securing a resource.

Starting up the UAA

The repository for the UAA project is at https://github.com/cloudfoundry/uaa


Downloading the project is simple, just clone this repo:
git clone https://github.com/cloudfoundry/uaa

If you have a local JDK available, start it up using:
./gradlew run

This version of UAA uses an in-memory database, so the test data generated will be lost on restart of the application.


Populate some data

An awesome way to interact with UAA is its companion CLI application called uaac, available here. Assuming that you have the uaac cli downloaded and UAA started up at its default port of 8080, let us start by pointing the uaac to the uaa application:

uaac target http://localhost:8080/uaa

and log into it using one of the canned client credentials(admin/adminsecret):

uaac token client get admin -s adminsecret

Now that a client has logged in, the token can be explored using :
uaac context

This would display the details of the token issued by UAA, along these lines:

[3]*[http://localhost:8080/uaa]

[2]*[admin]
client_id: admin
access_token: eyJhbGciOiJIUzI1NiJ9.eyJqdGkiOiJkOTliMjg1MC1iZDQ1LTRlOTctODIyZS03NGE2MmUwN2Y0YzUiLCJzdWIiOiJhZG1pbiIsImF1dGhvcml0aWVzIjpbImNsaWVudHMucmVhZCIsImNsaWVudHMuc2VjcmV0IiwiY2xpZW50cy53cml0ZSIsInVhYS5hZG1pbiIsImNsaWVudHMuYWRtaW4iLCJzY2ltLndyaXRlIiwic2NpbS5yZWFkIl0sInNjb3BlIjpbImNsaWVudHMucmVhZCIsImNsaWVudHMuc2VjcmV0IiwiY2xpZW50cy53cml0ZSIsInVhYS5hZG1pbiIsImNsaWVudHMuYWRtaW4iLCJzY2ltLndyaXRlIiwic2NpbS5yZWFkIl0sImNsaWVudF9pZCI6ImFkbWluIiwiY2lkIjoiYWRtaW4iLCJhenAiOiJhZG1pbiIsImdyYW50X3R5cGUiOiJjbGllbnRfY3JlZGVudGlhbHMiLCJyZXZfc2lnIjoiZTc4YjAyMTMiLCJpYXQiOjE0ODcwMzk3NzYsImV4cCI6MTQ4NzA4Mjk3NiwiaXNzIjoiaHR0cDovL2xvY2FsaG9zdDo4MDgwL3VhYS9vYXV0aC90b2tlbiIsInppZCI6InVhYSIsImF1ZCI6WyJhZG1pbiIsImNsaWVudHMiLCJ1YWEiLCJzY2ltIl19.B-RmeIvYttxJOMr_CX1Jsinsr6G_e8dVU-Fv-3Qq1ow
token_type: bearer
expires_in: 43199
scope: clients.read clients.secret clients.write uaa.admin clients.admin scim.write scim.read
jti: d99b2850-bd45-4e97-822e-74a62e07f4c5

To see a more readable and decoded form of token, just run:
uaac token decode 
which should display a decoded form of the token:
jti: d99b2850-bd45-4e97-822e-74a62e07f4c5
sub: admin
authorities: clients.read clients.secret clients.write uaa.admin clients.admin scim.write scim.read
scope: clients.read clients.secret clients.write uaa.admin clients.admin scim.write scim.read
client_id: admin
cid: admin
azp: admin
grant_type: client_credentials
rev_sig: e78b0213
iat: 1487039776
exp: 1487082976
iss: http://localhost:8080/uaa/oauth/token
zid: uaa
aud: admin clients uaa scim


Now, to create a brand new client(called client1), which I will be using in a follow on post:

uaac client add client1  \
--name client1 --scope resource.read,resource.write \
--autoapprove ".*" \
-s client1 \
--authorized_grant_types authorization_code,refresh_token,client_credentials \
--authorities uaa.resource

This client is going to request a scope of resource.read, resource.write from users and will participate in authorization_code grant-type OAuth2 flows


Creating a resource owner or a user of the system:

uaac user add user1 -p user1 --emails user1@user1.com

and assigning this user a resource.read scope:

uaac group add resource.read
uaac member add resource.read user1


Exercise a test flow

Now that we have a client and a resource owner, let us exercise a quick authorization_code flow, uaac provides a handy command line option that provides the necessary redirect hooks to capture auth code and transforms the auth_code to an access token.

uaac token authcode get -c client1 -s client1 --no-cf

Invoking the above command should open up a browser window and prompt for user creds:


Logging in with the user1/user1 user that was created previously should respond with a message in the command line that the token has been successfully fetched, this can be explored once more using the following command:

uaac context

with the output, showing the details of the logged in user!:
jti: c8ddfdfc-9317-4f16-b3a9-808efa76684b
nonce: 43c8d9f7d6264fb347ede40c1b7b44ae
sub: 7fdd9a7e-5b92-42e7-ae75-839e21b932e1
scope: resource.read
client_id: client1
cid: client1
azp: client1
grant_type: authorization_code
user_id: 7fdd9a7e-5b92-42e7-ae75-839e21b932e1
origin: uaa
user_name: user1
email: user1@user1.com
auth_time: 1487040497
rev_sig: c107f5c0
iat: 1487040497
exp: 1487083697
iss: http://localhost:8080/uaa/oauth/token
zid: uaa
aud: resource client1

This concludes the whirlwind tour of setting up a local UAA and adding a couple of roles involved in a OAuth2 flow - a client and a user. I have not covered the OAuth2 flows itself, the Digital Ocean intro to OAuth2 is a very good primer on the flows.

I will follow this post with a post on how this infrastructure can be used for securing a sample resource and demonstrate a flow using Spring Security and Spring Boot.

Using UAA OAuth2 authorization server - client and resource

$
0
0
In a previous post I had gone over how to bring up an OAuth2 authorization server using Cloud Foundry UAA project and populating it with some of the actors involved in a OAuth2 Authorization Code flow.


I have found this article at the Digital Ocean site does a great job of describing the OAuth2 Authorization code flow, so instead of rehashing what is involved in this flow I will directly jump into implementing this flow using Spring Boot/Spring Security.

The following diagram inspired by the one here shows a high level flow in an Authorization Code grant type:


I will have two applications - a resource server exposing some resources of a user, and a client application that wants to access those resources on behalf of a user. The Authorization server itself can be brought up as described in the previous blog post.

The rest of the post can be more easily followed along with the code available in my github repo here

Authorization Server

The Cloud Foundry UAA server can be easily brought up using the steps described in my previous blog post. Once it is up the following uaac commands can be used for populating the different credentials required to run the sample.

These scripts will create a client credential for the client app and add a user called "user1" with a scope of "resource.read" and "resource.write".

# Login as a canned client
uaac token client get admin -s adminsecret

# Add a client credential with client_id of client1 and client_secret of client1
uaac client add client1 \
--name client1 \
--scope resource.read,resource.write \
-s client1 \
--authorized_grant_types authorization_code,refresh_token,client_credentials \
--authorities uaa.resource


# Another client credential resource1/resource1
uaac client add resource1 \
--name resource1 \
-s resource1 \
--authorized_grant_types client_credentials \
--authorities uaa.resource


# Add a user called user1/user1
uaac user add user1 -p user1 --emails user1@user1.com


# Add two scopes resource.read, resource.write
uaac group add resource.read
uaac group add resource.write

# Assign user1 both resource.read, resource.write scopes..
uaac member add resource.read user1
uaac member add resource.write user1


Resource Server

The resource server exposes a few endpoints, expressed using Spring MVC and secured using Spring Security, the following way:

@RestController
public class GreetingsController {
@PreAuthorize("#oauth2.hasScope('resource.read')")
@RequestMapping(method = RequestMethod.GET, value = "/secured/read")
@ResponseBody
public String read(Authentication authentication) {
return String.format("Read Called: Hello %s", authentication.getCredentials());
}

@PreAuthorize("#oauth2.hasScope('resource.write')")
@RequestMapping(method = RequestMethod.GET, value = "/secured/write")
@ResponseBody
public String write(Authentication authentication) {
return String.format("Write Called: Hello %s", authentication.getCredentials());
}
}

There are two endpoint uri's being exposed - "/secured/read" authorized for scope "resource.read" and "/secured/write" authorized for scope "resource.write"

The configuration which secures these endpoints and marks the application as a resource server is the following:

@Configuration
@EnableResourceServer
@EnableWebSecurity
@EnableGlobalMethodSecurity(securedEnabled = true, prePostEnabled = true)
public class ResourceServerConfiguration extends ResourceServerConfigurerAdapter {

@Override
public void configure(ResourceServerSecurityConfigurer resources) throws Exception {
resources.resourceId("resource");
}

@Override
public void configure(HttpSecurity http) throws Exception {
http
.antMatcher("/secured/**")
.authorizeRequests()
.anyRequest().authenticated();
}
}

This configuration along with properties describing how the token is to be validated is all that is required to get the resource server running.


Client

The client configuration for OAuth2 using Spring Security OAuth2 is also fairly simple, @EnableAuth2SSO annotation pulls in all the required configuration to wire up the spring security filters for OAuth2 flows:

@EnableOAuth2Sso
@Configuration
public class OAuth2SecurityConfig extends WebSecurityConfigurerAdapter {
@Override
public void configure(WebSecurity web) throws Exception {
super.configure(web);
}

@Override
protected void configure(HttpSecurity http) throws Exception {
http.csrf().disable();

//@formatter:off
http.authorizeRequests()
.antMatchers("/secured/**")
.authenticated()
.antMatchers("/")
.permitAll()
.anyRequest()
.authenticated();

//@formatter:on

}

}

To call a downstream system, the client has to pass on the OAuth token as a header in the downstream calls, this is done by hooking a specialized RestTemplate called the OAuth2RestTemplate that can grab the access token from the context and pass it downstream, once it is hooked up a secure downstream call looks like this:

public class DownstreamServiceHandler {

private final OAuth2RestTemplate oAuth2RestTemplate;
private final String resourceUrl;


public DownstreamServiceHandler(OAuth2RestTemplate oAuth2RestTemplate, String resourceUrl) {
this.oAuth2RestTemplate = oAuth2RestTemplate;
this.resourceUrl = resourceUrl;
}


public String callRead() {
return callDownstream(String.format("%s/secured/read", resourceUrl));
}

public String callWrite() {
return callDownstream(String.format("%s/secured/write", resourceUrl));
}

public String callInvalidScope() {
return callDownstream(String.format("%s/secured/invalid", resourceUrl));
}

private String callDownstream(String uri) {
try {
ResponseEntity<String> responseEntity = this.oAuth2RestTemplate.getForEntity(uri, String.class);
return responseEntity.getBody();
} catch(HttpStatusCodeException statusCodeException) {
return statusCodeException.getResponseBodyAsString();
}
}
}


Demonstration

The Client and the resource server can be brought up using the instructions here. Once all the systems are up, accessing the client will present the user with a page which looks like this:


Accessing the secure page, will result in a login page being presented by the authorization server:


The client is requesting a "resource.read" and "resource.write" scope from the user, user is prompted to authorize these scopes:


Assuming that the user has authorized "resource.read" but not "resource.write", the token will be presented to the user:

At this point if the downstream resource is requested which requires a scope of "resource.read", it should get retrieved:


And if a downstream resource is requested with a scope that the user has not authorized - "resource.write" in this instance:


Reference

  • Most of the code is based on the Cloud Foundry UAA application samples available here - https://github.com/pivotal-cf/identity-sample-apps
  • The code in the post is here: https://github.com/bijukunjummen/oauth-uaa-sample

Spring Web-Flux - First steps

$
0
0
Spring Web-Flux term is used for denoting the Reactive programming support in the web layer of Spring Framework. It provides support for both creating reactive server based web applications and also has client libraries to make remote REST calls.

In this post, I will demonstrate a sample web application which makes use of Spring Web-Flux. As detailed here, the Web-Flux support in Spring 5+ supports two different programming style - the traditional annotation based style and the new functional style. In this post I will be sticking to the traditional annotation style and try to follow it up in another blog post detailing a similar application but with endpoints defined in a functional style. My focus is going to be purely the programming model.

Data and Services Layer


I have a fairly simple REST interface supporting CRUD operations of a Hotel resource with a structure along these lines:

public class Hotel {

private UUID id;

private String name;

private String address;

private String state;

private String zip;

....

}

I am using Cassandra as a store of this entity and using the reactive support in Spring Data Cassandra allows the data layer to be reactive, supporting an API that looks like this - I have two repositories here, one facilitating the storage of the Hotel entity above, another maintaining a duplicated data which makes searching for Hotel entity by its first letter a little more efficient:

public interface HotelRepository  {
Mono<Hotel> save(Hotel hotel);
Mono<Hotel> update(Hotel hotel);
Mono<Hotel> findOne(UUID hotelId);
Mono<Boolean> delete(UUID hotelId);
Flux<Hotel> findByState(String state);
}

public interface HotelByLetterRepository {
Flux<HotelByLetter> findByFirstLetter(String letter);
Mono<HotelByLetter> save(HotelByLetter hotelByLetter);
Mono<Boolean> delete(HotelByLetterKey hotelByLetterKey);
}


The operations which return one instance of an entity now return a Mono type and operations which return more than one element return a Flux type.


Given this let me touch on one quick use of returning the reactive types, when a Hotel is updated I have to delete the duplicated data maintained via HotelByLetter repository and recreate it again, this can be accomplished something like the following, using the excellent operators provided by Flux and Mono types:

public Mono<Hotel> update(Hotel hotel) {
return this.hotelRepository.findOne(hotel.getId())
.flatMap(existingHotel ->
this.hotelByLetterRepository.delete(new HotelByLetter(existingHotel).getHotelByLetterKey())
.then(this.hotelByLetterRepository.save(new HotelByLetter(hotel)))
.then(this.hotelRepository.update(hotel))).next();
}


Web Layer

Now to the focus of the article, support for annotation based reactive programming model support in the web layer!

The @Controller and @RestController annotations have been the workhorses of the Spring MVC's REST endpoint support for years now, traditionally they have enabled taking in and returning Java POJO's. These controllers in the reactive model have now been tweaked to take in and return the Reactive types - Mono and Flux in my examples, but additionally also the Rx-Java 1/2 and Reactive Streams types.

Given this, my controller in almost its entirety looks like this:

@RestController
@RequestMapping("/hotels")
public class HotelController {

....

@GetMapping(path = "/{id}")
public Mono<Hotel> get(@PathVariable("id") UUID uuid) {
return this.hotelService.findOne(uuid);
}

@PostMapping
public Mono<ResponseEntity<Hotel>> save(@RequestBody Hotel hotel) {
return this.hotelService.save(hotel)
.map(savedHotel -> new ResponseEntity<>(savedHotel, HttpStatus.CREATED));
}

@PutMapping
public Mono<ResponseEntity<Hotel>> update(@RequestBody Hotel hotel) {
return this.hotelService.update(hotel)
.map(savedHotel -> new ResponseEntity<>(savedHotel, HttpStatus.CREATED))
.defaultIfEmpty(new ResponseEntity<>(HttpStatus.NOT_FOUND));
}

@DeleteMapping(path = "/{id}")
public Mono<ResponseEntity<String>> delete(
@PathVariable("id") UUID uuid) {
return this.hotelService.delete(uuid).map((Boolean status) ->
new ResponseEntity<>("Deleted", HttpStatus.ACCEPTED));
}

@GetMapping(path = "/startingwith/{letter}")
public Flux<HotelByLetter> findHotelsWithLetter(
@PathVariable("letter") String letter) {
return this.hotelService.findHotelsStartingWith(letter);
}

@GetMapping(path = "/fromstate/{state}")
public Flux<Hotel> findHotelsInState(
@PathVariable("state") String state) {
return this.hotelService.findHotelsInState(state);
}
}

The traditional @RequestMapping, @GetMapping, @PostMapping is unchanged, what is different is the return types - for instances where atmost 1 result is expected I am now returning a Mono type and where a list would have been returned before, now a Flux type is returned.

With the use of the reactive support in Spring Data Cassandra the entire web to services and back is reactive and specifically for the focus of the article, eminently readable and intuitive.


It may be easier to simply try out the code behind this post which I have available in my github repo here.
Viewing all 250 articles
Browse latest View live