Quantcast
Channel: all and sundry
Viewing all 250 articles
Browse latest View live

Spring-boot and Scala

$
0
0
There is actually nothing very special about writing a Spring-boot web application purely using Scala, it just works!

In this blog entry, I will slowly transform a Java based Spring-boot application completely to Scala - the Java based sample is available at this github location - https://github.com/bijukunjummen/spring-boot-mvc-test

To start with, I had the option of going with either a maven based build or gradle based build - I opted to go with a gradle based build as gradle has a great scala plugin, so for scala support the only changes to a build.gradle build script is the following:


...
apply plugin: 'scala'
...
jar {
baseName = 'spring-boot-scala-web'
version = '0.1.0'
}


dependencies {
...
compile 'org.scala-lang:scala-library:2.10.2'
...
}

Essentially adding in the scala plugin and specifying the version of the scala-library.

Now, I have one entity, a Hotel class, it transforms to the following with Scala:

package mvctest.domain

....

@Entity
class Hotel {

@Id
@GeneratedValue
@BeanProperty
var id: Long = _

@BeanProperty
var name: String = _

@BeanProperty
var address: String = _

@BeanProperty
var zip: String = _
}

Every property is annotated with @BeanProperty annotation to instruct scala to generate the Java bean based getter and setter on the variables.

With the entity in place a Spring-data repository for CRUD operations on this entity transforms from:

import mvctest.domain.Hotel;

import org.springframework.data.repository.CrudRepository;

public interface HotelRepository extends CrudRepository<Hotel, Long> {

}

to the following in Scala:

import org.springframework.data.repository.CrudRepository
import mvctest.domain.Hotel
import java.lang.Long

trait HotelRepository extends CrudRepository[Hotel, Long]

And the Scala based controller which uses this repository to list the Hotels -

...
import org.springframework.web.bind.annotation.RequestMapping
import org.springframework.stereotype.Controller
import mvctest.service.HotelRepository
import org.springframework.beans.factory.annotation.Autowired
import org.springframework.ui.Model

@Controller
@RequestMapping(Array("/hotels"))
class HotelController @Autowired() (private val hotelRepository: HotelRepository) {

@RequestMapping(Array("/list"))
def list(model: Model) = {
val hotels = hotelRepository.findAll()
model.addAttribute("hotels", hotels)
"hotels/list"
}
}

Here the constructor autowiring of the HotelRepository just works!. Do note the slightly awkward way of specifying the @Autowired annotation for constructor based injection.

Finally, Spring-boot based application requires a main class to bootstrap the entire application, where this bootstrap class looks like this with Java:

@Configuration
@EnableAutoConfiguration
@ComponentScan
public class SampleWebApplication {

public static void main(String[] args) {
SpringApplication.run(SampleWebApplication.class, args);
}
}

In scala, though I needed to provide two classes, one to specify the annotation and other to bootstrap the application, there may be better way to do this(blame it on my lack of Scala depth!) -

package mvctest

import org.springframework.context.annotation.Configuration
import org.springframework.boot.autoconfigure.EnableAutoConfiguration
import org.springframework.context.annotation.ComponentScan
import org.springframework.boot.SpringApplication

@Configuration
@EnableAutoConfiguration
@ComponentScan
class SampleConfig


object SampleWebApplication extends App {
SpringApplication.run(classOf[SampleConfig]);
}

and that's it, with this set-up the entire application just works, the application can be started up with the following:

./gradlew build && java -jar build/libs/spring-boot-scala-web-0.1.0.jar

and the sample endpoint listing the hotels accessed at this url: http://localhost:8080/hotels/list

I have the entire git project available at this github location: https://github.com/bijukunjummen/spring-boot-scala-web

In conclusion, Scala can be considered a first class citizen for a Spring-boot based application and there is no special configuration required to get a Scala based Spring-boot application to work. It just works!

Memoization of Scala Streams

$
0
0
I learnt the hard way that scala internally uses memoization with Streams.

This was my first attempt at a solution to Euler Problem 5

def from(n: Int): Stream[Int] = n #:: from(n + 1)

def isDivisibleByRange(n: Int, r: Range) = {
r.forall(n % _ == 0)
}

val a = from(21)
val o = a.find(isDivisibleByRange(_, Range(2, 21)))
o match {
case Some(i) => println(i)
case None => println("Nothing found!")
}

I was a little mystified by why this code was throwing an OutOfMemoryError, realized thanks to Stackoverflow that since the answer to this problem is quite high 232792560, all the integers in this range will be memoized within the different nodes of the stream and hence the issue.

This is actually easy to see, let me first modify the stream generator function with a side effect:

def from(n: Int): Stream[Int] = {println(s"Gen $n"); n #:: from(n + 1)}
val s = from(1)
s.take(10).toList
s.take(10).toList

The second statement would not print anything.

Given this memoization behavior there are a few possible fixes, the simplest is to not keep a reference to the head of the stream anywhere and to use the find method of iterator instead:
from(1).iterator.find(isDivisibleByRange(_, Range(1, 21)))


On a related note, Java 8 streams are not memoized and a solution using Java 8 streams (admittedly can be improved massively) is the following:

@Test
public void testStreamOfInts() {
Stream<Integer> intStream = Stream.generate(from(1));
List<Integer> upto20 = IntStream.rangeClosed(1, 20).boxed().collect(Collectors.toList());
Predicate<Integer> p = (i -> isDivisibleOverRange(i, upto20));
Optional<Integer> o = intStream.filter(p).findFirst();
o.ifPresent(i -> System.out.println("Found: " + i));
}

private Supplier<Integer> from(Integer i) {
AtomicInteger counter = new AtomicInteger(0);
return () -> counter.incrementAndGet();
}

private boolean isDivisibleOverRange(Integer n, List<Integer> l) {
return l.stream().allMatch(i -> n % i == 0);
}

Spring test with thymeleaf for views

$
0
0
I am a recent convert to thymeleaf for view templating in Spring based web applications, preferring it over jsp's. All the arguments that thymeleaf documentation makes on why thymeleaf over jsp holds water and I am definitely sold.

One of the big reasons for me, apart from being able to preview the template, is the way the view is rendered at runtime. Whereas the application stack has to defer the rendering of jsp to the servlet container, it has full control over the rendering of thymeleaf templates. To clarify this a little more, with jsp as the view technology an application only returns the location of the jsp and it is upto the servlet container to render the jsp.

So why again is this a big reason - because using the mvc test support in spring-test module, now the actual rendered content can be asserted on rather than just the name of the view.

Consider a sample Spring MVC controller :

@Controller
@RequestMapping("/shop")
public class ShopController {
...

@RequestMapping("/products")
public String listProducts(Model model) {
model.addAttribute("products", this.productRepository.findAll());
return "products/list";
}
}

Had the view been jsp based, I would have had a test which looks like this:

@RunWith(SpringJUnit4ClassRunner.class)
@WebAppConfiguration
@ContextConfiguration(classes = SampleWebApplication.class)
public class ShopControllerWebTests {

@Autowired
private WebApplicationContext wac;

private MockMvc mockMvc;

@Before
public void setup() {
this.mockMvc = MockMvcBuilders.webAppContextSetup(this.wac).build();
}

@Test
public void testListProducts() throws Exception {
this.mockMvc.perform(get("/shop/products"))
.andExpect(status().isOk())
.andExpect(view().name("products/list"));
}
}

the assertion is only on the name of the view.

Now, consider a test with thymeleaf used as the view technology:

@Test
public void testListProducts() throws Exception {
this.mockMvc.perform(get("/shop/products"))
.andExpect(status().isOk())
.andExpect(content().string(containsString("Dummy Book1")));
}

Here, I am asserting on the actual rendered content.

This is really good, whereas with jsp I would had to validate that the jsp is rendered correctly at runtime with a real container, with thymeleaf I can validate that rendering is clean purely using tests.

Using Http Session with Spring based web applications

$
0
0
There are multiple ways to get hold of and use an Http session with a Spring based web application. This is a summarization based on an experience with a recent project.

Approach 1

Just inject in HttpSession where it is required.
@Service
public class ShoppingCartService {

@Autowired
private HttpSession httpSession;

...
}

Though surprising, since the service above is a singleton, this works well. Spring intelligently injects in a proxy to the actual HttpSession and this proxy knows how to internally delegate to the right session for the request.

The catch with handling session this way though is that the object being retrieved and saved back in the session will have to be managed by the user:

public void removeFromCart(long productId) {
ShoppingCart shoppingCart = getShoppingCartInSession();
shoppingCart.removeItemFromCart(productId);
updateCartInSession(shoppingCart);
}

Approach 2

Accept it as a parameter, this will work only in the web tier though:

@Controller
public class ShoppingCartController {

@RequestMapping("/addToCart")
public String addToCart(long productId, HttpSession httpSession) {
//do something with the httpSession
}

}


Approach 3
Create a bean and scope it to the session this way:

@Component
@Scope(proxyMode=ScopedProxyMode.TARGET_CLASS, value="session")
public class ShoppingCart implements Serializable{
...
}

Spring creates a proxy for a session scoped bean and makes the proxy available to services which inject in this bean. An advantage of using this approach is that any state changes on this bean are handled by Spring, it would take care of retrieving this bean from the session and propagating any changes to the bean back to the session. Further if the bean were to have any Spring lifecycle methods(say @PostConstruct or @PreDestroy annotated methods), they would get called appropriately.

Approach 4
Annotating Spring MVC model attributes with @SessionAttribute annotation:

@SessionAttributes("shoppingCart")
public class OrderFlowController {


public String step1(@ModelAttribute("shoppingCart") ShoppingCart shoppingCart) {

}

public String step2(@ModelAttribute("shoppingCart") ShoppingCart shoppingCart) {

}

public String step3(@ModelAttribute("shoppingCart") ShoppingCart shoppingCart, SessionStatus status) {
status.setComplete();
}

}

The use case for using SessionAttributes annotation is very specific, to hold state during a flow like above


Given these approaches, I personally prefer Approach 3 of using session scoped beans, this way depending on Spring to manage the underlying details of retrieving and storing the object into session. Other approaches have value though based on the scenario that you may be faced with, ranging from requiring more control over raw Http Sessions to needing to handle temporary state like in Approach 4 above.

Spring Boot and Scala with sbt as the build tool

$
0
0
Earlier I had blogged about using Scala with Spring Boot and how the combination just works. There was one issue with the previous approach though - the only way to run the earlier configuration was to build the project into a jar file and run the jar file.

./gradlew build
java -jar build/libs/spring-boot-scala-web-0.1.0.jar

Spring boot comes with a gradle based plugin which should have allowed the project to run with a "gradle bootRun" command, this unfortunately gives an error for scala based projects.

EDIT: This is actually not completely true, another way to run the Spring-boot code using gradle will be to use the gradle application plugin and specify the main program this way:
apply plugin:'application'
mainClassName = "mvctest.SampleWebApplication"

A good workaround is to use sbt for building and running Spring-boot based projects. The catch though is that with gradle and maven, the versions of the dependencies would have been managed through a parent pom, now these have to be explicitly specified. This is how a sample sbt build file with the dependencies spelled out looks:

name := "spring-boot-scala-web"

version := "1.0"

scalaVersion := "2.10.4"

sbtVersion := "0.13.1"

seq(webSettings : _*)

libraryDependencies ++= Seq(
"org.springframework.boot" % "spring-boot-starter-web" % "1.0.2.RELEASE",
"org.springframework.boot" % "spring-boot-starter-data-jpa" % "1.0.2.RELEASE",
"org.webjars" % "bootstrap" % "3.1.1",
"org.webjars" % "jquery" % "2.1.0-2",
"org.thymeleaf" % "thymeleaf-spring4" % "2.1.2.RELEASE",
"org.hibernate" % "hibernate-validator" % "5.0.2.Final",
"nz.net.ultraq.thymeleaf" % "thymeleaf-layout-dialect" % "1.2.1",
"org.hsqldb" % "hsqldb" % "2.3.1",
"org.springframework.boot" % "spring-boot-starter-tomcat" % "1.0.2.RELEASE" % "provided",
"javax.servlet" % "javax.servlet-api" % "3.0.1" % "provided"
)


libraryDependencies ++= Seq(
"org.apache.tomcat.embed" % "tomcat-embed-core" % "7.0.53" % "container",
"org.apache.tomcat.embed" % "tomcat-embed-logging-juli" % "7.0.53" % "container",
"org.apache.tomcat.embed" % "tomcat-embed-jasper" % "7.0.53" % "container"
)

Here I am also using xsbt-web-plugin which is plugin for building scala web applications.

xsbt-web-plugin also comes with commands to start-up tomcat or jetty based containers and run the applications within these containers, however I had difficulty in getting these to work.

What worked is the runMain command to start up the Spring-boot main program through sbt:

runMain mvctest.SampleWebApplication

and xsbt-web-plugin allows the project to be packaged as a war file using the "package" command, this war deploys and runs without any issues in a standalone tomcat container.

Here is a github project with these changes: https://github.com/bijukunjummen/spring-boot-scala-web.git

Spring Scala based sample bean configuration

$
0
0
I have been using Spring Scala for a toy project for the last few days and I have to say that it is a fantastic project, it simplifies Spring configuration even further when compared to the already simple configuration purely based on Spring Java Config.

Let me demonstrate this by starting with the Cake Pattern based sample here:

// =======================
// service interfaces
trait OnOffDeviceComponent {
val onOff: OnOffDevice
trait OnOffDevice {
def on: Unit
def off: Unit
}
}
trait SensorDeviceComponent {
val sensor: SensorDevice
trait SensorDevice {
def isCoffeePresent: Boolean
}
}

// =======================
// service implementations
trait OnOffDeviceComponentImpl extends OnOffDeviceComponent {
class Heater extends OnOffDevice {
def on = println("heater.on")
def off = println("heater.off")
}
}
trait SensorDeviceComponentImpl extends SensorDeviceComponent {
class PotSensor extends SensorDevice {
def isCoffeePresent = true
}
}
// =======================
// service declaring two dependencies that it wants injected
trait WarmerComponentImpl {
this: SensorDeviceComponent with OnOffDeviceComponent =>
class Warmer {
def trigger = {
if (sensor.isCoffeePresent) onOff.on
else onOff.off
}
}
}

// =======================
// instantiate the services in a module
object ComponentRegistry extends
OnOffDeviceComponentImpl with
SensorDeviceComponentImpl with
WarmerComponentImpl {

val onOff = new Heater
val sensor = new PotSensor
val warmer = new Warmer
}

// =======================
val warmer = ComponentRegistry.warmer
warmer.trigger

Cake pattern is a pure Scala way of specifying the dependencies.

Now, if we were to specify this dependency using Spring's native Java config, but with Scala as the language, firs to define the components that need to be wired together:


trait SensorDevice {
def isCoffeePresent: Boolean
}

class PotSensor extends SensorDevice {
def isCoffeePresent = true
}

trait OnOffDevice {
def on: Unit
def off: Unit
}

class Heater extends OnOffDevice {
def on = println("heater.on")
def off = println("heater.off")
}

class Warmer(s: SensorDevice, o: OnOffDevice) {
def trigger = {
if (s.isCoffeePresent) o.on
else o.off
}
}

and the configuration with Spring Java Config and a sample which makes use of this configuration:

import org.springframework.context.annotation.Configuration
import org.springframework.context.annotation.Bean

@Configuration
class WarmerConfig {
@Bean
def heater(): OnOffDevice = new Heater

@Bean
def potSensor(): SensorDevice = new PotSensor

@Bean
def warmer() = new Warmer(potSensor(), heater())
}

import org.springframework.context.annotation.AnnotationConfigApplicationContext

val ac = new AnnotationConfigApplicationContext(classOf[WarmerConfig])

val warmer = ac.getBean("warmer", classOf[Warmer])

warmer.trigger


Taking this further to use Spring-Scala project to specify the dependencies, the configuration and a sample look like this:

import org.springframework.context.annotation.Configuration
import org.springframework.context.annotation.Bean
import org.springframework.scala.context.function.FunctionalConfiguration


class WarmerConfig extends FunctionalConfiguration {
val h = bean("heater") {
new Heater
}

val p = bean("potSensor") {
new PotSensor
}

bean("warmer") {
new Warmer(p(), h())
}
}

import org.springframework.context.annotation.AnnotationConfigApplicationContext
import org.springframework.scala.context.function.FunctionalConfigApplicationContext

val ac = FunctionalConfigApplicationContext[WarmerConfig]
val warmer = ac.getBean("warmer", classOf[Warmer])
warmer.trigger

The essence of the Spring Scala project as explained in this wiki is the "bean" method derived from the `FunctionalConfiguration` trait, this method can be called to create a bean, passing in parameters to specify, if required, bean name, alias, scope and a function which returns the instantiated bean.

This sample hopefully gives a good appreciation for how simple Spring Java Config is, and how much more simpler Spring-Scala project makes it for Scala based projects.

Spring Rest Controller with angularjs $resource

$
0
0
Angularjs ngResource is an angularjs module for interacting with REST based services. I used it recently for a small project with Spring MVC and wanted to document a configuration that worked well for me.

The controller is run of the mill, it supports CRUD operations on a Hotel entity and supports the following methods:

POST /rest/hotels - creates a Hotel entity
GET /rest/hotels - gets the list of Hotel entities
GET /rest/hotels/:id - retrieves an entity with specified Id
PUT /rest/hotels/:id - updates an entity
DELETE /rest/hotels/:id - deletes an entity with the specified id

This can implemented in the following way using Spring MVC:

@RestController
@RequestMapping("/rest/hotels")
public class RestHotelController {
private HotelRepository hotelRepository;

@Autowired
public RestHotelController(HotelRepository hotelRepository) {
this.hotelRepository = hotelRepository;
}

@RequestMapping(method=RequestMethod.POST)
public Hotel create(@RequestBody @Valid Hotel hotel) {
return this.hotelRepository.save(hotel);
}

@RequestMapping(method=RequestMethod.GET)
public List<Hotel> list() {
return this.hotelRepository.findAll();
}

@RequestMapping(value="/{id}", method=RequestMethod.GET)
public Hotel get(@PathVariable("id") long id) {
return this.hotelRepository.findOne(id);
}

@RequestMapping(value="/{id}", method=RequestMethod.PUT)
public Hotel update(@PathVariable("id") long id, @RequestBody @Valid Hotel hotel) {
return hotelRepository.save(hotel);
}

@RequestMapping(value="/{id}", method=RequestMethod.DELETE)
public ResponseEntity<Boolean> delete(@PathVariable("id") long id) {
this.hotelRepository.delete(id);
return new ResponseEntity<Boolean>(Boolean.TRUE, HttpStatus.OK);
}
}

Note the @RestController annotation, this is a new annotation introduced with Spring Framework 4.0, with this annotation specified on the controller, the @ResponseBody annotation on each of the methods can be avoided.

On the angularjs side, the ngResource module can be configured in a factory the following way, to consume this service:

app.factory("Hotel", function ($resource) {
return $resource("/rest/hotels", {id: "@id"}, {
update: {
method: 'PUT'
}
});
});

The only change to the default configuration is in specifying the additional "update" action with the Http method of PUT instead of POST. With this change, the REST API can be accessed the following way:

POST /rest/hotels translates to:

var hotel = new Hotel({name:"test",address:"test address", zip:"0001"});
hotel.$save();

Or another variation of this:
Hotel.save({}, {name:"test",address:"test address", zip:"0001"});

GET /rest/hotels translates to :
Hotel.query();

GET /rest/hotels/:id translates to :
Hotel.get({id:1})

PUT /rest/hotels/:id translates to :
var hotel = new Hotel({id:1, name:"test",address:"test address", zip:"0001"});
hotel.$update();

DELETE /rest/hotels/:id translates to:
var hotel = new Hotel({id:1});
hotel.$delete();
OR
Hotel.delete({id:1});

To handle successful and failure outcomes just pass in additional callback handlers:

for eg. with create:
var hotel = new Hotel({name:"test",address:"test address", zip:"0001"});
hotel.$save({},function(response){
//on success
}, function(failedResponse){
//on failure
});

A complete CRUD working sample with angularjs and Spring MVC is available at this github location: https://github.com/bijukunjummen/spring-boot-mvc-test/tree/withangular

Spring Integration Java DSL sample

$
0
0
A new Java based DSL has now been introduced for Spring Integration which makes it possible to define the Spring Integration message flows using pure java based configuration instead of using the Spring XML based configuration.

I tried the DSL for a sample Integration flow that I have - I call it the Rube Goldberg flow, for it follows a convoluted path in trying to capitalize a string passed in as input. The flow looks like this and does some crazy things to perform a simple task:


  1. It takes in a message of this type - "hello from spring integ"
  2. splits it up into individual words(hello, from, spring, integ)
  3. sends each word to a ActiveMQ queue
  4. from the queue the word fragments are picked up by a enricher to capitalize each word
  5. placing the response back into a response queue
  6. It is picked up, resequenced based on the original sequence of the words
  7. aggregated back into a sentence("HELLO FROM SPRING INTEG") and
  8. returned back to the application.

To start with Spring Integration Java DSL, a simple Xml based configuration to capitalize a String would look like this:

<channel id="requestChannel"/>

<gateway id="echoGateway" service-interface="rube.simple.EchoGateway" default-request-channel="requestChannel" />

<transformer input-channel="requestChannel" expression="payload.toUpperCase()" />

There is nothing much going on here, a messaging gateway takes in the message passed in from the application, capitalizes it in a transformer and this is returned back to the application.

Expressing this in Spring Integration Java DSL:

@Configuration
@EnableIntegration
@IntegrationComponentScan
@ComponentScan
public class EchoFlow {

@Bean
public IntegrationFlow simpleEchoFlow() {
return IntegrationFlows.from("requestChannel")
.transform((String s) -> s.toUpperCase())
.get();
}
}

@MessagingGateway
public interface EchoGateway {
@Gateway(requestChannel = "requestChannel")
String echo(String message);
}

Do note that @MessagingGateway annotation is not a part of Spring Integration Java DSL, it is an existing component in Spring Integration and serves the same purpose as the gateway component in XML based configuration. I like the fact that the transformation can be expressed using typesafe Java 8 lambda expressions rather than the Spring-EL expression. Note that the transformation expression could have coded in quite few alternate ways:

??.transform((String s) -> s.toUpperCase())

Or:

??.<String, String>transform(s -> s.toUpperCase())

Or using method references:
??.<String, String>transform(String::toUpperCase)


Moving onto the more complicated Rube Goldberg flow to accomplish the same task, again starting with XML based configuration. There are two configurations to express this flow:

rube-1.xml: This configuration takes care of steps 1, 2, 3, 6, 7, 8 :
  1. It takes in a message of this type - "hello from spring integ"
  2. splits it up into individual words(hello, from, spring, integ)
  3. sends each word to a ActiveMQ queue
  4. from the queue the word fragments are picked up by a enricher to capitalize each word
  5. placing the response back into a response queue
  6. It is picked up, resequenced based on the original sequence of the words
  7. aggregated back into a sentence("HELLO FROM SPRING INTEG") and
  8. returned back to the application.

<channel id="requestChannel"/>

<!--Step 1, 8-->
<gateway id="echoGateway" service-interface="rube.complicated.EchoGateway" default-request-channel="requestChannel"
default-reply-timeout="5000"/>

<channel id="toJmsOutbound"/>

<!--Step 2-->
<splitter input-channel="requestChannel" output-channel="toJmsOutbound" expression="payload.split('\s')"
apply-sequence="true"/>

<channel id="sequenceChannel"/>

<!--Step 3-->
<int-jms:outbound-gateway request-channel="toJmsOutbound" reply-channel="sequenceChannel"
request-destination="amq.outbound" extract-request-payload="true"/>


<!--On the way back from the queue-->
<channel id="aggregateChannel"/>

<!--Step 6-->
<resequencer input-channel="sequenceChannel" output-channel="aggregateChannel" release-partial-sequences="false"/>

<!--Step 7-->
<aggregator input-channel="aggregateChannel"
expression="T(com.google.common.base.Joiner).on('').join(![payload])"/>

and rube-2.xml for steps 4, 5:
  1. It takes in a message of this type - "hello from spring integ"
  2. splits it up into individual words(hello, from, spring, integ)
  3. sends each word to a ActiveMQ queue
  4. from the queue the word fragments are picked up by a enricher to capitalize each word
  5. placing the response back into a response queue
  6. It is picked up, resequenced based on the original sequence of the words
  7. aggregated back into a sentence("HELLO FROM SPRING INTEG") and
  8. returned back to the application.

<channel id="enhanceMessageChannel"/>

<int-jms:inbound-gateway request-channel="enhanceMessageChannel" request-destination="amq.outbound"/>

<transformer input-channel="enhanceMessageChannel" expression="(payload + '').toUpperCase()"/>


Now, expressing this Rube Goldberg flow using Spring Integration Java DSL, the configuration looks like this, again in two parts:

EchoFlowOutbound.java:
@Bean
public DirectChannel sequenceChannel() {
return new DirectChannel();
}

@Bean
public DirectChannel requestChannel() {
return new DirectChannel();
}

@Bean
public IntegrationFlow toOutboundQueueFlow() {
return IntegrationFlows.from(requestChannel())
.split(s -> s.applySequence(true).get().getT2().setDelimiters("\\s"))
.handle(jmsOutboundGateway())
.get();
}

@Bean
public IntegrationFlow flowOnReturnOfMessage() {
return IntegrationFlows.from(sequenceChannel())
.resequence()
.aggregate(aggregate ->
aggregate.outputProcessor(g ->
Joiner.on("").join(g.getMessages()
.stream()
.map(m -> (String) m.getPayload()).collect(toList())))
, null)
.get();
}

and EchoFlowInbound.java:
@Bean
public JmsMessageDrivenEndpoint jmsInbound() {
return new JmsMessageDrivenEndpoint(listenerContainer(), messageListener());
}

@Bean
public IntegrationFlow inboundFlow() {
return IntegrationFlows.from(enhanceMessageChannel())
.transform((String s) -> s.toUpperCase())
.get();
}

Again here the code is completely typesafe and is checked for any errors at development time rather than at runtime as with the XML based configuration. Again I like the fact that transformation, aggregation statements can be expressed concisely using Java 8 lamda expressions as opposed to Spring-EL expressions.

What I have not displayed here is some of the support code, to set up the activemq test infrastructure, this configuration continues to remain as xml and I have included this code in a sample github project.

All in all, I am very excited to see this new way of expressing the Spring Integration messaging flow using pure Java and I am looking forward to seeing its continuing evolution and may be even try and participate in its evolution in small ways.


Here is the entire working code in a github repo: https://github.com/bijukunjummen/rg-si


References and Acknowledgement:
  • Spring Integration Java DSL introduction blog article by Artem Bilan: https://spring.io/blog/2014/05/08/spring-integration-java-dsl-milestone-1-released
  • Spring Integration Java DSL website and wiki: https://github.com/spring-projects/spring-integration-extensions/wiki/Spring-Integration-Java-DSL-Reference. A lot of code has been shamelessly copied over from this wiki by me :-). Also, a big thanks to Artemfor guidance on a question that I had
  • Webinar by Gary Russell on Spring Integration 4.0 in which Spring Integration Java DSL is covered in great detail.


Thymeleaf - fragments and angularjs router partial views

$
0
0
One more of the many cool features of thymeleaf is the ability to render fragments of templates - I have found this to be an especially useful feature to use with AngularJs.

AngularJS $routeProvider or AngularUI router can be configured to return partial views for different "paths", using thymeleaf to return these partial views works really well.

Consider a simple CRUD flow, with the AngularUI router views defined this way:

app.config(function ($stateProvider, $urlRouterProvider) {
$urlRouterProvider.otherwise("list");

$stateProvider
.state('list', {
url:'/list',
templateUrl: URLS.partialsList,
controller: 'HotelCtrl'
})
.state('edit', {
url:'/edit/:hotelId',
templateUrl: URLS.partialsEdit,
controller: 'HotelEditCtrl'
})
.state('create', {
url:'/create',
templateUrl: URLS.partialsCreate,
controller: 'HotelCtrl'
});
});

The templateUrl above is the partial view rendered when the appropriate state is activated, here these are defined using javascript variables and set using thymeleaf templates this way(to cleanly resolve the context path of the deployed application as the root path):

<script th:inline="javascript">
/*<![CDATA[*/
var URLS = {};
URLS.partialsList = /*[[@{/hotels/partialsList}]]*/ '/hotels/partialsList';
URLS.partialsEdit = /*[[@{/hotels/partialsEdit}]]*/ '/hotels/partialsEdit';
URLS.partialsCreate = /*[[@{/hotels/partialsCreate}]]*/ '/hotels/partialsCreate';
/*]]>*/
</script>

Now, consider one of the fragment definitions, say the one handling the list:

file: templates/hotels/partialList.html

<!DOCTYPE html>
<html xmlns:th="http://www.thymeleaf.org" layout:decorator="layout/sitelayout">
<head>
<title th:text="#{app.name}">List of Hotels</title>
<link rel="stylesheet" th:href="@{/webjars/bootstrap/3.1.1/css/bootstrap.min.css}"
href="http://netdna.bootstrapcdn.com/bootstrap/3.1.1/css/bootstrap.min.css"/>
<link rel="stylesheet" th:href="@{/webjars/bootstrap/3.1.1/css/bootstrap-theme.css}"
href="http://netdna.bootstrapcdn.com/bootstrap/3.1.1/css/bootstrap-theme.css"/>
<link rel="stylesheet" th:href="@{/css/application.css}" href="../../static/css/application.css"/>
</head>
<body>
<div class="container">
<div class="row">
<div class="col-xs-12">
<h1 class="well well-small">Hotels</h1>
</div>
</div>
<div th:fragment="content">
<div class="row">
<div class="col-xs-12">
<table class="table table-bordered table-striped">
<thead>
<tr>
<th>ID</th>
<th>Name</th>
<th>Address</th>
<th>Zip</th>
<th>Action</th>
</tr>
</thead>
<tbody>
<tr ng-repeat="hotel in hotels">
<td>{{hotel.id}}</td>
<td>{{hotel.name}}</td>
<td>{{hotel.address}}</td>
<td>{{hotel.zip}}</td>
<td><a ui-sref="edit({ hotelId: hotel.id })">Edit</a> | <a
ng-click="deleteHotel(hotel)">Delete</a></td>
</tr>
</tbody>
</table>
</div>
</div>
<div class="row">
<div class="col-xs-12">
<a ui-sref="create" class="btn btn-default">New Hotel</a>
</div>
</div>
</div>
</div>
</body>
</html>

The great thing about thymeleaf here is that this view can be opened up in a browser and previewed. To return the part of the view, which in this case is the section which starts with "th:fragment="content"", all I have to do is to return the name of the view as "hotels/partialList::content"!

The same approach can be followed for the update and the create views.

One part which I have left open is about how the uri in the UI which is "/hotels/partialsList" maps to "hotels/partialList::content", with Spring MVC this can be easily done through a View Controller, which is essentially a way to return a view name without needing to go through a Controller and can be configured this way:

@Configuration
public class WebConfig extends WebMvcConfigurerAdapter {

@Override
public void addViewControllers(ViewControllerRegistry registry) {
registry.addViewController("/hotels/partialsList").setViewName("hotels/partialsList::content");
registry.addViewController("/hotels/partialsCreate").setViewName("hotels/partialsCreate::content");
registry.addViewController("/hotels/partialsEdit").setViewName("hotels/partialsEdit::content");
}

}

So to summarize, you create a full html view using thymeleaf templates which can be previewed and any rendering issues fixed by opening the view in a browser during development time and then return the fragment of the view at runtime purely by referring to the relevant section of the html page.

A sample which follows this pattern is available at this github location - https://github.com/bijukunjummen/spring-boot-mvc-test


Spring Integration Java DSL sample - further simplification with Jms namespace factories

$
0
0
In an earlier blog entry I had touched on a fictitious rube goldberg flow for capitalizing a string through a complicated series of steps, the premise of the article was to introduce Spring Integration Java DSL as an alternative to defining integration flows through xml configuration files.

I learned a few new things after writing that blog entry, thanks to Artem Bilan and wanted to document those learnings here:


So, first my original sample, here I have the following flow(the one's in bold):

  1. Take in a message of this type - "hello from spring integ"
  2. Split it up into individual words(hello, from, spring, integ)
  3. Send each word to a ActiveMQ queue
  4. Pick up the word fragments from the queue and capitalize each word
  5. Place the response back into a response queue
  6. Pick up the message, re-sequence based on the original sequence of the words
  7. Aggregate back into a sentence("HELLO FROM SPRING INTEG") and
  8. Return the sentence back to the calling application.

EchoFlowOutbound.java:
@Bean
public DirectChannel sequenceChannel() {
return new DirectChannel();
}

@Bean
public DirectChannel requestChannel() {
return new DirectChannel();
}

@Bean
public IntegrationFlow toOutboundQueueFlow() {
return IntegrationFlows.from(requestChannel())
.split(s -> s.applySequence(true).get().getT2().setDelimiters("\\s"))
.handle(jmsOutboundGateway())
.get();
}

@Bean
public IntegrationFlow flowOnReturnOfMessage() {
return IntegrationFlows.from(sequenceChannel())
.resequence()
.aggregate(aggregate ->
aggregate.outputProcessor(g ->
Joiner.on("").join(g.getMessages()
.stream()
.map(m -> (String) m.getPayload()).collect(toList())))
, null)
.get();
}

@Bean
public JmsOutboundGateway jmsOutboundGateway() {
JmsOutboundGateway jmsOutboundGateway = new JmsOutboundGateway();
jmsOutboundGateway.setConnectionFactory(this.connectionFactory);
jmsOutboundGateway.setRequestDestinationName("amq.outbound");
jmsOutboundGateway.setReplyChannel(sequenceChannel());
return jmsOutboundGateway;
}

It turns out, based on Artem Bilan's feedback, that a few things can be optimized here.

First notice how I have explicitly defined two direct channels, "requestChannel" for starting the flow that takes in the string message and the "sequenceChannel" to handle the message once it returns back from the jms message queue, these can actually be totally removed and the flow made a little more concise this way:

@Bean
public IntegrationFlow toOutboundQueueFlow() {
return IntegrationFlows.from("requestChannel")
.split(s -> s.applySequence(true).get().getT2().setDelimiters("\\s"))
.handle(jmsOutboundGateway())
.resequence()
.aggregate(aggregate ->
aggregate.outputProcessor(g ->
Joiner.on(" ").join(g.getMessages()
.stream()
.map(m -> (String) m.getPayload()).collect(toList())))
, null)
.get();
}

@Bean
public JmsOutboundGateway jmsOutboundGateway() {
JmsOutboundGateway jmsOutboundGateway = new JmsOutboundGateway();
jmsOutboundGateway.setConnectionFactory(this.connectionFactory);
jmsOutboundGateway.setRequestDestinationName("amq.outbound");
return jmsOutboundGateway;
}


"requestChannel" is now being implicitly created just by declaring a name for it. The sequence channel is more interesting, quoting Artem Bilan -
do not specify outputChannel for AbstractReplyProducingMessageHandler and rely on DSL
, what it means is that here jmsOutboundGateway is a AbstractReplyProducingMessageHandler and its reply channel is implicitly derived by the DSL. Further, two methods which were earlier handling the flows for sending out the message to the queue and then continuing once the message is back, is collapsed into one. And IMHO it does read a little better because of this change.


The second good change and the topic of this article is the introduction of the Jms namespace factories, when I had written the previous blog article, DSL had support for defining the AMQ inbound/outbound adapter/gateway, now there is support for Jms based inbound/adapter adapter/gateways also, this simplifies the flow even further, the flow now looks like this:

@Bean
public IntegrationFlow toOutboundQueueFlow() {
return IntegrationFlows.from("requestChannel")
.split(s -> s.applySequence(true).get().getT2().setDelimiters("\\s"))
.handle(Jms.outboundGateway(connectionFactory)
.requestDestination("amq.outbound"))
.resequence()
.aggregate(aggregate ->
aggregate.outputProcessor(g ->
Joiner.on(" ").join(g.getMessages()
.stream()
.map(m -> (String) m.getPayload()).collect(toList())))
, null)
.get();
}

The inbound Jms part of the flow also simplifies to the following:

@Bean
public IntegrationFlow inboundFlow() {
return IntegrationFlows.from(Jms.inboundGateway(connectionFactory)
.destination("amq.outbound"))
.transform((String s) -> s.toUpperCase())
.get();
}


Thus, to conclude, Spring Integration Java DSL is an exciting new way to concisely configure Spring Integration flows. It is already very impressive in how it simplifies the readability of flows, the introduction of the Jms namespace factories takes it even further for JMS based flows.


I have updated my sample application with the changes that I have listed in this article - https://github.com/bijukunjummen/rg-si

Scala Tail Recursion confusion

$
0
0
I was looking at a video of Martin Odersky's keynote during Scala Days 2014 and there was a sample tail recursion code that confused me:

@tailrec
private def sameLength[T, U](xs: List[T], ys: List[U]): Boolean = {
if (xs.isEmpty) ys.isEmpty
else ys.nonEmpty && sameLength(xs.tail, ys.tail)
}

On a quick glance, this did not appear to be tail recursive to me, as there is the && operation that needs to be called after the recursive call.

However, thinking a little more about it, && is a short-circuit operator and the recursive operation would get called only if the ys.nonEmpty statement evaluates to true, thus maintaining the definition of a tail recursion.

The decompiled class clarifies this a little more, surprisingly the && operator does not appear anywhere in the decompiled code!:

public <T, U> boolean org$bk$sample$SameLengthTest$$sameLength(List<T> xs, List<U> ys)
{
for (; ys.nonEmpty(); xs = (List)xs.tail()) ys = (List)ys.tail();
return
xs.isEmpty() ? ys.isEmpty() :
false;
}

If the operator were changed to something that does not have short-circuit behavior, the method of course will not be a tail-recursion at that point, say a hypothetical method with the XOR operator:

private def notWorking[T, U](xs: List[T], ys: List[U]): Boolean = {
if (xs.isEmpty) ys.isEmpty
else ys.nonEmpty ^ notWorking(xs.tail, ys.tail)
}

Something fairly basic that tripped me up today!

Tailing a file - Spring Websocket sample

$
0
0
This is a sample that I have wanted to try for sometime - A Websocket application to tail the contents of a file.


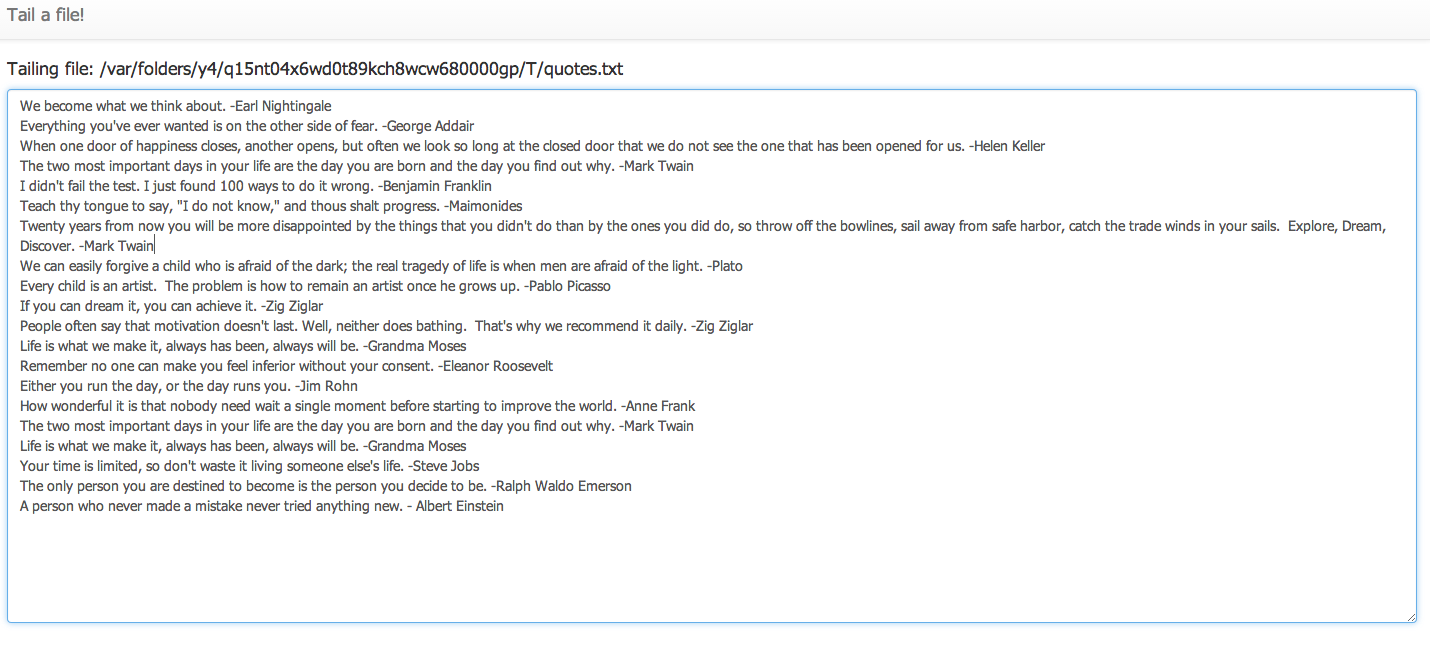
The following is the final view of the web-application:


There are a few parts to this application:

Generating a File to tail:


I chose to use a set of 100 random quotes as a source of the file content, every few seconds the application generates a quote and writes this quote to the temporary file. Spring Integration is used for wiring this flow for writing the contents to the file:

<int:channel id="toFileChannel"/>

<int:inbound-channel-adapter ref="randomQuoteGenerator" method="generateQuote" channel="toFileChannel">
<int:poller fixed-delay="2000"/>
</int:inbound-channel-adapter>

<int:chain input-channel="toFileChannel">
<int:header-enricher>
<int:header name="file_name" value="quotes.txt"/>
</int:header-enricher>
<int-file:outbound-channel-adapter directory="#{systemProperties['java.io.tmpdir']}" mode="APPEND" />
</int:chain>

Just a quick note, Spring Integration flows can now also be written using a Java Based DSL, and this flow using Java is available here

Tailing the file and sending the content to a broker


The actual tailing of the file itself can be accomplished by OS specific tail command or by using a library like Apache Commons IO. Again in my case I decided to use Spring Integration which provides Inbound channel adapters to tail a file purely using configuration, this flow looks like this:
<int:channel id="toTopicChannel"/>

<int-file:tail-inbound-channel-adapter id="fileInboundChannelAdapter"
channel="toTopicChannel"
file="#{systemProperties['java.io.tmpdir']}/quotes.txt"
delay="2000"
file-delay="10000"/>

<int:outbound-channel-adapter ref="fileContentRecordingService" method="sendLinesToTopic" channel="toTopicChannel"/>
and its working Java equivalent

There is a reference to a "fileContentRecordingService" above, this is the component which will direct the lines of the file to a place where the Websocket client will subscribe to.

Websocket server configuration

Spring Websocket support makes it super simple to write a Websocket based application, in this instance the entire working configuration is the following:
@Configuration
@EnableWebSocketMessageBroker
public class WebSocketDefaultConfig extends AbstractWebSocketMessageBrokerConfigurer {

@Override
public void configureMessageBroker(MessageBrokerRegistry config) {
//config.enableStompBrokerRelay("/topic/", "/queue/");
config.enableSimpleBroker("/topic/", "/queue/");
config.setApplicationDestinationPrefixes("/app");
}

@Override
public void registerStompEndpoints(StompEndpointRegistry registry) {
registry.addEndpoint("/tailfilesep").withSockJS();
}
}

This may seem a little over the top, but what these few lines of configuration does is very powerful and the configuration can be better understood by going through the reference here. In brief, it sets up a websocket endpoint at '/tailfileep' uri, this endpoint is enhanced with SockJS support, Stomp is used as a sub-protocol, endpoints `/topic` and `/queue` is configured to a real broker like RabbitMQ or ActiveMQ but in this specific to an in-memory one.

Going back to the "fileContentRecordingService" once more, this component essentially takes the line of the file and sends it this in-memory broker, SimpMessagingTemplate facilitates this wiring:

public class FileContentRecordingService {
@Autowired
private SimpMessagingTemplate simpMessagingTemplate;

public void sendLinesToTopic(String line) {
this.simpMessagingTemplate.convertAndSend("/topic/tailfiles", line);
}
}


Websocket UI configuration

The UI is angularjs based, the client controller is set up this way and internally uses the javascript libraries for sockjs and stomp support:

var tailFilesApp = angular.module("tailFilesApp",[]);

tailFilesApp.controller("TailFilesCtrl", function ($scope) {
function init() {
$scope.buffer = new CircularBuffer(20);
}

$scope.initSockets = function() {
$scope.socket={};
$scope.socket.client = new SockJS("/tailfilesep);
$scope.socket.stomp = Stomp.over($scope.socket.client);
$scope.socket.stomp.connect({}, function() {
$scope.socket.stomp.subscribe("/topic/tailfiles", $scope.notify);
});
$scope.socket.client.onclose = $scope.reconnect;
};

$scope.notify = function(message) {
$scope.$apply(function() {
$scope.buffer.add(angular.fromJson(message.body));
});
};

$scope.reconnect = function() {
setTimeout($scope.initSockets, 10000);
};

init();
$scope.initSockets();
});

The meat of this code is the "notify" function which the callback acting on the messages from the server, in this instance the new lines coming into the file and showing it in a textarea.


This wraps up the entire application to tail a file. A complete working sample without any external dependencies is available at this github location, instructions to start it up is also available at that location.

Conclusion

Spring Websockets provides a concise way to create Websocket based applications, this sample provides a good demonstration of this support. I had presented on this topic recently at my local JUG (IndyJUG) and a deck with the presentation is available here

Deploying a Spring boot application to Cloud Foundry with Spring-Cloud

$
0
0
I have a small Spring boot based application that uses a Postgres database as a datastore. I wanted to document the steps involved in deploying this sample application to Cloud Foundry.

Some of the steps are described in the Spring Boot reference guide, however the guides do not sufficiently explain how to integrate with the datastore provided in a cloud based environment.

Spring-cloud provides the glue to connect Spring based applications deployed on a Cloud to discover and connect to bound services, so the first step is to pull in the Spring-cloud libraries into the project with the following pom entries:

<dependency>
<groupId>org.springframework.cloud</groupId>
<artifactId>spring-cloud-spring-service-connector</artifactId>
<version>1.0.0.RELEASE</version>
</dependency>

<dependency>
<groupId>org.springframework.cloud</groupId>
<artifactId>spring-cloud-cloudfoundry-connector</artifactId>
<version>1.0.0.RELEASE</version>
</dependency>

Once this dependency is pulled in, connecting to a bound service is easy, just define a configuration along these lines:
@Configuration
public class PostgresCloudConfig extends AbstractCloudConfig {

@Bean
public DataSource dataSource() {
return connectionFactory().dataSource();
}

}

Spring-Cloud understands that the application is deployed on a specific Cloud(currently Cloud Foundry and Heroku by looking for certain characteristics of the deployed Cloud platform), discovers the bound services, recognizes that there is a bound service using which a Postgres based datasource can be created and returns the datasource as a Spring bean.

This application can now deploy cleanly to a Cloud Foundry based Cloud. The sample application can be tried out in a version of Cloud Foundry deployed with bosh-lite, these are how the steps in my machine looks like once Cloud Foundry is up and running with bosh-lite:

The following command creates a user provided service in Cloud Foundry:
cf create-user-provided-service psgservice -p '{"uri":"postgres://postgres:p0stgr3s@bkunjummen-mbp.local:5432/hotelsdb"}'

Now, push the app, however don't start it up. We can do that once the service above is bound to the app:
cf push spring-boot-mvc-test -p target/spring-boot-mvc-test-1.0.0-SNAPSHOT.war --no-start

Bind the service to the app and restart the app:
cf bind-service spring-boot-mvc-test psgservice
cf restart spring-boot-mvc-test

That is essentially it, Spring Cloud should ideally take over at the point and cleanly parse the credentials from the bound service which within Cloud Foundry translates to an environment variable called VCAP_SERVICES, and create the datasource from it.


There is however an issue with this approach - once the datasource bean is created using spring-cloud approach, it does not work in a local environment anymore.

The potential fix for this is to use Spring profiles, assume that there is a different "cloud" Spring profile available in Cloud environment where the Spring-cloud based datasource gets returned:

@Profile("cloud")
@Configuration
public class PostgresCloudConfig extends AbstractCloudConfig {

@Bean
public DataSource dataSource() {
return connectionFactory().dataSource();
}
}

and let Spring-boot auto-configuration create a datasource in the default local environment, this way the configuration works both local as well as in Cloud. Where does this "cloud" profile come from, it can be created using a ApplicationContextInitializer, and looks this way:

public class SampleWebApplicationInitializer implements ApplicationContextInitializer<AnnotationConfigEmbeddedWebApplicationContext> {

private static final Log logger = LogFactory.getLog(SampleWebApplicationInitializer.class);

@Override
public void initialize(AnnotationConfigEmbeddedWebApplicationContext applicationContext) {
Cloud cloud = getCloud();
ConfigurableEnvironment appEnvironment = applicationContext.getEnvironment();

if (cloud!=null) {
appEnvironment.addActiveProfile("cloud");
}

logger.info("Cloud profile active");
}

private Cloud getCloud() {
try {
CloudFactory cloudFactory = new CloudFactory();
return cloudFactory.getCloud();
} catch (CloudException ce) {
return null;
}
}
}

This initializer makes use of the Spring-cloud's scanning capabilities to activate the "cloud" profile.


One last thing which I wanted to try was to make my local behave like Cloud atleast in the eyes of Spring-Cloud and this can be done by adding in some environment variables using which Spring-Cloud makes the determination of the type of cloud where the application is deployed, the following is my startup script in local for the app to pretend as if it is deployed in Cloud Foundry:

read -r -d '' VCAP_APPLICATION <<'ENDOFVAR'
{"application_version":"1","application_name":"spring-boot-mvc-test","application_uris":[""],"version":"1.0","name":"spring-boot-mvc-test","instance_id":"abcd","instance_index":0,"host":"0.0.0.0","port":61008}
ENDOFVAR

export VCAP_APPLICATION=$VCAP_APPLICATION

read -r -d '' VCAP_SERVICES <<'ENDOFVAR'
{"postgres":[{"name":"psgservice","label":"postgresql","tags":["postgresql"],"plan":"Standard","credentials":{"uri":"postgres://postgres:p0stgr3s@bkunjummen-mbp.local:5432/hotelsdb"}}]}
ENDOFVAR

export VCAP_SERVICES=$VCAP_SERVICES

mvn spring-boot:run

This entire sample is available at this github location:https://github.com/bijukunjummen/spring-boot-mvc-test

Conclusion


Spring Boot along with Spring-Cloud project now provide an excellent toolset to create Spring-powered cloud ready applications, and hopefully these notes are useful in integrating Spring Boot with Spring-Cloud and using these for seamless local and Cloud deployments.

GemFire XD cluster using Docker

$
0
0
I stared learning how to build and use Docker containers a few days back and one of my learning samples has been to build a series of docker containers to hold a Pivotal GemFire XD cluster.

First the result and then I will go into some details on how the containers were built -

This is the GemfireXD topology that I wanted to build:


The topology consists of 2 GemFire XD servers each running in its own process and a GemFire XD locator to provide connectivity to clients using this cluster and to load balance between the 2(or potentially more) server processes.

The following fig definition shows how my cluster is configured:

fig.yml:
locator:
image: bijukunjummen/gfxd-locator
ports:
- "10334"
- "1527:1527"
- "7075:7075"

server1:
image: bijukunjummen/gfxd-server
ports:
- "1528:1528"
links:
- locator
environment:
- CLIENT_PORT=1528

server2:
image: bijukunjummen/gfxd-server
ports:
- "1529:1529"
links:
- locator
environment:
- CLIENT_PORT=1529

This simple fig definition would boot up and start the 3 container cluster, linking the Locator to the GemfireXD server and information about this cluster can be viewed through a tool called Pulse that GemFire XD comes packaged with:

This cluster definition is eminently repeatable - I was able to publish the 2 images "gfxd-locator" and "gfxd-server" to Docker Hub and using the fig.yml the entire cluster can be brought up by anybody with a local installation of Docker and Fig.

So how was the Docker image created:

I required two different Docker image types - a GemFire XD locator and a GemFire XD server, there is a lot common among these images, they both use the common Gemfire XD installation except for how each of them is started up. So I have a base image which is defined in the Dockerfile at this github location which builds on top of the CentOS image and deploys the Gemfire XD to the image. Then I have the Gemfire XD server and the locator images deriving from the base image with ENTRYPOINT's specifying how each of the processes should be started up.

The entire project is available at this github location - https://github.com/bijukunjummen/docker-gfxd-cluster and the README instruction there should provide enough information on how to build up and run the cluster.

To conclude, this has been an excellent learning exercise on how Docker works and how easy Fig makes it to orchestrate multiple containers to create a cohesive cluste, to share a repeatable configuration.

I would like to thank my friends Alvin Henrick and Jeff Cherng for their help with a good part of the Docker and GemFire XD configurations!

Spring MVC endpoint documentation with Spring Boot

$
0
0
A long time ago I had posted about a way to document all the uri mappings exposed by a typical Spring MVC based application. The steps to do this however are very verbose and requires a fairly deep knowledge of some of the underlying Spring MVC components.

Spring Boot makes this kind of documentation way simpler. All you need to do for a Spring-boot based application is to activate the Spring-boot actuator. Adding in the actuator brings in a lot more production ready features to a Spring-boot application, my focus however is specifically on the endpoint mappings.

So, first to add in the actuator as a dependency to a Spring-boot application:

<dependency>
<groupId>org.springframework.boot</groupId>
<artifactId>spring-boot-starter-actuator</artifactId>
</dependency>

and if the Spring-Boot app is started up now, a REST endpoint at this http://machinename:8080/mappings url should be available which lists out all the uri's exposed by the application, a snippet of this information looks like the following in a sample application I have:

{
"/**/favicon.ico" : {
"bean" : "faviconHandlerMapping"
},
"/hotels/partialsEdit" : {
"bean" : "viewControllerHandlerMapping"
},
"/hotels/partialsCreate" : {
"bean" : "viewControllerHandlerMapping"
},
"/hotels/partialsList" : {
"bean" : "viewControllerHandlerMapping"
},
"/**" : {
"bean" : "resourceHandlerMapping"
},
"/webjars/**" : {
"bean" : "resourceHandlerMapping"
},
"{[/hotels],methods=[GET],params=[],headers=[],consumes=[],produces=[],custom=[]}" : {
"bean" : "requestMappingHandlerMapping",
"method" : "public java.lang.String mvctest.web.HotelController.list(org.springframework.ui.Model)"
},
"{[/rest/hotels/{id}],methods=[GET],params=[],headers=[],consumes=[],produces=[],custom=[]}" : {
"bean" : "requestMappingHandlerMapping",
"method" : "public mvctest.domain.Hotel mvctest.web.RestHotelController.get(long)"
},
"{[/rest/hotels],methods=[GET],params=[],headers=[],consumes=[],produces=[],custom=[]}" : {
"bean" : "requestMappingHandlerMapping",
"method" : "public java.util.List<mvctest.domain.Hotel> mvctest.web.RestHotelController.list()"
},
"{[/rest/hotels/{id}],methods=[DELETE],params=[],headers=[],consumes=[],produces=[],custom=[]}" : {
"bean" : "requestMappingHandlerMapping",
"method" : "public org.springframework.http.ResponseEntity<java.lang.Boolean> mvctest.web.RestHotelController.delete(long)"
},
"{[/rest/hotels],methods=[POST],params=[],headers=[],consumes=[],produces=[],custom=[]}" : {
"bean" : "requestMappingHandlerMapping",
"method" : "public mvctest.domain.Hotel mvctest.web.RestHotelController.create(mvctest.domain.Hotel)"
},
"{[/rest/hotels/{id}],methods=[PUT],params=[],headers=[],consumes=[],produces=[],custom=[]}" : {
"bean" : "requestMappingHandlerMapping",
"method" : "public mvctest.domain.Hotel mvctest.web.RestHotelController.update(long,mvctest.domain.Hotel)"
},
"{[/],methods=[],params=[],headers=[],consumes=[],produces=[],custom=[]}" : {
"bean" : "requestMappingHandlerMapping",
"method" : "public java.lang.String mvctest.web.RootController.onRootAccess()"
},
"{[/error],methods=[],params=[],headers=[],consumes=[],produces=[],custom=[]}" : {
"bean" : "requestMappingHandlerMapping",
"method" : "public org.springframework.http.ResponseEntity<java.util.Map<java.lang.String, java.lang.Object>> org.springframework.boot.autoconfigure.web.BasicErrorController.error(javax.servlet.http.HttpServletRequest)"
},

....

Note that by default the json is not formatted, to get a formatted json just ensure that you have the following entry in your application.properties file:

http.mappers.json-pretty-print=true

This listing is much more comprehensive than the listing that I originally had.

The same information can of course be presented in a better way by rendering it to html and I have opted to use angularjs to present this information, the following is the angularjs service factory to retrieve the mappings and the controller which makes use of this factory to populate a mappings model:

app.factory("mappingsFactory", function($http) {
var factory = {};
factory.getMappings = function() {
return $http.get(URLS.mappingsUrl);
}
return factory;
});

app.controller("MappingsCtrl", function($scope, $state, mappingsFactory) {
function init() {
mappingsFactory.getMappings().success(function(data) {
$scope.mappings = data;
});
}

init();
});

The returned mappings model is essentially a map of a map, the key of the map being the uri path exposed by Spring-Boot application and the values being the name of the bean handling the endpoint and if available the details of the controller handling the call, this can be rendered using a template of the following form:

<table class="table table-bordered table-striped">
<thead>
<tr>
<th width="50%">Path</th>
<th width="10%">Bean</th>
<th width="40%">Method</th>
</tr>
</thead>
<tbody>
<tr ng-repeat="(k, v) in mappings">
<td>{{k}}</td>
<td>{{v.bean}}</td>
<td>{{v.method}}</td>
</tr>
</tbody>
</table>

the final rendered view of the endpoint mappings is displayed in the following way:

Here is a sample github project with the rendering implemented: https://github.com/bijukunjummen/spring-boot-mvc-test

Customizing HttpMessageConverters with Spring Boot and Spring MVC

$
0
0
Exposing a REST based endpoint for a Spring Boot application or for that matter a straight Spring MVC application is straightforward, the following is a controller exposing an endpoint to create an entity based on the content POST'ed to it:

@RestController
@RequestMapping("/rest/hotels")
public class RestHotelController {
....
@RequestMapping(method=RequestMethod.POST)
public Hotel create(@RequestBody @Valid Hotel hotel) {
return this.hotelRepository.save(hotel);
}
}

Internally Spring MVC uses a component called a HttpMessageConverter to convert the Http request to an object representation and back.

A set of default converters are automatically registered which supports a whole range of different resource representation formats - json, xml for instance.

Now, if there is a need to customize the message converters in some way, Spring Boot makes it simple. As an example consider if the POST method in the sample above needs to be little more flexible and should ignore properties which are not present in the Hotel entity - typically this can be done by configuring the Jackson ObjectMapper, all that needs to be done with Spring Boot is to create a new HttpMessageConverter bean and that would end up overriding all the default message converters, this way:

@Bean
public MappingJackson2HttpMessageConverter mappingJackson2HttpMessageConverter() {
MappingJackson2HttpMessageConverter jsonConverter = new MappingJackson2HttpMessageConverter();
ObjectMapper objectMapper = new ObjectMapper();
objectMapper.configure(DeserializationFeature.FAIL_ON_UNKNOWN_PROPERTIES, false);
jsonConverter.setObjectMapper(objectMapper);
return jsonConverter;
}

This works well for a Spring-Boot application, however for straight Spring MVC applications which do not make use of Spring-Boot, configuring a custom converter is a little more complicated - the default converters are not registered by default and an end user has to be explicit about registering the defaults - the following is the relevant code for Spring 4 based applications:

@Configuration
public class WebConfig extends WebMvcConfigurationSupport {

@Bean
public MappingJackson2HttpMessageConverter customJackson2HttpMessageConverter() {
MappingJackson2HttpMessageConverter jsonConverter = new MappingJackson2HttpMessageConverter();
ObjectMapper objectMapper = new ObjectMapper();
objectMapper.configure(DeserializationFeature.FAIL_ON_UNKNOWN_PROPERTIES, false);
jsonConverter.setObjectMapper(objectMapper);
return jsonConverter;
}

@Override
public void configureMessageConverters(List<HttpMessageConverter<?>> converters) {
converters.add(customJackson2HttpMessageConverter());
super.addDefaultHttpMessageConverters();
}
}

Here WebMvcConfigurationSupport provides a way to more finely tune the MVC tier configuration of a Spring based application. In the configureMessageConverters method, the custom converter is being registered and then an explicit call is being made to ensure that the defaults are registered also. A little more work than for a Spring-Boot based application.

Scala and Java 8 type inference in higher order functions sample

$
0
0
One of the concepts mentioned in the Functional Programming in Scala is about the type inference in higher order functions in Scala and how it fails in certain situations and a workaround for the same. So consider a sample higher order function, purely for demonstration:

def filter[A](list: List[A], p: A => Boolean):List[A] = {
list.filter(p)
}

Ideally, passing in a list of say integers, you would expect the predicate function to not require an explicit type:

val l = List(1, 5, 9, 20, 30) 

filter(l, i => i < 10)

Type inference does not work in this specific instance however, the fix is to specify the type explicitly:

filter(l, (i:Int) => i < 10)

Or a better fix is to use currying, then the type inference works!

def filter[A](list: List[A])(p: A=>Boolean):List[A] = {
list.filter(p)
}

filter(l)(i => i < 10)
//OR
filter(l)(_ < 10)
I was curious whether Java 8 type inference has this issue and tried a similar sample with Java 8 Lambda expression, the following is an equivalent filter function -
public <A> List<A> filter(List<A> list, Predicate<A> condition) {
return list.stream().filter(condition).collect(toList());
}
and type inference for the predicate works cleanly -
List ints = Arrays.asList(1, 5, 9, 20, 30);
List lessThan10 = filter(ints, i -> i < 10);
Another blog entry on a related topic by the author of the "Functional Programming in Scala" book is available here - http://pchiusano.blogspot.com/2011/05/making-most-of-scalas-extremely-limited.html

Spring WebApplicationInitializer and ApplicationContextInitializer confusion

$
0
0
These are two concepts that I mix up occasionally - a WebApplicationInitializer and an ApplicationContextInitializer, and wanted to describe each of them to clarify them for myself.

I have previously blogged about WebApplicationInitializerhere and here. It is relevant purely in a Servlet 3.0+ spec compliant servlet container and provides a hook to programmatically configure the servlet context. How does this help - you can have a web application without potentially any web.xml file, typically used in a Spring based web application to describe the root application context and the Spring web front controller called the DispatcherServlet. An example of using WebApplicationInitializer is the following:

public class CustomWebAppInitializer extends AbstractAnnotationConfigDispatcherServletInitializer {
@Override
protected Class<?>[] getRootConfigClasses() {
return new Class<?>[]{RootConfiguration.class};
}

@Override
protected Class<?>[] getServletConfigClasses() {
return new Class<?>[]{MvcConfiguration.class};
}

@Override
protected String[] getServletMappings() {
return new String[]{"/"};
}
}

Now, what is an ApplicationContextInitializer. It is essentially code that gets executed before the Spring application context gets completely created. A good use case for using an ApplicationContextInitializer would be to set a Spring environment profile programmatically, along these lines:

public class DemoApplicationContextInitializer implements ApplicationContextInitializer<ConfigurableApplicationContext> {

@Override
public void initialize(ConfigurableApplicationContext ac) {
ConfigurableEnvironment appEnvironment = ac.getEnvironment();
appEnvironment.addActiveProfile("demo");

}
}

If you have a Spring-Boot based application then registering an ApplicationContextInitializer is fairly straightforward:

@Configuration
@EnableAutoConfiguration
@ComponentScan
public class SampleWebApplication {

public static void main(String[] args) {
new SpringApplicationBuilder(SampleWebApplication.class)
.initializers(new DemoApplicationContextInitializer())
.run(args);
}
}

For a non Spring-Boot Spring application though, it is a little more tricky, if it is a programmatic configuration of web.xml, then the configuration is along these lines:
public class CustomWebAppInitializer implements WebApplicationInitializer {

@Override
public void onStartup(ServletContext container) {
AnnotationConfigWebApplicationContext rootContext = new AnnotationConfigWebApplicationContext();
rootContext.register(RootConfiguration.class);
ContextLoaderListener contextLoaderListener = new ContextLoaderListener(rootContext);
container.addListener(contextLoaderListener);
container.setInitParameter("contextInitializerClasses", "mvctest.web.DemoApplicationContextInitializer");
AnnotationConfigWebApplicationContext webContext = new AnnotationConfigWebApplicationContext();
webContext.register(MvcConfiguration.class);
DispatcherServlet dispatcherServlet = new DispatcherServlet(webContext);
ServletRegistration.Dynamic dispatcher = container.addServlet("dispatcher", dispatcherServlet);
dispatcher.addMapping("/");
}
}

If it a normal web.xml configuration then the initializer can be specified this way:
<context-param>
<param-name>contextInitializerClasses</param-name>
<param-value>com.myapp.spring.SpringContextProfileInit</param-value>
</context-param>

<listener>
<listener-class>org.springframework.web.context.ContextLoaderListener</listener-class>
</listener>

So to conclude, except for the Initializer suffix, both WebApplicationInitializer and ApplicationContextInitializer serve fairly different purposes. Whereas the WebApplicationInitializer is used by a Servlet Container at startup of the web application and provides a way for programmatic creating a web application(replacement for a web.xml file), ApplicationContextInitializer provides a hook to configure the Spring application context before it gets fully created.

Spring @Configuration and injecting bean dependencies as method parameters

$
0
0
One of the ways Spring recommends injecting inter-dependencies between beans is shown in the following sample copied from the Spring's reference guide here:

@Configuration
public class AppConfig {

@Bean
public Foo foo() {
return new Foo(bar());
}

@Bean
public Bar bar() {
return new Bar("bar1");
}

}
So here, bean `foo` is being injected with a `bar` dependency.

However, there is one alternate way to inject dependency that is not documented well, it is to just take the dependency as a `@Bean` method parameter this way:

@Configuration
public class AppConfig {

@Bean
public Foo foo(Bar bar) {
return new Foo(bar);
}

@Bean
public Bar bar() {
return new Bar("bar1");
}

}

There is a catch here though, the injection is now by type, the `bar` dependency would be resolved by type first and if duplicates are found, then by name:

@Configuration
public static class AppConfig {

@Bean
public Foo foo(Bar bar1) {
return new Foo(bar1);
}

@Bean
public Bar bar1() {
return new Bar("bar1");
}

@Bean
public Bar bar2() {
return new Bar("bar2");
}
}

In the above sample dependency `bar1` will be correctly injected. If you want to be more explicit about it, an @Qualifer annotation can be added in:

@Configuration
public class AppConfig {

@Bean
public Foo foo(@Qualifier("bar1") Bar bar1) {
return new Foo(bar1);
}

@Bean
public Bar bar1() {
return new Bar("bar1");
}

@Bean
public Bar bar2() {
return new Bar("bar2");
}
}


So now the question of whether this is recommended at all, I would say yes for certain cases. For eg, had the bar bean been defined in a different @Configuration class , the way to inject the dependency then is along these lines:

@Configuration
public class AppConfig {

@Autowired
@Qualifier("bar1")
private Bar bar1;

@Bean
public Foo foo() {
return new Foo(bar1);
}

}

I find the method parameter approach simpler here:

@Configuration
public class AppConfig {

@Bean
public Foo foo(@Qualifier("bar1") Bar bar1) {
return new Foo(bar1);
}

}


Thoughts?

Spring @Configuration - RabbitMQ connectivity

$
0
0
I have been playing around with converting an application that I have to use Spring @Configuration mechanism to configure connectivity to RabbitMQ - originally I had the configuration described using an xml bean definition file.

So this was my original configuration:

<beans ...;>

<context:property-placeholder/>
<rabbit:connection-factory id="rabbitConnectionFactory" username="${rabbit.user}" host="localhost" password="${rabbit.pass}" port="5672"/>
<rabbit:template id="amqpTemplate"
connection-factory="rabbitConnectionFactory"
exchange="rmq.rube.exchange"
routing-key="rube.key"
channel-transacted="true"/>

<rabbit:queue name="rmq.rube.queue" durable="true"/>

<rabbit:direct-exchange name="rmq.rube.exchange" durable="true">
<rabbit:bindings>
<rabbit:binding queue="rmq.rube.queue" key="rube.key"></rabbit:binding>
</rabbit:bindings>
</rabbit:direct-exchange>


</beans>

This is a fairly simple configuration that :

  • sets up a connection to a RabbitMQ server,
  • creates a durable queue(if not available)
  • creates a durable exchange
  • and configures a binding to send messages to the exchange to be routed to the queue based on a routing key called "rube.key"

This can be translated to the following @Configuration based java configuration:

@Configuration
public class RabbitConfig {

@Autowired
private ConnectionFactory rabbitConnectionFactory;

@Bean
DirectExchange rubeExchange() {
return new DirectExchange("rmq.rube.exchange", true, false);
}

@Bean
public Queue rubeQueue() {
return new Queue("rmq.rube.queue", true);
}

@Bean
Binding rubeExchangeBinding(DirectExchange rubeExchange, Queue rubeQueue) {
return BindingBuilder.bind(rubeQueue).to(rubeExchange).with("rube.key");
}

@Bean
public RabbitTemplate rubeExchangeTemplate() {
RabbitTemplate r = new RabbitTemplate(rabbitConnectionFactory);
r.setExchange("rmq.rube.exchange");
r.setRoutingKey("rube.key");
r.setConnectionFactory(rabbitConnectionFactory);
return r;
}
}

This configuration should look much more simpler than the xml version of the configuration. I am cheating a little here though, you should be seeing a missing connectionFactory which is just being injected into this configuration, where is that coming from..this is actually part of a Spring Boot based application and there is a Spring Boot Auto configuration for RabbitMQ connectionFactory based on whether the RabbitMQ related libraries are present in the classpath.

Here is the complete configuration if you are interested in exploring further - https://github.com/bijukunjummen/rg-si-rabbit/blob/master/src/main/java/rube/config/RabbitConfig.java

References:

  • Spring-AMQP project here
  • Spring-Boot starter project using RabbitMQ here
Viewing all 250 articles
Browse latest View live